Friday, June 7, 2024

Configurable Business Documents in Dynamics 365 Finance and Operations - PART 5 - Business documents security


CONFIGURABLE BUSINESS DOCUMENTS IN DYNAMICS 365 FINANCE AND OPERATIONS - PART 5 - BUSINESS DOCUMENTS SECURITY

This article series explains and demonstrates the use of configurable business documents in real-life scenarios. The purpose is to provide a unique implementation resource. The entire series will be in five parts as follows: 

PART 5: Business documents security

Let's get started with PART 5 which is the last part of this series.

CONTENT

Introduction
Activating Business Document security permissions 
Configuring Business Document security permissions
Summary

Introduction

Managing access to Configurable Business Document (CBD) templates within the Business Document Management workspace is crucial for maintaining organized and secure operations across various business domains (functional areas). By default, all users with access to this workspace can view all available ER solution templates. However, configuring access permissions allows administrators to control which users can edit specific templates, ensuring that only authorized personnel have the appropriate access based on their roles. This article outlines the step-by-step process for setting up these access permissions, enabling businesses to tailor template access according to functional areas and user roles, thereby enhancing document management efficiency and security.

Activating Business Document security permissions

If business document access permissions are not activated, every user with access to the Business Document Management workspace will see all of the ER document templates. To activate these permissions, follow these steps:

Go to Organization administration >> Electronic reporting >> Business document management >> Manage access permissions to edit templates.


Note that system notifies you that security is not in place yet.
Click on the access permissions settings. (1)
Activate the security. (2)

In this case, Business document management workspace (below) will show only


those templates that reside in ER format configurations and that are marked by a Business document type tag as below.


Configuring Business Document security permissions

The document list in the Business document management workspace can be restricted by configuring access permissions. This is crucial when various templates are used to create business documents across different domains (functional areas), and you need to grant specific users access to edit different templates within the Business Document Management workspace.

Access permissions for Business Document Management can be configured in the Access Permissions Configurator. Only one of the following users have access to this page:
  • Users assigned to System administrator role
  • Users assigned to any role that has duty Configure permissions to access Business document templates for editing (AOT name ERBDTemplatesSecurity)
Now, we know who can set up security configuration changes (any role with "Configure permissions to access Business document templates for editing" duty).

Let's talk about who can edit the business documents. 

When security is not activeevery user assigned to any security role that is configured to perform the Manage Business document templates (AOT name ERBDManageTemplates) duty is able to open the Business document management workspace and can edit any template that is available. 

Let's assign Manage Business document templates duty to Accounts receivable clerk and see what is available to the role.


Note: In our case, there are only 2 documents that we have created in the previous articles in total in the Business document management workspace as below.
Please note that Accounts receivable clerk can see all available business documents because security is not active.


That's not what we want. What we want is to allow the Accounts receivable clerk to see only their related process documents.

Follow the procedure below to configure specific access to Business Documents for all legal entities:

Let's activate the security by going to Configurator of access permissions page.
Click on Organization administration >> Electronic invoicing >> Business document management >> Manage access permissions to edit templates.
Click on Access permissions settings.

Activate the parameter.
Click on OK.
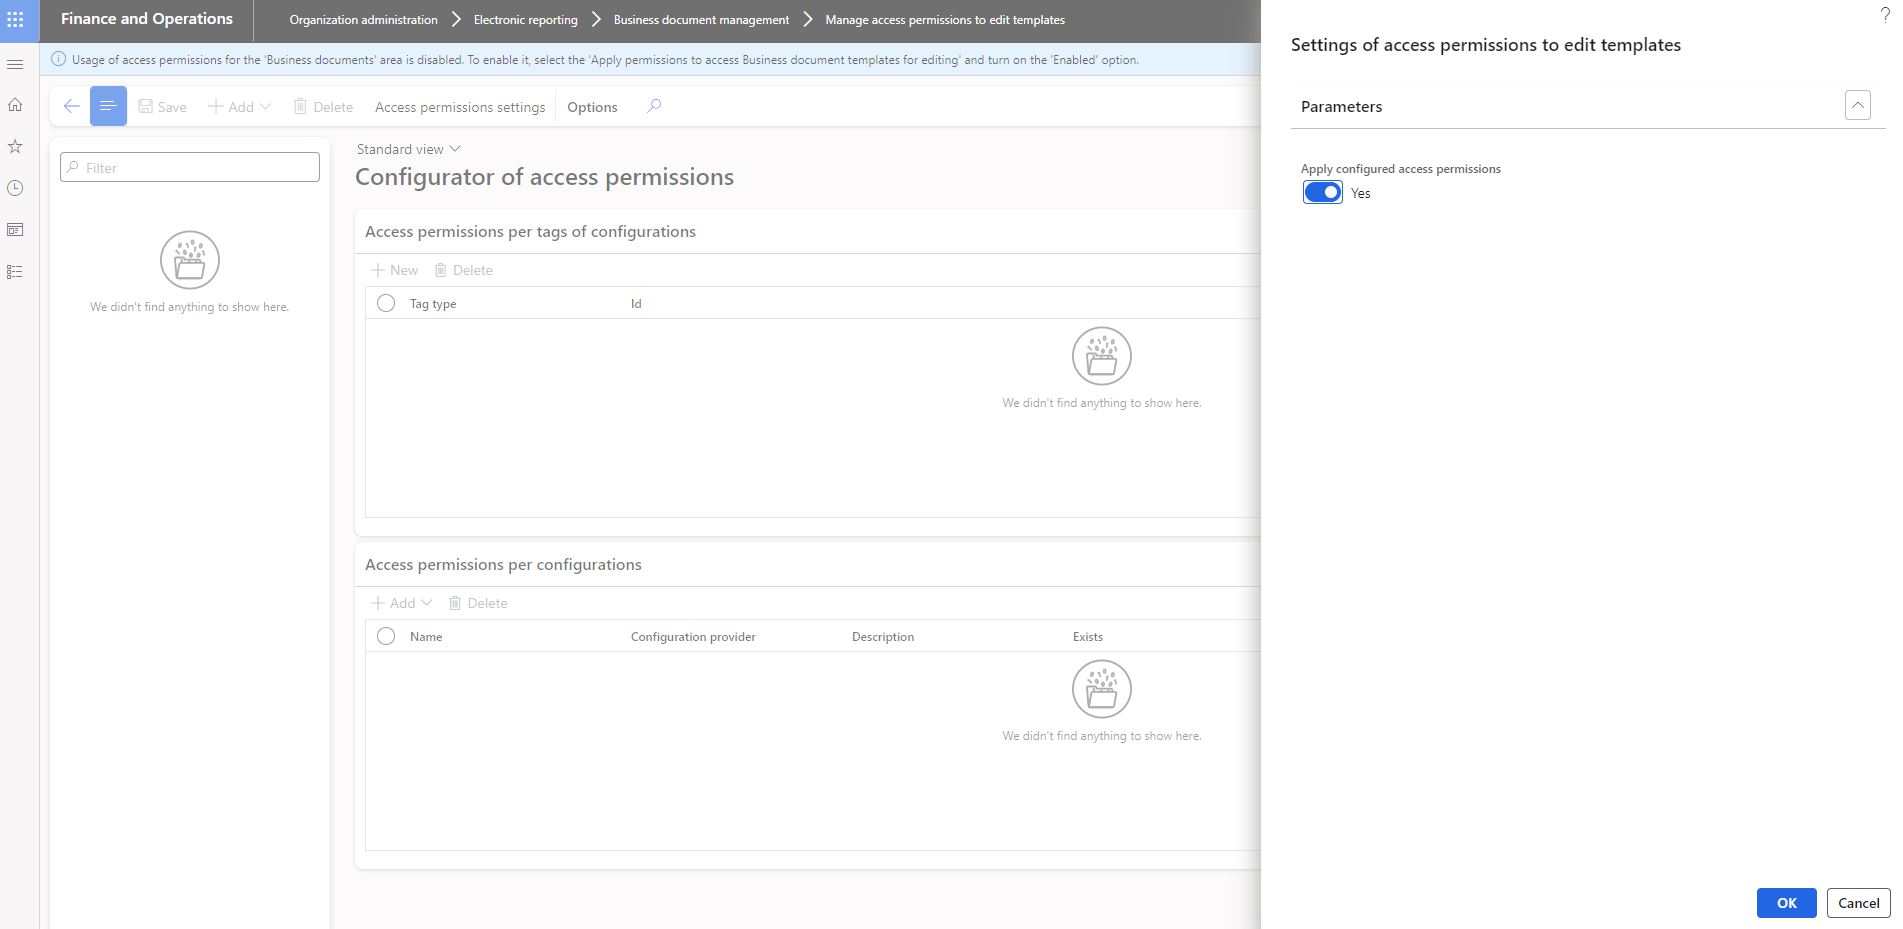


What we want is to provide users access to only their respective business areas. The next step is for this purpose, to configure specific access permissions.

Click on +Add.
Select the role Accounts receivable clerk.
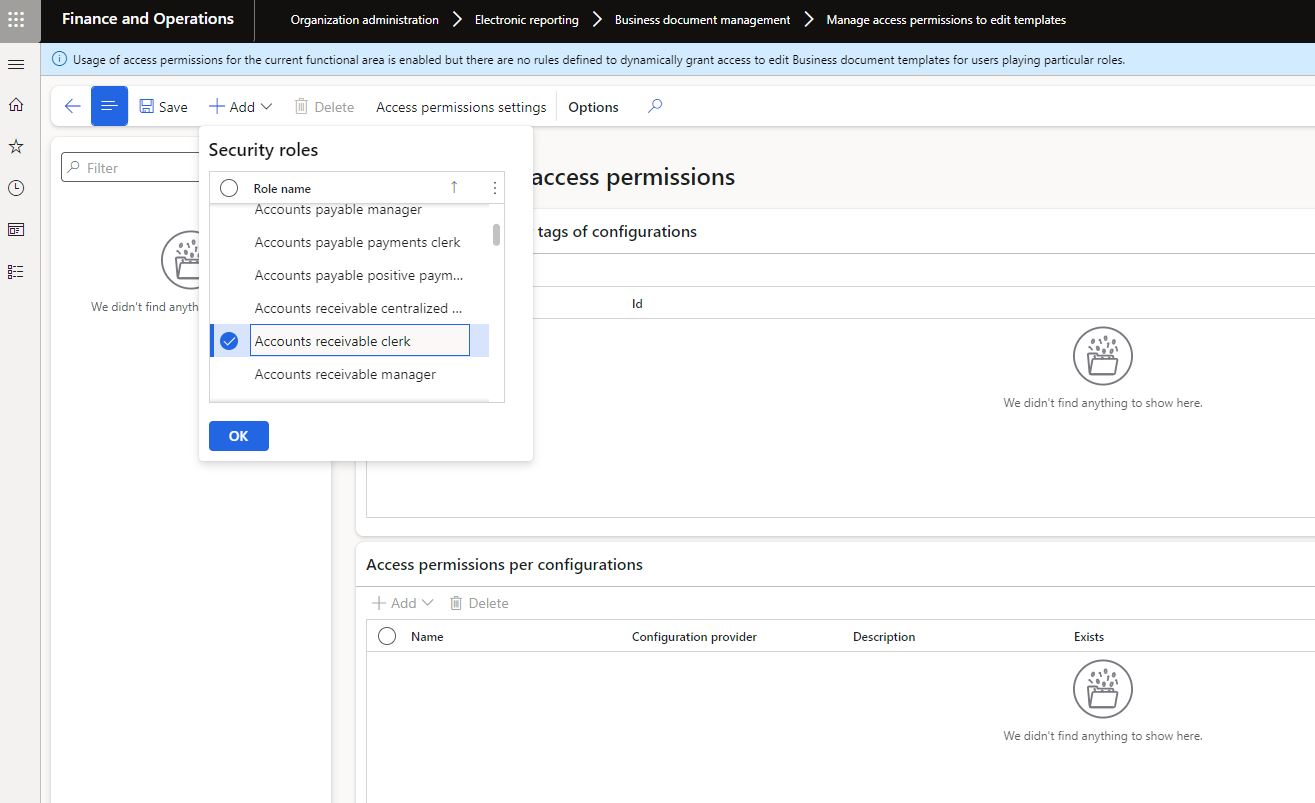
Create new line on the Access permissions per tags of configurations.
Select tag type Functional area.
Select Id Invoicing.

Create new line on the Access permissions per configurations.
Select related report configuration. We are selecting Free text invoice (Excel) Your company since we want Accounts receivable clerk to see only invoice, not packing slip.

All required configurations have been completed. Let's take a second look at the business document management workspace with Accounts receivable clerk role. There should be only free text invoice design there.

Please note that the Accounts Receivable Clerk can now only see the free text invoice design, as expected.

In summary, different combinations of the security settings result in the following:

In conclusion, this series on Configurable Business Documents in Dynamics 365 Finance and Operations has provided a comprehensive guide to setting up and securing business documents. By following the steps outlined across these five parts, organizations can effectively manage document configurations, make format changes, add new fields, and control access based on user roles and business areas. Implementing these security measures ensures that only authorized personnel can view and edit specific templates. 

This final part on Business Document Security completes the series, equipping you with the knowledge to fully leverage configurable business documents in your Dynamics 365 Finance and Operations environments.

Saturday, June 1, 2024

Promissory Notes in D365 Finance: A Step-by-Step Guide


CONTENT

Introduction
A real life scenario
Using the promissory note in Dynamics 365 Finance and Operations

MASTERING PROMISSORY NOTES IN D365 FINANCE: A STEP-BY-STEP GUIDE

Introduction
A promissory note is a financial instrument in which one party formally commits to paying a specific sum of money to another party. This Dynamics 365 Finance feature is versatile and can be effectively used by accounts payable (AP) teams, accounts receivable (AR) teams, treasury departments, legal teams, and vendors. By incorporating promissory notes into their processes, these teams can improve cash flow management and maintain the accuracy of financial records. Process users are as follows:
  • AP teams use promissory notes to manage payments to vendors and suppliers. Promissory notes can be issued as a promise to pay at a future date, helping to manage cash flow and payment schedules.
  • Finance professionals use promissory notes for cash management, planning, and ensuring that the company meets its financial obligations. They may also use them to secure short-term financing.
  • Legal and compliance teams ensure that the issuance and management of promissory notes comply with legal standards and company policies. They handle the documentation and record-keeping associated with promissory notes.
In Dynamics 365 Finance, promissory notes are primarily used by companies and organizations that engage in financial transactions requiring formalized payment agreements. 

Note:  Dynamics 365 Finance and Operations AR teams might use promissory notes to manage incoming payments from customers. This is common in B2B transactions where credit terms are extended to clients.

Let's take a look at the overall process flow.


User creates a purchase order for the required goods, materials or services. Upon receiving physical items or services, related product receipt is posted. After receiving items, vendor invoice is posted to document the payable amount to the vendor. So far, everything is as usual.

Issuing promissory note: Instead of immediate payment, user issues a promissory note to the vendor, promising to pay the amount at a future date. 
  • Record liability: User creates a promissory note as a liability in the accounts payable module.
  • Track promissory note: User monitors the promissory note for due dates and any interest accruals.
  • Settle promissory note: On the due date, user processes the payment to settle the promissory note.
User verifies that the payment has been successfully recorded and the vendor's account is updated. When the time cones, user generates financial reports to ensure all transactions are accurately reflected in the company's financial statements. 

A real life scenario

Contoso purchases $10,000 worth of inventory from Acme. Instead of making immediate payment, Contoso issues a promissory note promising to pay the amount in 60 days. While due date approaches, Contoso makes sure that funds are available. When the due date comes, Contoso settles the promissory note and issues the payment

Using the promissory note in Dynamics 365 Finance and Operations

Let's take a look at the invoice that we will work on.


Instead of making a payment, we will create a document that will promise a future payment.

When you use promissory notes as payment, 
  • you debit the vendor account, next step is to wait for bank's payment
  • when you receive notification from the bank that the promissory note has been honored (paid), you can close the promissory note.
This scenario will be covered with the below steps:
  • Draw a promissory note
  • Remit a promissory note
  • Settle a promissory note
At the start of the process, before drawing a promissory note, the promissory note statistics inquiry shows the current status as follows: 


We will get back to this screen several more times along the article. Let's create a promissory note now.

Draw promissory note:  Go to AP >> Payments >> Promissory notes >> Draw promissory note journal.


Create journal header.

Select the bank account on the promissory notes tab.
Click on lines.
Select the vendor >> Settle transactions
Mark the transaction and click OK. 
Click on Functions > Generate payments.


Send generated file to the vendor.


Post the journal.
Note that: 
  • last promised amount is now included on the Promissory note statistics form's "Drawn and invoice-confirmed document" line. Go to that form via AP >> Inquiries and reports >> payment >> Promissory note statistics.
  • vendor summary account is debited and the promissory note summary account is credited.

Next step is to notify bank for the future payment when the due date comes. 

Remit payment to the bank: Remittance journal is used to generate a remittance file that you can send to your bank. The file can contain information about drawn promissory notes and invoices that have been posted

Go to AP >> Payments >> Promissory notes >> Remittance journal.

Create journal header. 

Select the bank account on the promissory notes tab.
Click on lines.

Select the vendor >> Settle transactions
Mark the transaction and click OK.

Click on Functions > Generate remittance.


Note that:
  • remitted amount is now included on the Promissory note statistics form's "Remitted and remitted-confirmed documents" line. Go to that form via AP >> Inquiries and reports >> payment >> Promissory note statistics.
  • vendor summary account is debited, and the invoice-remitted summary account is credited.
Last step is to settle promissory note. 

Settle promissory note: Settlement journal is used to settle promissory note when it is due.

Go to AP >> Payments >> Promissory notes >> Settle promissory journal.

Create promissory settlement journal header
Select the bank account on the promissory notes tab.
Click on lines
Select the vendor. 
Click on "Settle transactions".
Mark the transaction and click OK. 

Post the journal. 
Note that:
  • honored amount is now included on the Promissory note statistics form's "Honored documents" line. Go to that form via AP >> Inquiries and reports >> payment >> Promissory note statistics.
  • when you settle an invoice-remitted invoice, the invoice-remitted summary account is debited and the vendor summary account is credited.
Lifecycle of the promissory note can be followed via promissory note journal inquiry form 
 
Note that the last status of  promissory note #000011 is honored. 

Click on Close button at the top.
Click OK. 
Promissory note related vendor transactions are as below. 


In conclusion, while the promissory note functionality in Dynamics 365 Finance offers significant benefits for managing payments and cash flow, it is important to note that this feature is not typically utilized within the United States. However, for businesses operating in regions where it is applicable, using this tool can lead to improved cash flow management.

Tuesday, May 21, 2024

User Onboarding in Dynamics 365 Finance and Operations for SOX Compliance - PART 1 - Solution components

USER ONBOARDING IN DYNAMICS 365 FINANCE AND OPERATIONS FOR SOX COMPLIANCE - PART1 - SOLUTION COMPONENTS

This article series explains how to streamline the user onboarding process in Dynamics 365 Finance and Operations, providing a unique implementation resource. The series is divided into two parts as follows:

PART 1: Solution components

PART 2: Solution configuration

Let's get started with PART 1. 

CONTENT

Effective user onboarding in Dynamics 365 Finance and Operations
Implementing effective user onboarding in Dynamics 365 Finance and Operations

EFFECTIVE USER ONBOARDING IN DYNAMICS 365 FINANCE AND OPERATIONS FOR SOX COMPLIANCE

User onboarding is critical in SOX compliance because it establishes the foundation for secure and compliant access to financial systems, specifically Dynamics 365 Finance and Operations (D365FO). Here are the key reasons why user onboarding processes are essential: 

1. Controlled Access to Financial Data
  • Approval and Authorization: User onboarding ensures that new users are properly reviewed and approved before they are granted access to the system. This prevents unauthorized individuals from accessing sensitive financial information. Dynamics 365 Finance and Operations (D365FO) is particularly well-suited for this task due to its robust workflow functionality. The workflow feature in D365FO automates the approval process, ensuring that each step is documented, consistent, and compliant with SOX requirements. This built-in functionality helps streamline the approval process, making it efficient and reliable.
  • Access Based on Role: Onboarding involves assigning roles and permissions that align with the user's job responsibilities. In D365FO, role-based access control is used to ensure users only have access to the data and functions necessary for their role, minimizing the risk of data breaches. D365FO allows for detailed role definitions and easy management of user permissions.

2. Ensuring Compliance with SOX Requirements
  • Documentation of Approvals: SOX compliance requires that all access to financial systems be properly documented and approved. Dynamics 365 Finance and Operations provides a Workflow History screen that is ideal for this purpose. This screen maintains a detailed log of all workflow activities, showing who approved access, when it was approved, and the actions taken. This comprehensive documentation is crucial during audits to demonstrate compliance and ensure that all access approvals are properly recorded.
  • Policy Adherence: Onboarding processes ensure that new users are informed about and comply with company policies and regulatory requirements, including those related to SOX. D365FO can be configured to include policy acknowledgment as part of the onboarding workflow, ensuring that users confirm their understanding of compliance requirements before gaining access.

3. Risk Mitigation
  • Minimizing Security Risks: By having a structured onboarding process, companies can ensure that new users are educated about security protocols and compliance requirements, reducing the risk of accidental or intentional misuse of financial data. D365FO supports security training and awareness programs by integrating training modules and tracking completion as part of the onboarding workflow.
  • Verification of User Identity: Onboarding typically includes verifying the identity of new users, which helps in preventing fraud and ensuring that only legitimate users gain access to the system. D365FO can integrate with identity management solutions to verify user identities during the onboarding process.

4. Audit and Accountability
  • Trackable Processes: A formal onboarding process creates a clear audit trail showing who was given access, who approved it, and what level of access was granted. The Workflow History screen in Dynamics 365 Finance and Operations is particularly valuable for this purpose. It provides a detailed, transparent, and traceable record of all workflow activities, including approvals, changes, and actions taken. This ensures that during SOX audits, you can demonstrate that proper controls are in place and that all access permissions have been appropriately managed and documented.
  • Regular Review: As part of the onboarding process, it is essential to periodically review and update user access to ensure it remains appropriate, further supporting SOX compliance. D365FO can automate reminders and workflows for periodic access reviews, ensuring continuous compliance with access policies.

IMPLEMENTING EFFECTIVE USER ONBOARDING IN DYNAMICS 365 FINANCE AND OPERATIONS

To ensure that your user onboarding process supports SOX compliance in Dynamics 365 Finance and Operations (D365FO), it is crucial to implement a structured and comprehensive approach. Here are detailed steps to achieve this:

1. Define Clear Onboarding Procedures
  • Identify Approval Steps: Establish detailed procedures for onboarding new users, focusing on identifying the approval steps that will be configured in D365FO. This includes specifying who needs to approve new user access, what criteria must be met for approval, and how these approvals will be documented.
  • Role Assignment: Clearly define user roles and responsibilities. Ensure that each role has specific permissions aligned with job functions, minimizing unnecessary access to sensitive data.
  • Compliance Checkpoints: Integrate compliance checkpoints within the onboarding process to ensure that each step adheres to SOX requirements.

2. Automate the Process
  • Workflow Configuration: Use D365FO’s powerful workflow capabilities to automate the approval and onboarding process. Configure workflows to route approval requests to the appropriate personnel, ensuring that each step is completed before access is granted.
  • Consistency and Accuracy: Automation ensures that the onboarding process is consistent and accurate, reducing the risk of human error. It also helps in maintaining a standardized approach to onboarding across the organization.
  • Notifications and Alerts: Set up notifications and alerts within the workflow to inform relevant stakeholders of pending approvals or required actions, ensuring timely processing of onboarding requests.

3. Maintain Comprehensive Records:
  • Workflow History Screen: Utilize the Workflow History screen in D365FO to maintain detailed records of all onboarding activities. This screen captures all relevant information, including who approved access, when it was approved, and any actions taken.
  • Audit-Ready Documentation: Ensure that all records are easily accessible and audit-ready. This includes maintaining logs of role assignments, changes in access levels, and training completions. The Workflow History screen provides a transparent and traceable record, which is crucial for SOX audits.
  • Centralized Repository: Store all onboarding documentation in a centralized repository within D365FO, ensuring that records are organized and can be easily retrieved during audits or compliance reviews.

4. Provide Training
  • System Training: Ensure new users receive thorough training on how to use D365FO effectively. This includes training on specific functionalities they will use based on their roles.
  • Compliance Training: Integrate compliance training modules within the onboarding process. These modules should cover SOX requirements, data security protocols, and company policies. D365FO can track training completion, ensuring that all users are properly educated on compliance requirements.
  • Ongoing Education: Implement ongoing education and refresher courses to keep users updated on any changes in compliance requirements or system updates. D365FO can schedule and track these training sessions, ensuring continuous user education.

5. Regular Review and Access Management
  • Periodic Access Reviews: Configure D365FO to automate periodic reviews of user access. This ensures that access rights remain appropriate and are updated as necessary based on role changes or other factors.
  • Revocation of Access: Establish procedures for promptly revoking access for users who no longer require it, such as when they change roles or leave the company. D365FO can automate the deactivation of user accounts to maintain security.
  • Monitoring and Reporting: Use D365FO’s monitoring and reporting capabilities to regularly review access logs and identify any unusual or unauthorized access patterns. This proactive approach helps in maintaining a secure and compliant environment.

By focusing on these detailed steps, your user onboarding process in Dynamics 365 Finance and Operations will be robust, ensuring compliance with SOX requirements and providing secure, regulated access to your financial systems.

Understanding Telemetry Pricing for Dynamics 365 Finance & Operations (D365FO)

UNDERSTANDING TELEMETRY PRICING FOR DYNAMICS 365 FINANCE AND OPERATIONS (D365FO) CONTENT Introduction D365FO Telemetry Capabilities Key Pric...