Showing posts with label Security. Show all posts

Monday, April 7, 2025

User & Security Role Assignments via Data Management in Dynamics 365 Finance and Operations


USER & SECURITY ROLE ASSINGMENTS VIA DATA MANAGEMENT IN DYNAMICS 365 FINANCE AND OPERATIONS

CONTENT

Introduction
The challenge of scale
Why use data management?
Demo
Conclusion

INTRODUCTION

Role assignment can be a cumbersome and time-consuming process in Dynamics 365 Finance and Operations (D365FO). Identifying the appropriate future-state security roles for business users, and then ensuring those roles are correctly assigned, often involves multiple teams and a deep understanding of both business processes and security architecture. Without a structured approach, this can easily become an overwhelming task—especially during large-scale implementations, reorganizations, or security clean-up efforts.

THE CHALLENGE OF SCALE

As the number of users in the system grows, so does the complexity of managing their security role assignments. In environments with hundreds—or even thousands—of users, manually assigning or updating roles becomes highly inefficient and error-prone. It's not just the volume of users that creates difficulty, but also the variety of roles and the need to reflect organizational changes quickly and accurately.

Keeping track of which users need which roles, ensuring Segregation of Duties (SoD) compliance, and maintaining consistent role structures across business units requires a scalable solution. Relying solely on the user interface to manage role assignments simply doesn't scale well.

WHY USE DATA MANAGEMENT?

Fortunately, D365FO provides a powerful alternative through its Data Management workspace. This workspace enables administrators to manage user and security role assignments in bulk using import/export functionality. It offers a faster, more consistent way to perform updates, which is critical for both initial setup and ongoing maintenance.

The process involves a few key steps:

Prepare the Data File: Create an Excel or CSV file that includes the required fields—typically the user ID and the associated security role(s). This document serves as your template for import.

1. Upload Through Data Management: Use the "Security user role" entity within the Data Management workspace to upload the prepared file. The system processes the file and assigns roles to users based on the contents.

2. It's a time consuming process. There has to be an easy way to upload user & role assignments. Data management workspace is an excellent fit for that. First, a user & security role assignment file has to be prepared. Next step, Prepared document should be uploaded into D365FO.

This method is not only fast but also offers flexibility. For example, you can choose to delete existing role assignments before importing new ones, which is helpful during role restructuring or system refreshes. It also helps reduce manual errors and increases consistency, especially when dealing with repeatable processes or multiple environments (such as test, UAT, and production).

Benefits

  • Efficiency: Assign roles to hundreds of users in a matter of minutes.
  • Consistency: Reduce the risk of manual entry errors.
  • Scalability: Easily handle role assignments in growing or dynamic organizations.
  • Clean-Up Support: Replace outdated role assignments with updated ones using delete and import options.
  • Audit Readiness: Maintain traceable and auditable documentation of role changes through import files.

By leveraging the Data Management workspace, organizations can dramatically simplify and accelerate the user role assignment process, making it a sustainable part of their overall security management strategy in D365FO.

DEMO

Intro sentence here.

1. Preparing Guide File

Navigate to Data Management workspace.

System administration >> Workspaces >> Data management.


Create a new export project and use data entity Security user role association.

Select Excel as the source data format.


Click Export.

Find the project in the job history.

Click Execution details.

Once the export job completes, locate the project in Job history, click on Execution details, and Download file.


Template contains the following columns:

  • USERID: D365FO user ID.
  • SECURITYROLEIDENTIFIER: Security role system name.
  • ASSIGNMENTMODE: Manual or automatic role assignment indicator.
  • ASSIGNMENTSTATUS: Role assignment status. Disabled line disappears from the UI and role assignment is not active anymore.
  • SECURITYROLENAME: The actual role name.

2. Preparing Import File

Update the downloaded file with the future-state user and security role assignments.

Key considerations:

  • Don't forget to include service accounts.
  • Don't forget to include system administrators.
  • Ensure each role assignment is a separate line for every user.

3. Importing User & Security Role Assignment File

Return to the Data Management workspace and create a new Import project.

Again, select the entity Security user role association, and use Excel as the source data format.


Before importing:
Set Truncate entity data parameter to Yes. This removes previous role assignments.
Set Skip staging parameter to Yes for direct import without preview.


Click Import to proceed.


Once the job completes, new role assignments will be reflected in the system.

CONCLUSION

Managing user and role assignments at scale requires a structured and efficient approach, particularly in environments where accuracy and auditability are critical. Leveraging the Data Management workspace in D365FO provides a repeatable and auditable method for mass assigning or updating security roles. By exporting current assignments, preparing a controlled future-state file, and importing with the appropriate parameters, administrators can confidently maintain security alignment across environments. This approach minimizes manual input, reduces the potential for errors, and supports governance objectives tied to compliance.

Tuesday, September 17, 2024

Securing Dynamics 365 F&O with Azure Active Directory Group Management


SECURING DYNAMICS 365 F&O WITH AZURE ACTIVE DIRECTORY GROUP MANAGEMENT

CONTENT

Introduction
Enable the Active Directory security groups feature
Setup Active Directory security groups
Import Active Directory security groups
Assign D365FO security roles to Active Directory Groups
Managing users in Dynamics 365 Finance and Operations

Introduction

Microsoft Active Directory (AD) Security Groups are a long-established feature in Microsoft’s identity management framework, designed to centralize the management of users, roles, and organizational assignments. By assigning users to specific AD security groups, administrators can map those groups to corresponding roles or permissions within Dynamics 365 Finance and Operations (D365 F&O). This ensures consistent access control across the organization, reducing the manual effort of managing individual user permissions.

A key benefit of AD Security Groups in D365 F&O is Just-in-Time (JIT) provisioning. JIT allows new users to be automatically created and assigned appropriate roles based on their AD group membership when they first sign into the system. This simplifies onboarding and ensures that access is aligned with their organizational role from the start.

While AD Security Groups are a valuable tool, they are considered a legacy option compared to modern identity management solutions like Azure Active Directory (Azure AD). Azure AD offers enhanced features, such as conditional access and multi-factor authentication, which provide more robust security options. However, organizations with existing AD infrastructure can still leverage AD Security Groups for efficient role-based access control in their D365 environments.

The purpose of AD security groups is to streamline access control within a network by allowing administrators to assign rights and permissions to multiple users simultaneously. This method ensures uniform access to resources such as files, folders, and applications. For example, an AD security group for a department like "Finance" can be assigned specific permissions, and all members of that group will inherit the same access rights, simplifying permission management.

Over time, security groups also make it easy to manage changing user roles or onboarding new users. By adding or removing users from a group, administrators can adjust permissions without needing to update each user individually. This helps maintain security, reduces errors, and ensures compliance with regulatory standards.

Administrators can utilize Azure Active Directory (Azure AD) groups to efficiently control user permissions within Dynamics 365 Finance and Operations (D365FO). This guide outlines the process for configuring and managing access in D365FO. It’s important to note that the configuration of Azure AD itself falls under the purview of the IT department.

Enable the Active Directory security groups feature

To enable the feature, go to System administration > Setup > License configuration. You can find the Microsoft Entra ID (Active Directory) security group configuration key in the Administration folder.

Configuration keys can be edited only in maintenance mode.


Note: Microsoft Entra ID is the new name for Azure AD in November 2023. The names Azure Active Directory, Azure AD, and AAD are replaced with Microsoft Entra ID.

  • Microsoft Entra is the name for the product family of identity and network access solutions.
  • Microsoft Entra ID is one of the products within that family.
  • Acronym usage isn't encouraged, but if you must replace AAD with an acronym due to space limitations, use ME-ID.

Setup Active Directory security groups

The next step is to create Azure Active Directory groups and assign members to them. This can be done in the Microsoft 365 admin center, the Office 365 admin center, or the Azure portal. 

Import Active Directory security groups

After the feature is enabled, a new Groups page is available at System administration > Users > Groups. 

Once the group structure and memberships are ready, proceed with the configuration in Microsoft Dynamics 365. Go to System administration > Users > Groups.

To start to import Azure Directory security groups, select Import groups, and then select the groups to import.

The ID field requires custom input.

After the import is completed, you can maintain role and organization assignments on the Groups page. The process resembles the process that's used on the Users page.

Assign D365FO security roles to Active Directory Groups

Next is to assign security roles to the AD groups in D365FO. Users who are members of the Azure Active Directory (AD) groups will inherit the assigned security roles.

  • Roles are not directly assigned to the individual users, roles are assigned to AD security groups. 
  • A user can belong to multiple groups, and in such cases, they will receive cumulative access across all their group memberships.

Managing users in Dynamics 365 Finance and Operations

If security is set up through AD groups, SOD risk analysis will not work. The solution is to assign security roles directly to users as usual.

If workflows include security roles in their setup, they will not function properly either. The solution is to assign security roles directly to users as usual.

User can have AD security group and security role direct assignment at the same time. In this case, user will grant access to all permissions cumulatively.

Friday, June 7, 2024

Configurable Business Documents in Dynamics 365 Finance and Operations - PART 5 - Business documents security


CONFIGURABLE BUSINESS DOCUMENTS IN DYNAMICS 365 FINANCE AND OPERATIONS - PART 5 - BUSINESS DOCUMENTS SECURITY

This article series explains and demonstrates the use of configurable business documents in real-life scenarios. The purpose is to provide a unique implementation resource. The entire series will be in five parts as follows: 

PART 5: Business documents security

Let's get started with PART 5 which is the last part of this series.

CONTENT

Introduction
Activating Business Document security permissions 
Configuring Business Document security permissions
Summary

Introduction

Managing access to Configurable Business Document (CBD) templates within the Business Document Management workspace is crucial for maintaining organized and secure operations across various business domains (functional areas). By default, all users with access to this workspace can view all available ER solution templates. However, configuring access permissions allows administrators to control which users can edit specific templates, ensuring that only authorized personnel have the appropriate access based on their roles. This article outlines the step-by-step process for setting up these access permissions, enabling businesses to tailor template access according to functional areas and user roles, thereby enhancing document management efficiency and security.

Activating Business Document security permissions

If business document access permissions are not activated, every user with access to the Business Document Management workspace will see all of the ER document templates. To activate these permissions, follow these steps:

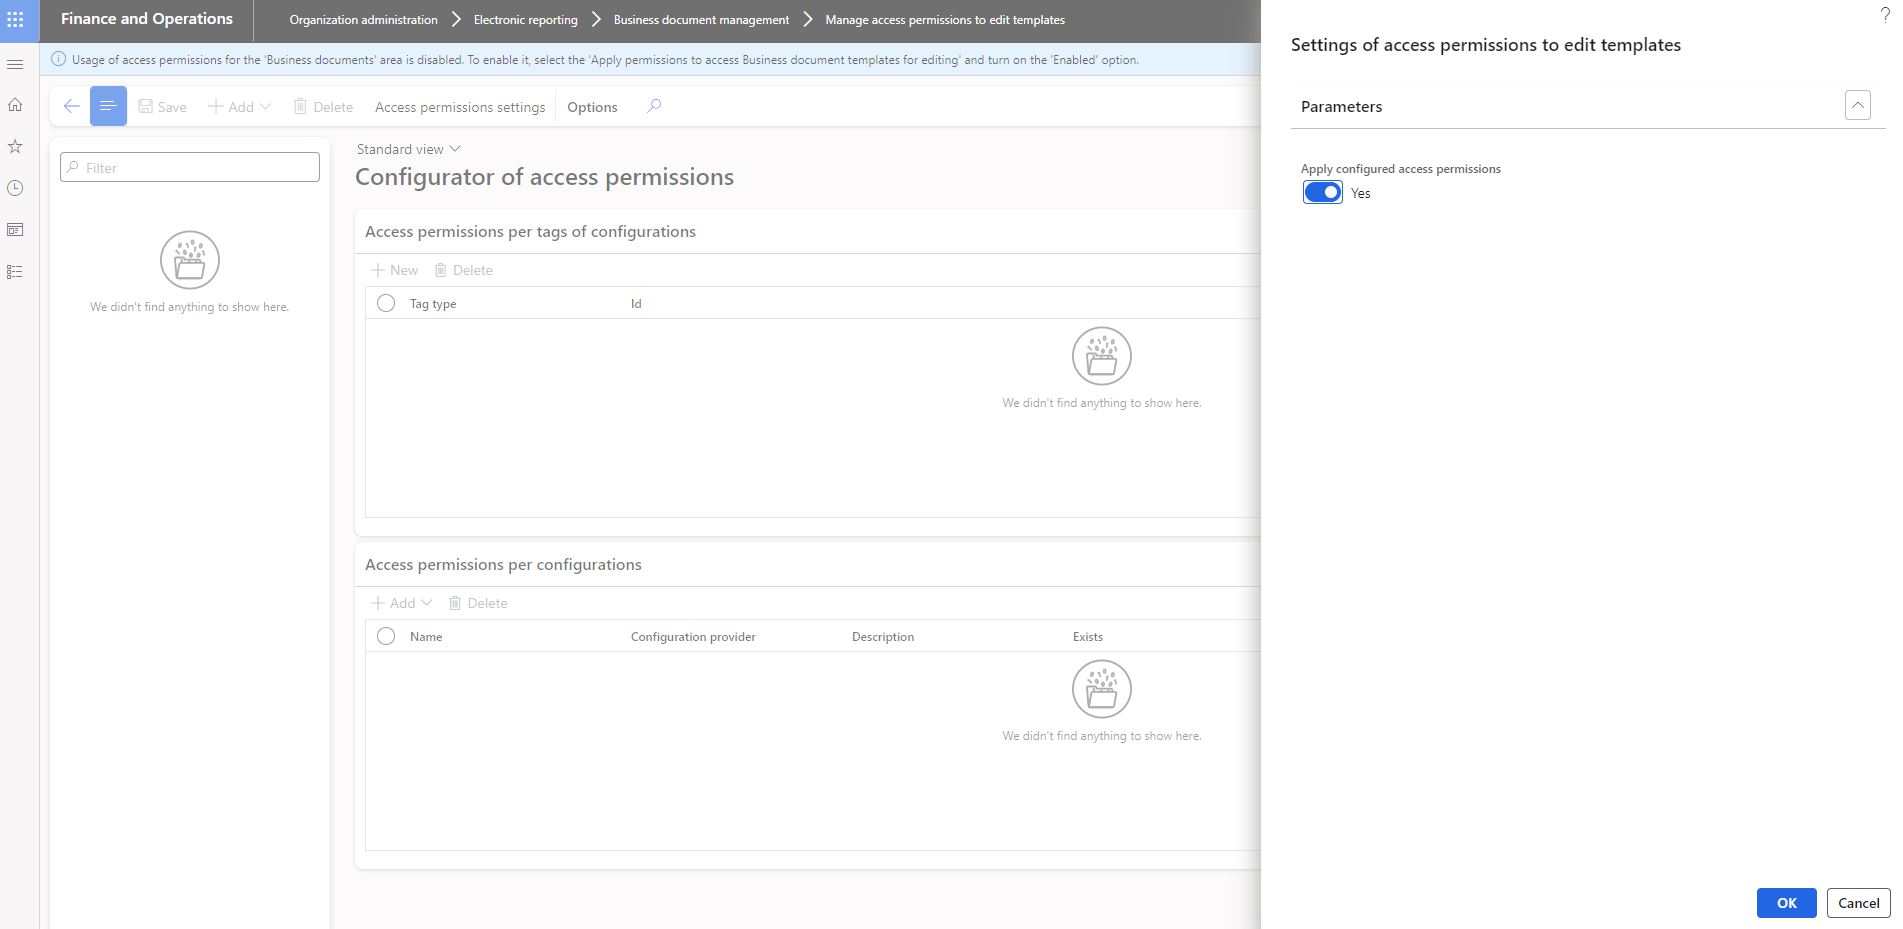
Go to Organization administration >> Electronic reporting >> Business document management >> Manage access permissions to edit templates.


Note that system notifies you that security is not in place yet.
Click on the access permissions settings. (1)
Activate the security. (2)

In this case, Business document management workspace (below) will show only


those templates that reside in ER format configurations and that are marked by a Business document type tag as below.


Configuring Business Document security permissions

The document list in the Business document management workspace can be restricted by configuring access permissions. This is crucial when various templates are used to create business documents across different domains (functional areas), and you need to grant specific users access to edit different templates within the Business Document Management workspace.

Access permissions for Business Document Management can be configured in the Access Permissions Configurator. Only one of the following users have access to this page:
  • Users assigned to System administrator role
  • Users assigned to any role that has duty Configure permissions to access Business document templates for editing (AOT name ERBDTemplatesSecurity)
Now, we know who can set up security configuration changes (any role with "Configure permissions to access Business document templates for editing" duty).

Let's talk about who can edit the business documents. 

When security is not activeevery user assigned to any security role that is configured to perform the Manage Business document templates (AOT name ERBDManageTemplates) duty is able to open the Business document management workspace and can edit any template that is available. 

Let's assign Manage Business document templates duty to Accounts receivable clerk and see what is available to the role.


Note: In our case, there are only 2 documents that we have created in the previous articles in total in the Business document management workspace as below.
Please note that Accounts receivable clerk can see all available business documents because security is not active.


That's not what we want. What we want is to allow the Accounts receivable clerk to see only their related process documents.

Follow the procedure below to configure specific access to Business Documents for all legal entities:

Let's activate the security by going to Configurator of access permissions page.
Click on Organization administration >> Electronic invoicing >> Business document management >> Manage access permissions to edit templates.
Click on Access permissions settings.

Activate the parameter.
Click on OK.


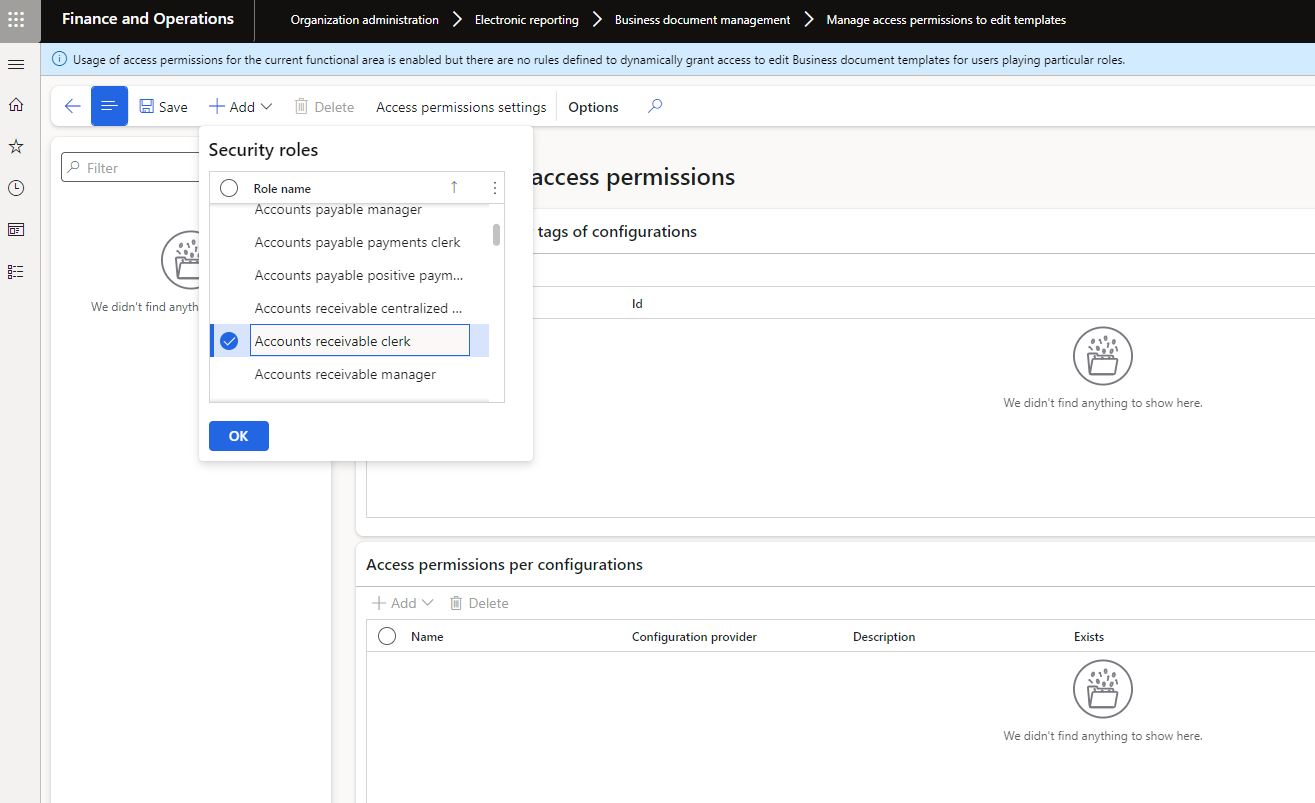
What we want is to provide users access to only their respective business areas. The next step is for this purpose, to configure specific access permissions.

Click on +Add.
Select the role Accounts receivable clerk.

Create new line on the Access permissions per tags of configurations.
Select tag type Functional area.
Select Id Invoicing.

Create new line on the Access permissions per configurations.
Select related report configuration. We are selecting Free text invoice (Excel) Your company since we want Accounts receivable clerk to see only invoice, not packing slip.

All required configurations have been completed. Let's take a second look at the business document management workspace with Accounts receivable clerk role. There should be only free text invoice design there.

Please note that the Accounts Receivable Clerk can now only see the free text invoice design, as expected.

In summary, different combinations of the security settings result in the following:

In conclusion, this series on Configurable Business Documents in Dynamics 365 Finance and Operations has provided a comprehensive guide to setting up and securing business documents. By following the steps outlined across these five parts, organizations can effectively manage document configurations, make format changes, add new fields, and control access based on user roles and business areas. Implementing these security measures ensures that only authorized personnel can view and edit specific templates. 

This final part on Business Document Security completes the series, equipping you with the knowledge to fully leverage configurable business documents in your Dynamics 365 Finance and Operations environments.

Tuesday, December 5, 2023

How to Make Your ERP SOX Compliant? - PART 1


CONTENT
 
Introduction
How to make your ERP sox compliant?
Where does the SoD (Segregation of Duties) framework stand among the steps mentioned above?
How to manage access rights?
How to design application mitigating controls?
Summary

INTRODUCTION

This article series acts as a comprehensive guide for SOX compliance, specifically tailored for public companies utilizing Microsoft ERP systems. The foundational knowledge provided here will then help build a SOX compliance framework. 

First article part will be theoretical, following articles will be application of the given information.

Let's get started.

The Sarbanes-Oxley Act, often referred to as SOX, is a U.S. law that sets standards for all U.S. public company boards, management, and public accounting firms. The purpose is to keep top management accountable for financial accuracy, to enhance financial disclosures, to enforce auditor independence, and to establish the Public Company Accounting Oversight Board (PCAOB). The idea is to make companies more transparent, so people feel safer when they invest their money in them.

How to make your ERP sox compliant?

To make your Enterprise Resource Planning (ERP) system SOX (Sarbanes-Oxley Act) compliant, you can follow these steps:

  • Understand SOX Requirements: Familiarize with the requirements of the Sarbanes-Oxley Act, especially sections 302 and 404, which are about internal control over financial reporting.
  • Assess Current Compliance Level: Evaluate your current ERP system to identify areas that do not meet SOX compliance requirements. This involves reviewing financial reporting processes, data accuracy, access controls, and audit trails.
  • Implement Strong Internal Controls: Establish robust internal controls within your ERP system. This includes controls over financial data entry, processing, and reporting. Ensure that these controls are documented and tested regularly.
  • Manage Access Rights: Strictly control access within the ERP system. Implement role-based access controls to ensure that only authorized personnel have access to sensitive financial information.
  • Ensure Data Accuracy and Integrity: Implement measures to ensure the accuracy and integrity of financial data. This can involve validation checks, regular reconciliations, and automated data processing controls.
  • Maintain an Audit Trail: Your ERP should maintain a comprehensive audit trail that logs all financial transactions and changes made within the system. This is crucial for auditors to verify the accuracy of financial reports.
  • Regular Testing and Monitoring: Regularly test and monitor the effectiveness of internal controls. This can be done through internal audits and by using features within the ERP system that flag anomalies or control failures.
  • Train Staff: Ensure that all staff who use the ERP system are trained in SOX compliance requirements. They should understand the importance of controls and their role in maintaining compliance.
  • Continuous Improvement: SOX compliance is not a one-time task but an ongoing process. Continuously review and improve the internal controls and processes within your ERP system.
  • Engage with Auditors: Work closely with external auditors to understand their expectations and get feedback on your compliance efforts. This collaboration can provide valuable insights into areas needing improvement.

As result, don't forget that each organization's needs and challenges are unique, so tailor these steps to fit your specific circumstances and consult with legal or compliance professionals if needed.

Where does the SoD (Segregation of Duties) framework stand among the steps mentioned above?

Segregation of Duties (SoD) helps you making your ERP system SOX compliant, and it intertwines with several of the steps mentioned above, particularly in implementing strong internal controls and managing access rights. Here's where SoD fits into the process:

  • Implement Strong Internal Controls v2: SoD is a key aspect of internal controls. It involves dividing responsibilities and tasks among different employees to prevent fraud and errors. In an ERP system, this means ensuring that no single individual has control over all aspects of a financial transaction. For example, the same person should not be authorized to initiate, approve, and reconcile transactions.
  • Manage Access Rights v2: SoD is closely linked to managing access rights within the ERP system. By controlling who has access to perform certain tasks or view certain data, you can enforce SoD effectively. For instance, different roles and permissions can be set up in the ERP system to ensure that conflicting tasks are not performed by the same person.
  • Regular Testing and Monitoring v2: Part of regular testing and monitoring should include reviewing the effectiveness of SoD controls. This might involve checking whether the roles and responsibilities assigned in the ERP still align with SoD principles and making adjustments as needed.
  • Continuous Improvement v2: The SoD framework should be reviewed regularly to adapt to changes in the organization, such as new business processes, changes in staff roles, or updates to the ERP system itself.

Incorporating SoD into your ERP system is essential for mitigating risks related to fraud, errors, and financial misstatements, making it a vital element of SOX compliance.

How to manage access rights?

Managing access rights in an ERP system is a critical component of maintaining security and compliance, particularly with frameworks like SOX and in ensuring proper Segregation of Duties (SoD). Here's a detailed approach to managing access rights effectively:

  • Least Privilege Principle: This principle dictates that users should be granted only the access rights that are absolutely necessary for them to perform their job functions. This minimizes the risk of unauthorized access or actions within the system. Regularly review user permissions to ensure they align with current job responsibilities.
  • Role-Based Access Control (RBAC): Define roles within your organization and assign access rights based on these roles. For example, a financial officer would have different access rights compared to a sales manager. This makes managing and auditing access rights more efficient.
  • Implementing Segregation of Duties (SoD): SoD is vital for preventing fraud and errors. Ensure that conflicting tasks, such as creating a vendor and approving invoices, are not assigned to the same person. Design roles in the ERP system in a way that these duties are segregated.
  • Regular Audits and Reviews: Periodically audit access rights to ensure they are still appropriate. Changes in employee roles, departures, or new hires often necessitate updates in access permissions. This process helps in identifying and rectifying any inappropriate access rights.
  • User Access Reviews: Conduct regular user access reviews where managers verify and confirm the appropriateness of their team members’ access. This practice helps in identifying any discrepancies or unnecessary access privileges.
  • Strong Authentication and Authorization Procedures: Implement strong authentication methods, like multi-factor authentication (MFA), to ensure that access to the ERP system is secure. Also, ensure that authorization procedures are robust and that any elevation in access rights is properly vetted and approved.
  • Training and Awareness: Educate employees about the importance of access control and the risks associated with improper access. This includes training on how to handle access credentials securely.
  • Use of Automated Tools: Consider using automated tools for managing access rights. These tools can help in efficiently assigning roles, tracking changes, and conducting regular audits.
  • Documenting Policies and Procedures: Document your access control policies and procedures. This documentation should include details on how roles are defined, how access is granted, reviewed, and revoked, and the procedures for auditing and compliance checks.
  • Incident Response Plan: Have a plan in place for responding to access-related security incidents. This should include steps for immediate action, investigation, and remediation to minimize potential damage.

How to design application mitigating controls?

Application mitigating controls are an essential part of the framework for ensuring the security and compliance of an ERP system, particularly in the context of SOX compliance and effective management of access rights. These controls are specific to the ERP application and are designed to ensure the integrity, accuracy, and confidentiality of the data and processes within the application. Here’s how application controls fit into the overall framework:

  • Data Input Controls: These ensure that the data entered into the ERP system is accurate, complete, and authorized. This can include validation checks, field format restrictions, and mandatory fields to prevent incomplete entries.
  • Data Processing Controls: These controls ensure that data is processed correctly within the ERP system. They can include workflow approvals, automated calculations, and checks that transactions are processed as intended.
  • Data Output Controls: These controls ensure the integrity of data outputs, such as reports and exports from the ERP system. They ensure that data is accurately and appropriately presented and can only be accessed by authorized individuals.
  • Integration with Access Rights Management: Application controls work hand-in-hand with access rights management. They help enforce the principles of least privilege and SoD by controlling what actions users can perform within the application based on their assigned roles and permissions.
  • Audit Trails and Logs: Application controls often include creating and maintaining detailed audit trails and logs that record transactions and changes within the ERP system. These logs are crucial for audits and for monitoring and investigating suspicious activities.
  • Error Detection and Correction Mechanisms: Implement controls to detect errors in data processing and provide mechanisms for their correction. This could include alert systems for unusual transactions or discrepancies.
  • Segregation of Duties within the Application: Ensure that application controls help enforce SoD by restricting the ability to perform conflicting tasks within the application to different users or roles.
  • Compliance and Regular Audits: Use application controls to facilitate compliance with relevant regulations and standards. Regular audits of these controls help ensure they are functioning correctly and remain aligned with compliance requirements.
  • User Authentication and Authorization: Incorporate controls within the application for strong user authentication and for ensuring that authorization procedures are followed before granting access or approving transactions.
  • Change Management Controls: Implement controls around the modification of the ERP system itself, including updates or changes to application settings, to ensure that they are authorized, tested, and documented.

In summary, application mitigating controls are a vital component of a secure and compliant ERP system. They work in conjunction with other measures like access rights management to provide a comprehensive approach to data integrity, security, and regulatory compliance.

Summary

Here's a table that combines the aspects of SOX compliance, Segregation of Duties (SoD), Access Rights Management, and Application Controls, highlighting how they interact with each other:


This framework illustrates the interconnectedness of these aspects in creating a secure, compliant, and efficient ERP system. Each aspect supports and reinforces the others, ensuring a holistic approach to compliance and security.

Understanding Telemetry Pricing for Dynamics 365 Finance & Operations (D365FO)

UNDERSTANDING TELEMETRY PRICING FOR DYNAMICS 365 FINANCE AND OPERATIONS (D365FO) CONTENT Introduction D365FO Telemetry Capabilities Key Pric...