Showing posts with label Dynamics365Finance. Show all posts

Monday, April 7, 2025

User & Security Role Assignments via Data Management in Dynamics 365 Finance and Operations


USER & SECURITY ROLE ASSINGMENTS VIA DATA MANAGEMENT IN DYNAMICS 365 FINANCE AND OPERATIONS

CONTENT

Introduction
The challenge of scale
Why use data management?
Demo
Conclusion

INTRODUCTION

Role assignment can be a cumbersome and time-consuming process in Dynamics 365 Finance and Operations (D365FO). Identifying the appropriate future-state security roles for business users, and then ensuring those roles are correctly assigned, often involves multiple teams and a deep understanding of both business processes and security architecture. Without a structured approach, this can easily become an overwhelming task—especially during large-scale implementations, reorganizations, or security clean-up efforts.

THE CHALLENGE OF SCALE

As the number of users in the system grows, so does the complexity of managing their security role assignments. In environments with hundreds—or even thousands—of users, manually assigning or updating roles becomes highly inefficient and error-prone. It's not just the volume of users that creates difficulty, but also the variety of roles and the need to reflect organizational changes quickly and accurately.

Keeping track of which users need which roles, ensuring Segregation of Duties (SoD) compliance, and maintaining consistent role structures across business units requires a scalable solution. Relying solely on the user interface to manage role assignments simply doesn't scale well.

WHY USE DATA MANAGEMENT?

Fortunately, D365FO provides a powerful alternative through its Data Management workspace. This workspace enables administrators to manage user and security role assignments in bulk using import/export functionality. It offers a faster, more consistent way to perform updates, which is critical for both initial setup and ongoing maintenance.

The process involves a few key steps:

Prepare the Data File: Create an Excel or CSV file that includes the required fields—typically the user ID and the associated security role(s). This document serves as your template for import.

1. Upload Through Data Management: Use the "Security user role" entity within the Data Management workspace to upload the prepared file. The system processes the file and assigns roles to users based on the contents.

2. It's a time consuming process. There has to be an easy way to upload user & role assignments. Data management workspace is an excellent fit for that. First, a user & security role assignment file has to be prepared. Next step, Prepared document should be uploaded into D365FO.

This method is not only fast but also offers flexibility. For example, you can choose to delete existing role assignments before importing new ones, which is helpful during role restructuring or system refreshes. It also helps reduce manual errors and increases consistency, especially when dealing with repeatable processes or multiple environments (such as test, UAT, and production).

Benefits

  • Efficiency: Assign roles to hundreds of users in a matter of minutes.
  • Consistency: Reduce the risk of manual entry errors.
  • Scalability: Easily handle role assignments in growing or dynamic organizations.
  • Clean-Up Support: Replace outdated role assignments with updated ones using delete and import options.
  • Audit Readiness: Maintain traceable and auditable documentation of role changes through import files.

By leveraging the Data Management workspace, organizations can dramatically simplify and accelerate the user role assignment process, making it a sustainable part of their overall security management strategy in D365FO.

DEMO

Intro sentence here.

1. Preparing Guide File

Navigate to Data Management workspace.

System administration >> Workspaces >> Data management.


Create a new export project and use data entity Security user role association.

Select Excel as the source data format.


Click Export.

Find the project in the job history.

Click Execution details.

Once the export job completes, locate the project in Job history, click on Execution details, and Download file.


Template contains the following columns:

  • USERID: D365FO user ID.
  • SECURITYROLEIDENTIFIER: Security role system name.
  • ASSIGNMENTMODE: Manual or automatic role assignment indicator.
  • ASSIGNMENTSTATUS: Role assignment status. Disabled line disappears from the UI and role assignment is not active anymore.
  • SECURITYROLENAME: The actual role name.

2. Preparing Import File

Update the downloaded file with the future-state user and security role assignments.

Key considerations:

  • Don't forget to include service accounts.
  • Don't forget to include system administrators.
  • Ensure each role assignment is a separate line for every user.

3. Importing User & Security Role Assignment File

Return to the Data Management workspace and create a new Import project.

Again, select the entity Security user role association, and use Excel as the source data format.


Before importing:
Set Truncate entity data parameter to Yes. This removes previous role assignments.
Set Skip staging parameter to Yes for direct import without preview.


Click Import to proceed.


Once the job completes, new role assignments will be reflected in the system.

CONCLUSION

Managing user and role assignments at scale requires a structured and efficient approach, particularly in environments where accuracy and auditability are critical. Leveraging the Data Management workspace in D365FO provides a repeatable and auditable method for mass assigning or updating security roles. By exporting current assignments, preparing a controlled future-state file, and importing with the appropriate parameters, administrators can confidently maintain security alignment across environments. This approach minimizes manual input, reduces the potential for errors, and supports governance objectives tied to compliance.

Friday, August 2, 2024

Vendor Prepayments in Dynamics 365 Finance & Operations


VENDOR PREPAYMENTS IN DYNAMICS 365 FINANCE AND OPERATIONS

CONTENT

Introduction
Vendor prepayment reasons
Vendor prepayment types in D365FO
Setup requirements for vendor prepayments
Demo
Conclusion

INTRODUCTION

A vendor prepayment is an advance payment made to a supplier before goods or services are received. In Dynamics 365 Finance & Operations (D365FO), vendor prepayment functionality enables businesses to streamline payment processes, mitigate financial risks, and maintain healthy relationships with suppliers.

In this article, we will explore the importance of vendor prepayments, review the necessary configurations within D365FO, and walk through a demonstration of how to process vendor prepayments. Finally, we will wrap up with some key takeaways and best practices.

Vendor Prepayments Reasons

There are several reasons why organizations utilize vendor prepayments:

  • Supplier Relationship Management: Making a prepayment can build trust with suppliers and improve relationships, especially with new vendors or during periods of high demand when suppliers may require upfront payments.
  • Risk Mitigation: Prepayments help mitigate financial risks, particularly when dealing with overseas suppliers or when a vendor has specific prepayment terms outlined in the contract.
  • Cash Flow Management: Some businesses opt for prepayments as a way to manage cash flow effectively, locking in pricing and securing essential goods or services before price changes or supply shortages occur.
  • Compliance and Contractual Requirements: Prepayments may be necessary to comply with certain contractual obligations or to meet industry-specific regulations.

By leveraging the prepayment functionality in D365FO, organizations can ensure smooth payment processing and maintain accurate financial records throughout the procurement cycle.

Vendor Prepayment Types in D365FO

Organizations can use advance payments (prepayments) in 2 different ways. 

  • Prepayment invoicing: This method creates a prepayment invoice that's associated with a purchase order. This method is easier for tracking prepayment sources/reasons. Prepayment invoices are frequently used in business transactions, where a vendor requests an advance deposit before fulfilling a purchase order. This is often the case for custom goods or services that require upfront payments. With the prepayment invoicing feature, you can specify a prepayment amount on the purchase order, record and process the prepayment invoice, and then apply this prepayment against the final invoice once it is issued.
  • Prepayments: This method creates prepayment journal vouchers by creating journal entries and marking them as prepayment journal vouchers. For this method, you can't track which prepayments to a vendor are made against which purchase orders. However, you can mark a posted prepayment for settlement against a purchase order. In several countries and regions, accounting standards require that prepayments made to vendors or received from customers are recorded in dedicated ledger accounts rather than the general customer or vendor accounts. These prepayments are initially posted to specific prepayment accounts. Once a sales order or purchase order is processed, and the invoice is issued, the payment is applied, reversing the prepayment entries. The invoice amounts are then automatically transferred to the standard customer or vendor summary accounts. 

Microsoft has has a detailed chart that compares these 2 methods:


This article focuses on prepayments process that is done from journal entries since it's more flexible.

Setup Requirements for Vendor Prepayments

A new prepayment posting profile: Since prepayment is a liability that needs to be tracked, it deserves having a separate account. The only way of reflecting this approach in D365FO is to create another posting profile for vendor prepayments.

Accounts payable >> Setup >> Accounts payable parameters

Go to Ledger and sales tax tab and select the prepayment posting profile in the 'Posting profile for payment journal with prepayment' field.


New Prepayment Journal Name: As a best practice, each type of transaction should have its own distinct journal name.

General ledger >> Journal setup >> Journal names

Everything is ready, let's make a prepayment now.

DEMO

Accounts payable >> Payments >> Vendor payment journal

Create a new header and select prepayment journal.


Go to the lines.

Select vendor, and populate the prepayment amount in the debit field.


Switch to payment tab.

Toggle the 'Prepayment journal voucher' parameter on. Note that the system automatically updates the 'Posting profile'.


When the journal is posted, generated voucher is as below.


Let's take a look at the vendor balance.
Accounts payable >> Vendors >> All vendors
Find the vendor and click on Balance button as shown below.


Please note that the vendor balance is currently positive due to the recorded prepayment. This reflects the advance payment made to the vendor before the receipt of goods or services.


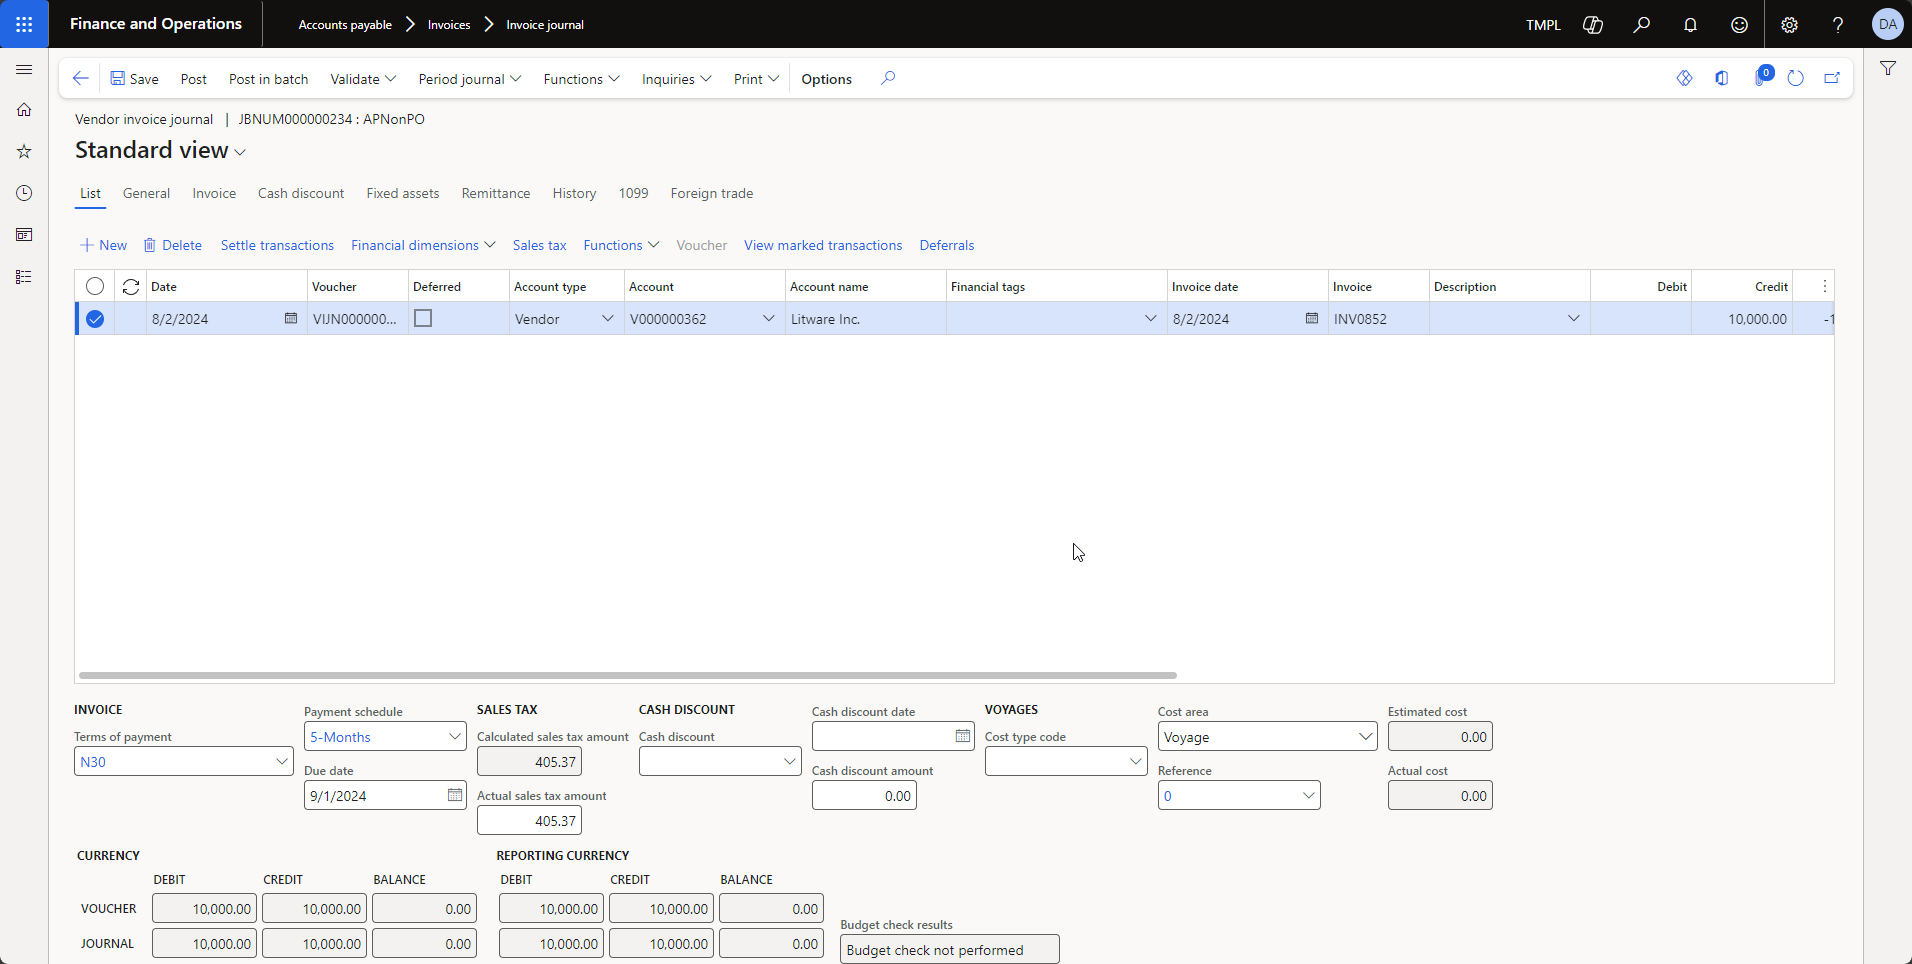
Let's assume that we got the invoice that is $10K from the vendor. It's now time to register vendor's real invoice.
Go to Accounts payable >> Invoices >> Invoice journal
Enter the header information and click on the lines.


Enter the line information such as vendor account, invoice date, invoice number and invoice amount.


Click on 'Settle transactions' as shown below.


Select the prepayment voucher.

Click OK.


Note that the system notifies you since the selected voucher is a prepayment.

Click on Yes.


On the journal line, the system notifies you that the selected voucher amount intended for settlement differs from the amount entered on the journal line. The system then prompts you to confirm whether you want to adjust the invoice amount.


Post the invoice journal now.


Click on the Voucher button.

Note that the amount is $10,000 as expected.


Let's take a quick look at the vendor's new balance.


Note that vendor's new balance is now $8,000 as expected.

Finally let's take a look at the vendor's transactions.


CONCLUSION

Vendor prepayments in D365FO offer an efficient way to manage advance payments and meet specific procurement needs. This article demonstrated how to configure the necessary setup for prepayments and provided a walkthrough of processing prepayments via journal entries. The system’s prepayment functionality ensures accurate accounting by tracking these payments separately and automating the settlement process against vendor invoices. By following these steps, users can maintain clear financial records, reduce reconciliation efforts, and handle prepayments in compliance with local accounting standards.

Sunday, July 14, 2024

Vendor Workflows – PART 2 – Vendor Bank Account Changes

VENDOR WORKFLOWS – PART 2 – VENDOR BANK ACCOUNT CHANGES

This article series explains how to use vendor workflows in Dynamics 365 Finance and Operations within the context of SOX (Sarbanes-Oxley Act) compliance. Specifically, it aims to educate the audience on the SOX requirement for tracking changes in critical vendor master data, including vendor and vendor bank account information, to ensure the integrity and accuracy of financial records.

The series is divided into two parts as follows:

PART 1 - Vendor changes

PART 2 - Vendor’s bank account creation/changes

You can read the PART 1 - Vendor changes here. Let's get started with PART 2 - Vendor bank account changes.

CONTENT

Importance of vendor workflows for SOX Compliance
Vendor workflow types in D365FO
Comprehensive workflow demo for vendor bank account changes
Conclusion

IMPORTANCE OF VENDOR WORKFLOWS FOR SOX COMPLIANCE

Ensuring SOX compliance requires strict tracking and approval processes for any changes in critical vendor master data. 

SOX (Sarbanes-Oxley) compliance requires vendor master data change tracking to ensure the integrity, accuracy, and reliability of financial reporting. Here are the key reasons why this is essential:

1. Accuracy of Financial Records: Vendor master data includes critical information such as vendor names, addresses, payment terms, and banking details. Accurate vendor data is crucial for maintaining correct financial records, which directly impact financial statements and reporting.

2. Prevention of Fraud: Change tracking helps in detecting unauthorized or fraudulent changes to vendor data. For example, unauthorized modifications to payment details can lead to fraudulent payments, which can significantly impact the company's financial integrity.

3. Internal Controls and Audits: SOX emphasizes strong internal controls over financial reporting. Tracking changes to vendor master data ensures that any modifications are logged, audited, and reviewed. This enables the identification of irregularities and ensures that only authorized personnel make changes.

4. Compliance with Legal and Regulatory Requirements: SOX compliance requires companies to maintain accurate records and provide evidence of internal controls over financial processes. Change tracking of vendor data provides an audit trail that can be reviewed by internal and external auditors to ensure compliance.

5. Risk Management: By tracking changes to vendor data, companies can identify potential risks early. For instance, if there are frequent or unusual changes to vendor information, it may indicate potential issues that need to be addressed to mitigate risk.

6. Transparency and Accountability: Change tracking promotes transparency and accountability within the organization. Employees are aware that any changes they make to vendor data are recorded and can be traced back to them, which encourages responsible behavior and adherence to policies.

Overall, vendor master data change tracking is a vital component of SOX compliance, helping to ensure that financial data is accurate, secure, and reliable, thereby supporting the overall objective of enhancing corporate governance and protecting investors.

VENDOR WORKFLOW TYPES IN D365FO

When specific form fields are updated, the system generates a change proposal. The user then submits this through the workflow. Upon approval, the changes are automatically applied, requiring no additional action.


Workflows are triggered only when users update certain fields. In other words, workflows are not triggered by any type of update but only when one of the predefined field values is changed. Therefore, the fields subject to the approval process are limited as below.


Vendor’s Bank Account Creation/Changes Workflow

Go to Accounts payable >> Setup >> Accounts payable parameters >> Vendor bank account approval fast tab.

  • Activate vendor Bank account approval on creation. (Optional)
  • Activate vendor Bank account approval on update. (Optional)
  • Activate vendor Bank account approval on update via data entity. (Optional)

Select the fields that are subject to approval.

Next is actual workflow configuration.

Go to Accounts payable >> Setup >> Accounts payable workflows

Configure an approval workflow.

Note: Actual workflow configuration is not part of this article series. 


You can see a fully configured and activated vendor bank account changes workflow below.


Vendor Changes Workflow

Go to Accounts payable >> Setup >> Accounts payable parameters >> Vendor approval fast tab

  • Activate vendor approval process.
  • Activate vendor approval on update via data entity. (Optional)

Select the fields that are subject to approval.

Note: Vendor won’t be subject to approval process on creation.

Next is actual workflow configuration.

Go to Accounts payable >> Setup >> Accounts payable workflows

Configure an approval workflow.

Note: Vendor changes workflow has been detailed in PART 1.

COMPREHENSIVE WORKFLOW DEMO FOR VENDOR BANK ACCOUNT CREATION/CHANGES

Prerequisites: Make sure that vendor bank account creation/changes workflow parameters are active, and fields are selected on AP parameters.


Select a vendor and go to selected vendor's Set up field group >> Click on Bank accounts.


Start creating a new bank account for the vendor.

Note that system automatically indicates that workflow approval won’t be a useful feature until a new bank account for the vendor is created.

Note that bank account fields that will trigger the approval process has additional labels as "(requires  approval)".

Submit the workflow.


Note that created bank account will not useable until it's approved.

If you are one of the approvers, go to Home page and review Work items assigned to me
Click on Vendor bank accounts: Review.

Review pending approvals.
Click on hyperlink of approval ID in order to see the original document to be approved.

Next action is to approve the workflow. 
Click on Workflow >> Approve.

When the workflow approval process is completed, bank account's review status becomes Approved.

Making a Change On The Existing Bank Account

When vendor parameters indicate that selected fields are subject to the approval process on updates, making a change to at least one of these selected bank account fields triggers a new workflow. 

Let's change account number from 0701244 to 0804123.

System immediately captures this change and notifies the user. Click on Close.

Submit the workflow again.

Note that Review status is now Approved, changes not submitted. That means that 
  • bank account was initially approved 
  • but then a change was made 
  • but workflow hasn't been submitted yet.
Review status becomes Approved, pending changes upon workflow submission.

Next step is to approve workflow. If you are one of the approvers, you will see pending approval task on your Home page as below.

Click on the desired workflow item's ID hyperlink.

System will show you the document that is subject to approval.
Click on Proposed changes to see requested changes. 

Review the changes, approve the workflow.

Vendor bank account's status becomes Approved upon the completion of workflow approval process. 

Updated bank account is now ready to be used again. In other words, vendor's bank account look up now shows updated bank account information.

Conclusion
Implementing vendor workflows in Dynamics 365 Finance and Operations is critical for ensuring SOX (Sarbanes-Oxley Act) compliance, focusing on tracking changes in vendor master data and bank account information. These workflows enhance the accuracy and integrity of financial records, prevent fraudulent activities, and maintain strong internal controls. By automating the approval process for vendor changes and bank account updates, organizations can ensure regulatory compliance, promote transparency, and mitigate risks. This approach strengthens corporate governance and protects the reliability of financial reporting, thereby safeguarding investors' interests.

Understanding Telemetry Pricing for Dynamics 365 Finance & Operations (D365FO)

UNDERSTANDING TELEMETRY PRICING FOR DYNAMICS 365 FINANCE AND OPERATIONS (D365FO) CONTENT Introduction D365FO Telemetry Capabilities Key Pric...