Showing posts with label SecurityRoles. Show all posts

Saturday, May 31, 2025

Excel (Add-in) Data Entity Identification for Security Purposes in Dynamics 365 Finance and Operations (D365FO)


EXCEL (ADD-IN) DATA ENTITY IDENTIFICATION FOR SECURITY PURPOSES IN DYNAMICS 365 FINANCE AND OPERATIONS (D365FO)

CONTENT

Introduction
Understanding the Two Types of Data Entities
Why You Need Excel Entity Names in Security Roles
How to Identify the Correct Excel Data Entity Name
Most Common Excel Add-in Data Entities
Conclusion

INTRODUCTION

In Dynamics 365 Finance and Operations (D365FO), Excel Add-in integrations are frequently used by business users to update journal data efficiently. However, granting access to Excel-based data entities requires precise identification of entity names, because they are different than data management entities. This article explains the distinction between standard data entities and Excel Add-in (Office integration) data entities, and provides a structured approach for identifying the correct entity names needed when configuring security roles.

UNDERSTANDING THE TWO TYPES OF DATA ENTITIES

There are two primary types of data entities in D365FO. Although they both enable access to system data, they are used in different contexts and have distinct characteristics:

1. Data Entity (Used in Data Management Projects)

  • Purpose: Primarily used for data import/export, data migration, system integrations, and data projects in the Data Management Workspace.
  • Accessed via: Data Management Framework (DMF) or Integration APIs.
  • Characteristics:
    • Supports staging tables and data validation.
    • Can handle large volumes of data.
    • Often includes all required fields for complete record creation.
    • Suitable for IT and system administrators.

2. Excel Data Entity (Used in Excel Add-in)

  • Purpose: Designed for end users (e.g., accountants, planners) to update or manage transactional data directly in Excel, like journal lines, forecast lines, budget register entries, etc.
  • Accessed via: “Open in Excel” button on D365FO forms or from Excel using the Excel Add-in.
  • Characteristics:
    • Easy-to-use interface with filtering and lookup capabilities.
    • Often shows only a subset of fields relevant to day-to-day operations.
    • Real-time read/write interaction with D365FO.
    • Security-aware (only shows what the user has permission to access).

⚠️ Note: Not every data entity is exposed for Excel; only entities designed for Office integration are surfaced in Excel Add-ins. That’s why they have different names.

Example for Comparison: The data entity used in Data Management is not the same as the one used for the journal line Excel Add-in. Confusing these can result in incomplete security configurations.

Functional Name: Purchase trade agreement journal lines

  • Data entity name: Open purchase price journal lines V2
  • Excel data entity name: PurchOpenPurchasePriceJournalLineV2Entity


WHY YOU NEED EXCEL ENTITY NAMES IN SECURITY ROLES

When assigning permissions, especially for users expected to use Excel integrations, identifying the correct Excel data entity name is critical. Without it, users may have access to the journal forms but will not see the "Open in Excel" button.

Common use cases that require Excel Add-in access:

  • General Ledger (GL) Journal Lines
  • Inventory Counting Journal Lines
  • Trade Agreement Journal Lines
  • Vendor Invoice Journal Lines

This method is widely used to update journal lines in bulk. However, if the security role doesn’t include the specific Excel entity, the integration features will be hidden or restricted.

HOW TO IDENTIFY THE CORRECT EXCEL DATA ENTITY NAME

In D365FO, identifying the correct Excel Add-in data entity is necessary when configuring security roles, especially if users rely on the “Open in Excel” feature. The entity name used for the Excel integration is not always obvious, and often differs from the one used in Data Management. This section outlines practical steps for identifying the exact data entity tied to the Excel Add-in, ensuring users are granted appropriate access without over-provisioning.

OPTION 1: The Excel Template Name

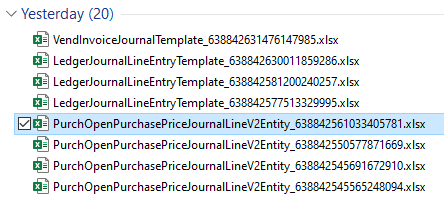
Most of the time, the downloaded Excel template's file name includes the entity name.


OPTION 2: The Excel Template Designer

In D365FO, navigate to Procurement and sourcing >> Prices and discounts >> Trade agreement journals.

Select a journal with Relation: Price (purch.) and click lines.

Click Open in Microsoft Office and choose the relevant data entity.


System downloads the excel template.

Open the downloaded template and click design in the Excel Add-in.


Click + Add table or + Add fields.


Select data entity source field will reveal the actual source data entity.


This field shows you the exact data entity name, not the excel data entity name.


This helps identify the standard entity used in the integration, which can then be translated to the Excel entity name. Once you know the data entity name, apply the following pattern:

[Module prefix] + [Entity name] + "Entity"

Module prefix: e.g., Invent, Purch, Sales, Ledger

Entity name: As retrieved from the template

Example: 

If the source entity is OpenPurchasePriceJournalLineV2 then

the Excel entity would be PurchOpenPurchasePriceJournalLineV2Entity as shown below


Special Case: Multiple Entities in One Template

In some cases, the Excel template contains multiple excel data entities. You may need to do some investigation to identify the name of the secondary entity—for example, in general ledger journal lines.

Navigate to General ledger >> Journal entries >> General journals.

Click Open in Microsoft Office and choose the relevant data entity.


System downloads the excel template.

Open the downloaded template and click design in the Excel Add-in.


Note that you are seeing two data entities, unlike the usual view. So both entities should be accessible by the same security role.

⚠️ Note: Another way to identify the presence of multiple data entities is by checking the downloaded Excel file name. If it ends with "Template," it indicates that multiple entities are included.

Click + Add table or + Add fields.


Select data entity source field will reveal the actual source data entity.


This field shows you the exact data entity name, not the excel data entity name.


Now you can apply the below formula and identify exact required excel data entity name for your security configuration.

[Module prefix] + [Entity name] + "Entity" = LedgerLedgerJournalLineEntity (No need to use 'Ledger' two times)

If you grant access to excel data entity LedgerJournalLineEntity, user can use export to excel add-in feature.


MOST COMMON EXCEL ADD-IN DATA ENTITIES

Here are the most frequently used Excel data entities, especially in journal-heavy environments:

  • General Ledger (GL) Journal Lines: Requires access to both header and line entities
  • Inventory Counting Journal Lines: Only one entity is required
  • Trade Agreement Journal Lines: Different entities may be activated depending on the price type
  • Vendor Invoice Journal Lines: Requires access to both header and line entities

CONCLUSION

Identifying the correct Excel Add-in data entity name is essential when configuring security roles in D365FO. Without it, even experienced users might be blocked from using the Excel integration features they rely on for daily operations. Use the methods outlined above—especially downloading templates and checking the entity structure—to accurately assign permissions. As always, keep in mind that Excel Add-in entities are security-aware, so careful role configuration ensures both usability and compliance with least privilege principles.

Monday, April 7, 2025

User & Security Role Assignments via Data Management in Dynamics 365 Finance and Operations


USER & SECURITY ROLE ASSINGMENTS VIA DATA MANAGEMENT IN DYNAMICS 365 FINANCE AND OPERATIONS

CONTENT

Introduction
The challenge of scale
Why use data management?
Demo
Conclusion

INTRODUCTION

Role assignment can be a cumbersome and time-consuming process in Dynamics 365 Finance and Operations (D365FO). Identifying the appropriate future-state security roles for business users, and then ensuring those roles are correctly assigned, often involves multiple teams and a deep understanding of both business processes and security architecture. Without a structured approach, this can easily become an overwhelming task—especially during large-scale implementations, reorganizations, or security clean-up efforts.

THE CHALLENGE OF SCALE

As the number of users in the system grows, so does the complexity of managing their security role assignments. In environments with hundreds—or even thousands—of users, manually assigning or updating roles becomes highly inefficient and error-prone. It's not just the volume of users that creates difficulty, but also the variety of roles and the need to reflect organizational changes quickly and accurately.

Keeping track of which users need which roles, ensuring Segregation of Duties (SoD) compliance, and maintaining consistent role structures across business units requires a scalable solution. Relying solely on the user interface to manage role assignments simply doesn't scale well.

WHY USE DATA MANAGEMENT?

Fortunately, D365FO provides a powerful alternative through its Data Management workspace. This workspace enables administrators to manage user and security role assignments in bulk using import/export functionality. It offers a faster, more consistent way to perform updates, which is critical for both initial setup and ongoing maintenance.

The process involves a few key steps:

Prepare the Data File: Create an Excel or CSV file that includes the required fields—typically the user ID and the associated security role(s). This document serves as your template for import.

1. Upload Through Data Management: Use the "Security user role" entity within the Data Management workspace to upload the prepared file. The system processes the file and assigns roles to users based on the contents.

2. It's a time consuming process. There has to be an easy way to upload user & role assignments. Data management workspace is an excellent fit for that. First, a user & security role assignment file has to be prepared. Next step, Prepared document should be uploaded into D365FO.

This method is not only fast but also offers flexibility. For example, you can choose to delete existing role assignments before importing new ones, which is helpful during role restructuring or system refreshes. It also helps reduce manual errors and increases consistency, especially when dealing with repeatable processes or multiple environments (such as test, UAT, and production).

Benefits

  • Efficiency: Assign roles to hundreds of users in a matter of minutes.
  • Consistency: Reduce the risk of manual entry errors.
  • Scalability: Easily handle role assignments in growing or dynamic organizations.
  • Clean-Up Support: Replace outdated role assignments with updated ones using delete and import options.
  • Audit Readiness: Maintain traceable and auditable documentation of role changes through import files.

By leveraging the Data Management workspace, organizations can dramatically simplify and accelerate the user role assignment process, making it a sustainable part of their overall security management strategy in D365FO.

DEMO

Intro sentence here.

1. Preparing Guide File

Navigate to Data Management workspace.

System administration >> Workspaces >> Data management.


Create a new export project and use data entity Security user role association.

Select Excel as the source data format.


Click Export.

Find the project in the job history.

Click Execution details.

Once the export job completes, locate the project in Job history, click on Execution details, and Download file.


Template contains the following columns:

  • USERID: D365FO user ID.
  • SECURITYROLEIDENTIFIER: Security role system name.
  • ASSIGNMENTMODE: Manual or automatic role assignment indicator.
  • ASSIGNMENTSTATUS: Role assignment status. Disabled line disappears from the UI and role assignment is not active anymore.
  • SECURITYROLENAME: The actual role name.

2. Preparing Import File

Update the downloaded file with the future-state user and security role assignments.

Key considerations:

  • Don't forget to include service accounts.
  • Don't forget to include system administrators.
  • Ensure each role assignment is a separate line for every user.

3. Importing User & Security Role Assignment File

Return to the Data Management workspace and create a new Import project.

Again, select the entity Security user role association, and use Excel as the source data format.


Before importing:
Set Truncate entity data parameter to Yes. This removes previous role assignments.
Set Skip staging parameter to Yes for direct import without preview.


Click Import to proceed.


Once the job completes, new role assignments will be reflected in the system.

CONCLUSION

Managing user and role assignments at scale requires a structured and efficient approach, particularly in environments where accuracy and auditability are critical. Leveraging the Data Management workspace in D365FO provides a repeatable and auditable method for mass assigning or updating security roles. By exporting current assignments, preparing a controlled future-state file, and importing with the appropriate parameters, administrators can confidently maintain security alignment across environments. This approach minimizes manual input, reduces the potential for errors, and supports governance objectives tied to compliance.

Friday, January 17, 2025

Security Role Assignments in Dynamics 365 Finance and Operations


SECURITY ROLE ASSIGNMENTS IN DYNAMICS 365 FINANCE AND OPERATIONS

This article provides detailed information about the user security role assignment methods available in Dynamics 365 Finance and Operations. These methods are essential for managing user access and ensuring secure system operations.

Let's get started.

CONTENT

Introduction
Role assignment levels
Role assignment methods - auto
Role assignment methods - manual
Demo
Conclusion

INTRODUCTION

Role assignments can be automated through query-based rules or handled manually using data management tools or direct assignments at various levels, including global, organizational hierarchy, and company-specific scopes.

By exploring these methods, you can gain a better understanding of how to effectively manage security roles to align with organizational policies and compliance requirements.

Let’s explore these details. 

In Microsoft Dynamics AX and Dynamics 365 Finance and Operations (D365FO), security roles are always assigned to users, as every user has a different function in maintaining a Segregation of Duties (SOD)-compliant environment. This critical function underlines why security roles are often referred to as role-based security roles, emphasizing their alignment with user responsibilities and access needs.

ROLE ASSIGNMENT LEVELS

Security roles can be assigned to users manually at different levels, depending on the scope of their responsibilities and the organization's structure.

Global

At the global level, role assignments apply across all legal entities in the system. This method is straightforward and requires minimal maintenance. Once a user is assigned to a role globally, they gain access to all legal entities within Dynamics 365 Finance and Operations (D365FO) permitted by their role. Users can seamlessly navigate and interact across all entities, as long as their assigned role grants the necessary permissions.

Organization Hierarchy

This level of assignment is ideal for environments with many legal entities, as it leverages the organizational hierarchy to streamline role management. By assigning a user to a role at a higher node within the hierarchy (e.g., a main branch), the role is automatically inherited by all subordinate nodes. This approach significantly reduces administrative effort while ensuring consistency across organizational levels.

Company

At the company level, role assignments are specific to individual legal entities. This allows for precise control over user permissions within a particular entity but comes with a higher maintenance overhead. This method is beneficial when users require distinct roles or access restrictions tailored to specific legal entities.

ROLE ASSIGNMENT METHODS - AUTO

This feature uses query-based rules to automatically assign security roles to users based on specific criteria.

Navigate to System administration >> Security >> Assign users to roles


The screen is used for both automatic and manual security role assignments for users. Let's talk about automatic role assignments first.

Click Add rules.


This blog serves as a trusted resource and provides additional information on various topics. In line with this purpose, please find the query details listed below:

FMDynamicRoleAssignmentWorkerPosition

  • Purpose: Assigns roles to users based on their worker position.
  • Primary Table Used: HcmPosition and related worker position records in HcmWorker.
  • Use Case: Automatically assign a specific role to users in a defined position (e.g., HR Manager, Procurement Specialist).

FMDynamicRoleAssignmentWorkerTitle

  • Purpose: Assigns roles to users based on their worker title.
  • Primary Table Used: HcmTitle and HcmWorker.
  • Use Case: Automatically assign roles based on titles such as "Senior Accountant" or "Operations Manager" to enforce position-based security.

LedgerJournalPostControl

  • Purpose: Assigns roles to users responsible for posting ledger journals.
  • Primary Table Used: LedgerJournalTable and related configurations.
  • Use Case: Ensures users who are part of a posting process receive appropriate permissions, like "Ledger Clerk" or "General Accountant."

Select All Users

  • Purpose: A query that selects all users in the system.
  • Primary Table Used: SysUserInfo.
  • Use Case: Assigns roles universally to every user in the system, often used for roles like "Employee Self-Service" where access is granted to all employees.

SysUserInfoDataset

  • Purpose: Provides user information for queries.
  • Primary Table Used: UserInfo.
  • Use Case: Assign roles based on specific user attributes, such as email, user ID, or company association.

SysUserSecurity

  • Purpose: Assigns roles based on existing user security setup.
  • Primary Table Used: UserInfo or similar security configuration tables.
  • Use Case: Dynamically assign roles based on users' existing security roles or privileges.

TrvExpMobileMasterDataQuery

  • Purpose: Assigns roles to users based on travel and expense management data.
  • Primary Table Used: TrvExpTable or related travel and expense data tables.
  • Use Case: Automatically assign roles like "Expense Approver" or "Expense Submitter" for users involved in expense workflows.

UserInfoPartitions

  • Purpose: Assigns roles to users based on their data partition association.
  • Primary Table Used: UserInfo and partition configurations.
  • Use Case: Helps manage access across partitions in multi-tenant environments by assigning roles specific to a data partition.

VendVendorPortalUsers

  • Purpose: Assigns roles to vendor portal users.
  • Primary Table Used: VendUserSetup or VendTable for vendor records.
  • Use Case: Automatically grants roles like "Vendor Portal User" or "Vendor Approver" to users associated with vendor accounts.

ROLE ASSIGNMENT METHODS - MANUAL

Security roles can be manually assigned to users using two different ways.

  • Data management
  • Manual assignment 

Data management: Data management method gives you ability to import user & role assignments in bulk. This approach allows  for assigning roles to users at all levels, including global, organizational hierarchy, and company levels.

Manual assignment: This is the most commonly used method for assigning security roles. You can navigate to the specific user record and assign a security role directly at all levels (global, organizational hierarchy, and company levels).

Now, let's discuss the combination of role assignment levels and role assignment methods.

DEMO: User & Security role assignment at organizational hierarchy level - Manual assignment

The following example demonstrates how to a assign security role at the organizational hierarchy level.


Navigate to System administration >> Users >> Users and select a user and assign a role to the user.


The next step is to assign this role to an organizational hierarchy.


Highlight the role and click Assign organizations.


This screen shows that current selection is valid for all legal entities. 


Click 'Grant access to specific organizations individually' to assign access to a specific legal entity or an organization hierarchy. 


This selection gives you two options in the Select organization hierarchy field:

(All legal entities): If this option is selected, the role chosen on the previous screen can be assigned to specific legal entities here. There is no need to select an organization hierarchy. Simply select the legal entity or entities where the role will apply.


  • (All legal entities): If this option is selected, the role chosen on the previous screen can be assigned to specific legal entities here. There is no need to select an organization hierarchy. Simply select the legal entity or entities where the role will apply.
  • The list of Organization hierarchies. In our case, there is only one: Security hierarchy.

Select the organization hierarchy that is Security hierarchy.


Note that 'Available organization nodes' now shows selected hierarchy's components.

Select the main Retail node, Contoso Retail and click Grant.


The role assignment should have been valid only for Contoso Retail GLRT since I didn't select Grant with children.

Is that really the case?

Actually, it's not. The selected user was able to perform all (RSM) Accountant role duties in any of the retail companies.

I conducted further investigation and realized that selected hierarchy node, along with all its subordinate levels, had been assigned to the same role.


As result, it really doesn't matter whether you click Grant or Grant with children. The system will behave the same way: Assigning selected hierarchy node, along with all its subordinate levels.

CONCLUSION

Managing security roles in Dynamics 365 Finance and Operations doesn't have to be a complicated or time-consuming process. Among all the methods available, assigning roles at the organizational hierarchy level stands out for its efficiency. It not only saves a lot of time by automatically applying roles to all subordinate nodes but also makes ongoing maintenance much simpler. Instead of juggling multiple assignments at the company or global level, you can rely on the hierarchy to handle most of the heavy lifting.

Understanding Telemetry Pricing for Dynamics 365 Finance & Operations (D365FO)

UNDERSTANDING TELEMETRY PRICING FOR DYNAMICS 365 FINANCE AND OPERATIONS (D365FO) CONTENT Introduction D365FO Telemetry Capabilities Key Pric...