Showing posts with label Dynamics 365 Finance and Operations. Show all posts

Saturday, May 31, 2025

Excel (Add-in) Data Entity Identification for Security Purposes in Dynamics 365 Finance and Operations (D365FO)


EXCEL (ADD-IN) DATA ENTITY IDENTIFICATION FOR SECURITY PURPOSES IN DYNAMICS 365 FINANCE AND OPERATIONS (D365FO)

CONTENT

Introduction
Understanding the Two Types of Data Entities
Why You Need Excel Entity Names in Security Roles
How to Identify the Correct Excel Data Entity Name
Most Common Excel Add-in Data Entities
Conclusion

INTRODUCTION

In Dynamics 365 Finance and Operations (D365FO), Excel Add-in integrations are frequently used by business users to update journal data efficiently. However, granting access to Excel-based data entities requires precise identification of entity names, because they are different than data management entities. This article explains the distinction between standard data entities and Excel Add-in (Office integration) data entities, and provides a structured approach for identifying the correct entity names needed when configuring security roles.

UNDERSTANDING THE TWO TYPES OF DATA ENTITIES

There are two primary types of data entities in D365FO. Although they both enable access to system data, they are used in different contexts and have distinct characteristics:

1. Data Entity (Used in Data Management Projects)

  • Purpose: Primarily used for data import/export, data migration, system integrations, and data projects in the Data Management Workspace.
  • Accessed via: Data Management Framework (DMF) or Integration APIs.
  • Characteristics:
    • Supports staging tables and data validation.
    • Can handle large volumes of data.
    • Often includes all required fields for complete record creation.
    • Suitable for IT and system administrators.

2. Excel Data Entity (Used in Excel Add-in)

  • Purpose: Designed for end users (e.g., accountants, planners) to update or manage transactional data directly in Excel, like journal lines, forecast lines, budget register entries, etc.
  • Accessed via: “Open in Excel” button on D365FO forms or from Excel using the Excel Add-in.
  • Characteristics:
    • Easy-to-use interface with filtering and lookup capabilities.
    • Often shows only a subset of fields relevant to day-to-day operations.
    • Real-time read/write interaction with D365FO.
    • Security-aware (only shows what the user has permission to access).

⚠️ Note: Not every data entity is exposed for Excel; only entities designed for Office integration are surfaced in Excel Add-ins. That’s why they have different names.

Example for Comparison: The data entity used in Data Management is not the same as the one used for the journal line Excel Add-in. Confusing these can result in incomplete security configurations.

Functional Name: Purchase trade agreement journal lines

  • Data entity name: Open purchase price journal lines V2
  • Excel data entity name: PurchOpenPurchasePriceJournalLineV2Entity


WHY YOU NEED EXCEL ENTITY NAMES IN SECURITY ROLES

When assigning permissions, especially for users expected to use Excel integrations, identifying the correct Excel data entity name is critical. Without it, users may have access to the journal forms but will not see the "Open in Excel" button.

Common use cases that require Excel Add-in access:

  • General Ledger (GL) Journal Lines
  • Inventory Counting Journal Lines
  • Trade Agreement Journal Lines
  • Vendor Invoice Journal Lines

This method is widely used to update journal lines in bulk. However, if the security role doesn’t include the specific Excel entity, the integration features will be hidden or restricted.

HOW TO IDENTIFY THE CORRECT EXCEL DATA ENTITY NAME

In D365FO, identifying the correct Excel Add-in data entity is necessary when configuring security roles, especially if users rely on the “Open in Excel” feature. The entity name used for the Excel integration is not always obvious, and often differs from the one used in Data Management. This section outlines practical steps for identifying the exact data entity tied to the Excel Add-in, ensuring users are granted appropriate access without over-provisioning.

OPTION 1: The Excel Template Name

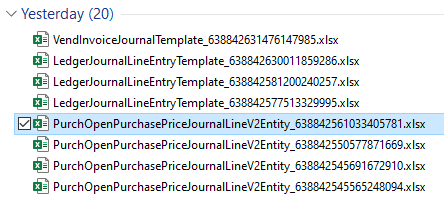
Most of the time, the downloaded Excel template's file name includes the entity name.


OPTION 2: The Excel Template Designer

In D365FO, navigate to Procurement and sourcing >> Prices and discounts >> Trade agreement journals.

Select a journal with Relation: Price (purch.) and click lines.

Click Open in Microsoft Office and choose the relevant data entity.


System downloads the excel template.

Open the downloaded template and click design in the Excel Add-in.


Click + Add table or + Add fields.


Select data entity source field will reveal the actual source data entity.


This field shows you the exact data entity name, not the excel data entity name.


This helps identify the standard entity used in the integration, which can then be translated to the Excel entity name. Once you know the data entity name, apply the following pattern:

[Module prefix] + [Entity name] + "Entity"

Module prefix: e.g., Invent, Purch, Sales, Ledger

Entity name: As retrieved from the template

Example: 

If the source entity is OpenPurchasePriceJournalLineV2 then

the Excel entity would be PurchOpenPurchasePriceJournalLineV2Entity as shown below


Special Case: Multiple Entities in One Template

In some cases, the Excel template contains multiple excel data entities. You may need to do some investigation to identify the name of the secondary entity—for example, in general ledger journal lines.

Navigate to General ledger >> Journal entries >> General journals.

Click Open in Microsoft Office and choose the relevant data entity.


System downloads the excel template.

Open the downloaded template and click design in the Excel Add-in.


Note that you are seeing two data entities, unlike the usual view. So both entities should be accessible by the same security role.

⚠️ Note: Another way to identify the presence of multiple data entities is by checking the downloaded Excel file name. If it ends with "Template," it indicates that multiple entities are included.

Click + Add table or + Add fields.


Select data entity source field will reveal the actual source data entity.


This field shows you the exact data entity name, not the excel data entity name.


Now you can apply the below formula and identify exact required excel data entity name for your security configuration.

[Module prefix] + [Entity name] + "Entity" = LedgerLedgerJournalLineEntity (No need to use 'Ledger' two times)

If you grant access to excel data entity LedgerJournalLineEntity, user can use export to excel add-in feature.


MOST COMMON EXCEL ADD-IN DATA ENTITIES

Here are the most frequently used Excel data entities, especially in journal-heavy environments:

  • General Ledger (GL) Journal Lines: Requires access to both header and line entities
  • Inventory Counting Journal Lines: Only one entity is required
  • Trade Agreement Journal Lines: Different entities may be activated depending on the price type
  • Vendor Invoice Journal Lines: Requires access to both header and line entities

CONCLUSION

Identifying the correct Excel Add-in data entity name is essential when configuring security roles in D365FO. Without it, even experienced users might be blocked from using the Excel integration features they rely on for daily operations. Use the methods outlined above—especially downloading templates and checking the entity structure—to accurately assign permissions. As always, keep in mind that Excel Add-in entities are security-aware, so careful role configuration ensures both usability and compliance with least privilege principles.

Monday, February 17, 2025

Optimizing Financial Operations with Microsoft 365 Copilot for Finance in Excel


OPTIMIZING FINANCIAL OPERATIONS WITH MICROSOFT 365 COPILOT FOR FINANCE IN EXCEL

CONTENT

Introduction
Microsoft 365 Copilot for Finance: Key components
Customer Reconciliation with Microsoft 365 Copilot for Finance in Excel
Conclusion

INTRODUCTION

As organizations strive for greater efficiency in financial operations, AI-driven capabilities play a key role in enhancing decision-making and reducing manual effort. Microsoft 365 Copilot for Finance extends AI into ERP systems, enabling finance teams to streamline workflows and improve data accuracy.

This article focuses on Microsoft 365 Copilot for Finance in Excel, highlighting its role in automating data reconciliation, generating reports, and providing actionable insights. Building on the previous discussion of vendor reconciliation, this article broadens the scope to cover data reconciliation from a more comprehensive perspective.

Let's get started.

MICROSOFT 365 COPILOT FOR FINANCE: KEY COMPONENTS

Microsoft 365 Copilot for Finance consists of two key components:

  • Microsoft 365 Copilot for Finance in Excel – Designed to automate financial data reconciliation and generate reports with insights.
  • Microsoft 365 Copilot for Finance in Outlook – Enhances email-based financial processes (covered in a separate article).

Using these features requires a Copilot license and Copilot Finance Agent setup.

By integrating with ERP systems, Copilot for Finance Agent helps finance teams make informed decisions faster while minimizing manual effort. Embedded within everyday productivity tools, it enhances efficiency by automating routine tasks and delivering AI-driven insights where they are needed most.

The primary use case explored in this article is customer reconciliation using the data reconciliation feature of the Copilot Finance Agent. This capability automates data comparison, identifies discrepancies, and generates reports for streamlined financial analysis.


MICROSOFT 365 COPILOT FOR FINANCE IN EXCEL INSTALLATION

Navigate to the Dynamics 365 Finance homepage and select Copilot for Finance (Preview).


Choose Install Microsoft 365 Copilot for Finance (Preview) in Excel.


Click Get it now to initiate the installation.


Once installed, Copilot for Finance (Preview) will be available in Excel.


DATA RECONCILIATION PROCESS

Microsoft 365 Copilot for Finance in Excel simplifies financial reconciliation through below flow:

  • Export relevant financial data
  • Combine relevant exported data
  • Auto categorize and align data
  • Review and adjust column assignments
  • Generate data reconciliation report
  • Investigate discrepancies

CUSTOMER RECONCILIATION WITH MICROSOFT 365 COPILOT FOR FINANCE IN EXCEL

Customer reconciliation ensures that transactions recorded in subledger align with ledger transactions. This is an internal reconciliation. Microsoft 365 Copilot for Finance in Excel streamlines this process by automating data comparison, identifying discrepancies, and generating reconciliation reports with minimal manual effort.

This section demonstrates how to perform customer reconciliation using the data reconciliation feature of Copilot for Finance in Excel.

Step 1: Exporting Customer-Related Financial Data

To begin, export the necessary financial data from Dynamics 365 Finance. Two key datasets are required:

  • Customer Posting Profile Transactions
  • Customer Transactions

Let's export the relevant financial data.

Extracting Customer Posting Profile Transactions

Navigate to General ledger >> Inquiries and reports >> Voucher transactions.

Enter the account numbers related to customer posting profiles and specify a date range.

Review the filtered results and export all rows.

Download the excel file.

Rename the worksheet as Voucher Transactions.

Extracting Customer Transactions

Second relevant data is customer transactions. 

Navigate to D365FO table browser and find CustTrans table and filter customer transactions the specified date range.

Review the filtered data and export all rows.

Download the Excel file.

Rename the worksheet as CustTrans.

Step 2: Combining Data in Excel

Once both datasets are extracted, combine them into a single workbook.

Open the Excel file containing Voucher Transactions

Insert the CustTrans worksheet into the same workbook

Ensure that both datasets are structured properly before proceeding with reconciliation

Step 3: Running Data Reconciliation with Copilot for Finance in Excel

Next section is about the Copilot for Finance in Excel.

Click the Copilot for Finance (Preview) icon in Excel.

Select Reconcile data.

The system will automatically recognize the first worksheet (Voucher Transactions).

Click + Add to include the second dataset (CustTrans).

Select CustTrans worksheet.

Review the auto generated column mappings and ensure correctness.

Click Keep to confirm the mappings.

Step 4: Executing Reconciliation Analysis

Click reconcile data to initiate the analysis.

Copilot for Finance will compare transactions, highlight discrepancies (if any), and generate a structured reconciliation report. If no differences are detected, the system confirms that all customer transactions are aligned with financial records.

Expand the Insights section to review additional analysis details and ensure financial data integrity.

CONCLUSION

Automation reduces manual reconciliation efforts, allowing finance teams to focus on exception handling rather than routine data comparison. AI-driven analysis enhances accuracy, ensuring that financial records align with customer balances. Streamlined reporting improves audit readiness, providing clear visibility into transaction consistency.

By leveraging Microsoft 365 Copilot for Finance in Excel, organizations can enhance the efficiency, accuracy, and reliability of customer reconciliation, strengthening financial governance and compliance. 

Full account reconciliation along with insights will be possible in the near future via Account reconciliation agent workspace that will be released very soon.

Monday, December 9, 2024

Performing Segregation of Duties (SOD) Risk Analysis in Dynamics 365 Finance and Operations (D365FO) - PART 2: Using RSM's Power App (GRC Guardian)


PERFORMING SEGREGATION OF DUTIES (SOD) RISK ANALYSIS IN DYNAMICS 365 FINANCE AND OPERATIONS (D365FO)

CONTENT

Introduction
Solution Components of GRC Guardian for SOD Risk Analysis
Configuring GRC Guardian for SOD Risk Analysis
Detecting and Analyzing SOD Violations with GRC Guardian
Summary and Insights

This article series explains how to perform a Segregation of Duties (SOD) analysis using 3 different tools for Dynamics 365 Finance and Operations. The purpose is to provide various options. The entire series will consist of 3 parts, as follows:

Performing Segregation of Duties (SOD) Risk Analysis in Dynamics 365 Finance and Operations (D365FO)

PART 2: Using RSM's Power App (GRC Guardian)
PART 3: Using Fastpath

Let's get started with PART 2.

Introduction

In PART 1 of this series, we introduced the concepts of segregation of duties (SOD) risk analysis and demonstrated how to perform it using Dynamics 365 Finance and Operations (D365FO) out-of-box features. In this article, we shift our focus to RSM’s proprietary Power App, GRC Guardian, a managed service that simplifies SOD risk analysis. As part of RSM’s intellectual property, GRC Guardian enables organizations to efficiently assess and address SOD risks after a brief analysis session to identify applicable rules. My role as a consultant on Dynamics 365 Finance and Operations implementations has provided valuable insights into utilizing this innovative tool for effective risk management.

RSM's GRC Guardian is a custom application designed to assess and evaluate security risks across platforms such as Dynamics 365, SAP, Oracle, and NetSuite. It provides actionable insights to identify potential vulnerabilities in application security roles and user access efficiently.

The Power App is built with a persona-based architecture to restrict access at the ERP client and project levels. Leveraging Microsoft Azure Active Directory for authentication and access control, the application ensures robust data privacy and protection, allowing only authorized RSM employees to access specific modules.

Solution Components of GRC Guardian for SOD risk analysis

In RSM's Power App, GRC Guardian, Segregation of Duties (SOD) revolves around security extraction (objects, privileges, duties, and roles), RSM's industry best-practice SOD ruleset, and technical mapping that links security objects to business activities—a fundamental concept within the app's framework. The SOD ruleset and technical mapping are customizable, with the results seamlessly integrated into GRC Guardian. Below are the key solution components of RSM's GRC Guardian tool:

Security Roles, duties, and privileges

Security roles are the top-level entities in D365FO's security model, grouping duties and privileges necessary for specific business tasks. Roles like "Accounts Payable Manager" or "Inventory Clerk" ensure users have access only to features relevant to their job functions.

Duties represent collections of related privileges tied to specific responsibilities, such as approving invoices, processing payments, or creating purchase orders.

Privileges, the most granular access definitions in the security hierarchy, control access to individual forms, menu items, or actions within the application. By combining privileges into duties, D365FO implements a layered approach to access control. This structure is critical for managing SOD conflicts, as risks often arise when users are assigned conflicting privileges.


Segregation of Duty Rules

SOD rules specify which combinations of business activities are considered incompatible and must not be assigned to the same user. For example:

Conflict Example: If a user is assigned both "Create or change vendor master records" and "Vendor invoice entry/registration" business activities, they could create fictitious vendors, alter vendor details (e.g., name or address), and initiate unauthorized payments to those vendors.

The list of these conflicts forms the Segregation of Duties (SOD) Framework, also known as the SOD ruleset.

Technical Mapping

Technical mapping is the process of teaching the Power App what "Create or change vendor master records" and "Vendor invoice entry/registration" are. This process, also known as Technical Security Modeling, is entirely customized and based on insights gathered during a brief interview.

Technical mapping encompasses forms, buttons, tables, and reports. It also incorporates components from the sensitive access framework, which will be discussed in another article. For example, the technical mapping of a form includes its display menu item, other menu items granting access to the same form, and critical buttons within the form.

This mapping must be completed for all business activities.

SOD Violations Detection and Analysis

The Power App includes an algorithm to detect SOD conflicts, helping administrators identify violations and ensure compliance with regulatory standards like SOX.

Conflict Resolution: D365FO provides workflows and configuration options to address conflicts, such as modifying security roles or distributing responsibilities among multiple users.

Mitigation / Remediation Tools: Workflows and ITACs

SOD enforcement in D365FO relies on workflows and additional parameters such as 3-way matching and posting profiles. These tools help organizations establish a secure environment that supports operational efficiency while ensuring compliance with internal and external regulations.

ITACs complement SOD enforcement by reinforcing security principles in Dynamics 365 Finance and Operations (D365FO). The risk analysis generated by GRC Guardian is reviewed, and mitigating or remediating ITACs are implemented to address identified risks.

Configuring GRC Guardian for SOD risk analysis

Security Role Access Extractions

GRC Guardian needs D365FO security roles to be extracted properly as illustrated below:

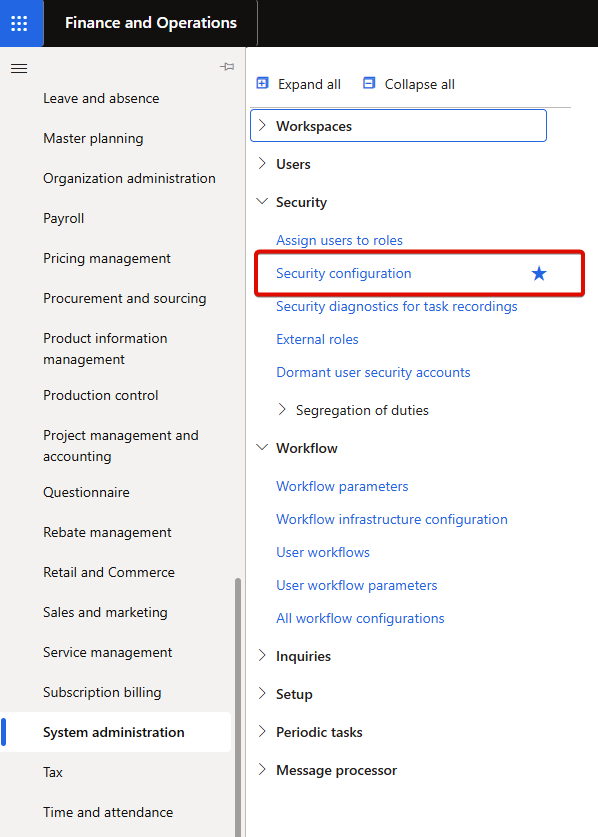
Go to System administrator >> Security >> Security configuration

Select the desired role and click Permissions.


All role permissions are listed.


Proceed with the security extraction by right-clicking any column header and selecting Export all rows.

The extracted user access data will appear as shown below.

This process must be repeated for all roles, and the resulting files should be consolidated. Once completed, all user access information will be available.

Security User Role Assignment Extractions

Next extraction is "user & security role assignments". Go to Data management workspace and create an export project that has Security user role association entity.

Run the project and extract the data.


Extracted document looks like as below:

As a result, all security role permissions, along with user and role assignments, are now prepared and available.

Segregation of Duties Framework

GRC Guardian enables the creation of a custom Segregation of Duties (SOD) framework, designed efficiently during a brief meeting. These rules define which combinations of business activities are incompatible and should not be assigned to the same user.

The identified conflicts collectively form the Segregation of Duties (SOD) framework, also referred to as the SOD ruleset.

Navigate to RSM GRC Guardian that is part of RSM’s extensive portfolio of digital solutions in RSM's Automation on Demand platform.


Select the relevant business processes (e.g., Purchase to Pay, Record to Report, Order to Cash) for SOD risk analysis.

Choose the RSM industry best-practice risk levels that will be subject to risk analysis.

Generate a working file by clicking Export to excel.


Once exported, the Excel file can be customized further by adding new rules, modifying rule definitions, or adjusting risk ratings. The goal is to create a fully tailored SOD rule list.

Technical Mapping

Once the custom SOD rule list is finalized, the next step is to educate GRC Guardian. This involves what "Create or change vendor master records" and "Vendor invoice entry/Registration" are. This is called Technical Security Modeling. This process, known as Technical Security Modeling, is entirely customized and typically based on insights gathered during a brief interview.

GRC Guardian automatically generates a technical mapping based on selected business processes. The content of technical mapping is independent of the risk ratings.

The generated technical mapping can be modified and re-imported into GRC Guardian to include customized security objects, ensuring the mapping aligns with specific business requirements.

Detecting and Analyzing SOD Violations with GRC Guardian

GRC Guardian includes an algorithm for detecting SOD conflicts. Administrators can utilize this feature to identify violations and support compliance with regulatory standards such as SOX.

Conflict Resolution: D365FO provides workflows and configuration options to address identified conflicts, including modifying security roles and distributing responsibilities across multiple users.

GRC Guardian offers two types of analysis: SOD risk analysis and Sensitive Access (SA) analysis.

When the risk analysis is run, three types of documents are generated:

▶️ Raw risk analysis data in excel format


▶️ A summary that can be modified in power point format

▶️ A dashboard in POWER BI format


Each document gives insights about

  • Overall Executive Summary: This section provides a high-level overview of the SOD and SA analysis performed. It includes the total number of roles, total number of users, and total number of SOD rules used in the analysis. The remainder of the page highlights the findings, such as roles and users with violations.
  • Internal role SOD risks: This page provides an overview of SOD analysis within roles. In other words, inherited role violations are displayed here. 
  • User SOD Risks: This page provides an overview of SOD analysis from the user perspective. It includes the number of users with SOD violations, details of violated SOD rules, impacted business processes, the number of SOD violations per user, and the distribution of users by role.
  • Role & User SA Analysis Overview: This page provides an overview of SA analysis, including SA conflicts. Additionally, it details violations by business processes, risk rankings, the number of roles with SA violations, the number of SA violations by role, the number of users with SA violations, the number of SA violations by user, the number of roles by user, and the number of users by role.

Summary and insights

RSM’s GRC Guardian Power App simplifies Segregation of Duties (SOD) risk analysis in Dynamics 365 Finance and Operations (D365FO). As a managed service, it is highly affordable, eliminating the need for additional licensing. Its customizable SOD frameworks, advanced technical mapping, and automated risk detection ensure compliance with standards like SOX. The tool can be configured efficiently after just a few short meetings—one to define SOD rules and another to validate the technical mapping. With actionable insights and streamlined implementation, GRC Guardian is a valuable solution for managing application security and mitigating risks. Stay tuned for the next article, where we explore SOD risk analysis using Fastpath.

Understanding Telemetry Pricing for Dynamics 365 Finance & Operations (D365FO)

UNDERSTANDING TELEMETRY PRICING FOR DYNAMICS 365 FINANCE AND OPERATIONS (D365FO) CONTENT Introduction D365FO Telemetry Capabilities Key Pric...