Showing posts with label Dynamics365. Show all posts

Saturday, June 7, 2025

Turning Document Routing Agent into a Compliance Enabler in Dynamics 365 Finance & Operations


TURNING DOCUMENT ROUTING AGENT INTO A COMPLIANCE ENABLER IN DYNAMICS 365 FINANCE & OPERATIONS

CONTENT

Introduction
Implement Printer Access Controls
Monitor and Log Print Jobs
Set Up Role-Based Document Routing Policies
Include DRA in Your ITGC Walkthroughs
Ensure DRA is Covered in Business Continuity and Disaster Recovery (BC/DR) Planning
Conclusion

INTRODUCTION

In most ERP implementations, the Document Routing Agent (DRA) is seen as a basic utility for printing documents from the D365FO cloud environment to on-premises printers. While its technical function is straightforward, DRA plays a far more critical role in compliance—especially in industries governed by internal controls and audit scrutiny.

When configured intentionally, DRA strengthens Segregation of Duties (SOD), enhances data confidentiality, and supports IT General Controls (ITGCs) by providing visibility into how and where sensitive documents are output. This article repositions DRA from a background tool to a frontline compliance enabler, supported by practical configuration guidance. 

IMPLEMENT PRINTER ACCESS CONTROLS

Compliance Concern

In financial systems, printers are often treated as generic hardware—but they are in fact data endpoints. Unrestricted printer access can result in payroll reports, AP checks, or tax filings being printed in unmonitored locations. This exposes sensitive information to unauthorized users and violates least privilege and data segregation principles. Without access controls, even users outside of finance may inadvertently (or maliciously) access confidential documents.

Configuration Guidance

  • In Print Management >> Document Type Setup, assign specific printers per legal entity, document type, and user group.
  • Use Entra Id (Azure Active Directory) (AAD) groups in the DRA setup to scope printer access by role.
  • Disable “default printer fallback” to prevent routing documents to unintended devices.

Example: Map payroll printers only to HR security groups and remove visibility from general business users.

MONITOR AND LOG PRINT JOBS

Compliance Concern

In the event of a dispute or audit inquiry, the inability to trace document output—who printed what, when, and where—can be viewed as a control failure. Unlike financial transactions, printing often occurs outside standard logging unless deliberately configured. For high-value outputs such as checks and invoices, this gap leaves organizations vulnerable to fraud, forgery, or data mishandling.

Configuration Guidance

  • Enable logging on the DRA server using Windows Event Viewer or custom PowerShell scripts.
  • Export and archive logs in a secure location tied to document IDs or journal references.
  • Consider Power BI dashboards or SIEM integration for ongoing monitoring and anomaly detection.

Example: Capture DRA logs related to payment batch ID 30992, noting user, timestamp, and destination printer.

SETUP ROLE-BASED DOCUMENT ROUTING POLICIES

Compliance Concern

If the same person can initiate, approve, and print a payment document, SOD policies are undermined. Often overlooked, printer access can provide the final control point for fraudulent activities. By failing to route documents based on role or business unit, organizations leave a back door open to financial manipulation.

Configuration Guidance

  • Align document routing rules with security roles and approval hierarchy.
  • Ensure that users responsible for initiating financial transactions are restricted from accessing print devices assigned to payment or reporting outputs.
  • Use conditional routing in Print Management to dynamically assign printers based on the user’s business unit or document type.

Example: Assign check printing rights exclusively to an “AP Supervisor” role with no posting rights, separating duty from execution.

INCLUDE DRA IN YOUR ITGC WALKTHROUGHS

Compliance Concern

Despite being critical to delivering physical financial outputs, DRA is often excluded from ITGC documentation and walkthroughs. Yet, its failure—whether due to expired certificates, misconfiguration, or access gaps—can delay audits, compromise controls, and disrupt compliance reporting. Regulators increasingly demand visibility into end-to-end control paths, including how documents move from system to paper.

Configuration Guidance

  • Document DRA setup, including machine location, service account, and certificate renewal process.
  • Retain screenshots of Print Management and DRA settings for audit folders.
  • Include DRA in quarterly IT control reviews and walkthrough narratives with auditors.

Tip: Demonstrate a full “initiate → approve → print” chain using real data during control testing.

ENSURE DRA IS COVERED IN BUSINESS CONTINUITY AND DISASTER RECOVERY (BC/DR) PLANNING

Compliance Concern

DRA outages—whether caused by server failure, software patches, or expired certificates—can halt printing of essential documents. In time-sensitive environments like payroll or tax, missing a print deadline may result in non-compliance, delayed payments, or regulatory fines. Yet DRA is often overlooked in BC/DR plans, leaving a critical gap in continuity readiness.

Configuration Guidance

  • Monitor DRA service uptime and certificate validity using scheduled tasks or Azure Monitor alerts.
  • Deploy redundant DRA instances on multiple machines to ensure high availability.
  • Define an alternate output channel (e.g., secure PDF delivery) and test it regularly as part of DR simulations.

BC Planning Tip: Document DRA failover procedures and simulate a test during quarter-end processing.

CONCLUSION

The Document Routing Agent in D365FO may appear to be a technical detail, but it plays a critical role in the secure and compliant delivery of financial documents. When overlooked, it can introduce control gaps—especially around data confidentiality and segregation of duties. When properly governed, however, DRA becomes a practical compliance enabler that reinforces ITGC, supports audit readiness, and ensures continuity for key financial outputs.

Organizations should treat DRA with the same discipline applied to financial workflows and security roles. By doing so, they not only strengthen their ERP control environment but also close a commonly missed gap in the end-to-end integrity of business operations.

Saturday, May 31, 2025

Excel (Add-in) Data Entity Identification for Security Purposes in Dynamics 365 Finance and Operations (D365FO)


EXCEL (ADD-IN) DATA ENTITY IDENTIFICATION FOR SECURITY PURPOSES IN DYNAMICS 365 FINANCE AND OPERATIONS (D365FO)

CONTENT

Introduction
Understanding the Two Types of Data Entities
Why You Need Excel Entity Names in Security Roles
How to Identify the Correct Excel Data Entity Name
Most Common Excel Add-in Data Entities
Conclusion

INTRODUCTION

In Dynamics 365 Finance and Operations (D365FO), Excel Add-in integrations are frequently used by business users to update journal data efficiently. However, granting access to Excel-based data entities requires precise identification of entity names, because they are different than data management entities. This article explains the distinction between standard data entities and Excel Add-in (Office integration) data entities, and provides a structured approach for identifying the correct entity names needed when configuring security roles.

UNDERSTANDING THE TWO TYPES OF DATA ENTITIES

There are two primary types of data entities in D365FO. Although they both enable access to system data, they are used in different contexts and have distinct characteristics:

1. Data Entity (Used in Data Management Projects)

  • Purpose: Primarily used for data import/export, data migration, system integrations, and data projects in the Data Management Workspace.
  • Accessed via: Data Management Framework (DMF) or Integration APIs.
  • Characteristics:
    • Supports staging tables and data validation.
    • Can handle large volumes of data.
    • Often includes all required fields for complete record creation.
    • Suitable for IT and system administrators.

2. Excel Data Entity (Used in Excel Add-in)

  • Purpose: Designed for end users (e.g., accountants, planners) to update or manage transactional data directly in Excel, like journal lines, forecast lines, budget register entries, etc.
  • Accessed via: “Open in Excel” button on D365FO forms or from Excel using the Excel Add-in.
  • Characteristics:
    • Easy-to-use interface with filtering and lookup capabilities.
    • Often shows only a subset of fields relevant to day-to-day operations.
    • Real-time read/write interaction with D365FO.
    • Security-aware (only shows what the user has permission to access).

⚠️ Note: Not every data entity is exposed for Excel; only entities designed for Office integration are surfaced in Excel Add-ins. That’s why they have different names.

Example for Comparison: The data entity used in Data Management is not the same as the one used for the journal line Excel Add-in. Confusing these can result in incomplete security configurations.

Functional Name: Purchase trade agreement journal lines

  • Data entity name: Open purchase price journal lines V2
  • Excel data entity name: PurchOpenPurchasePriceJournalLineV2Entity


WHY YOU NEED EXCEL ENTITY NAMES IN SECURITY ROLES

When assigning permissions, especially for users expected to use Excel integrations, identifying the correct Excel data entity name is critical. Without it, users may have access to the journal forms but will not see the "Open in Excel" button.

Common use cases that require Excel Add-in access:

  • General Ledger (GL) Journal Lines
  • Inventory Counting Journal Lines
  • Trade Agreement Journal Lines
  • Vendor Invoice Journal Lines

This method is widely used to update journal lines in bulk. However, if the security role doesn’t include the specific Excel entity, the integration features will be hidden or restricted.

HOW TO IDENTIFY THE CORRECT EXCEL DATA ENTITY NAME

In D365FO, identifying the correct Excel Add-in data entity is necessary when configuring security roles, especially if users rely on the “Open in Excel” feature. The entity name used for the Excel integration is not always obvious, and often differs from the one used in Data Management. This section outlines practical steps for identifying the exact data entity tied to the Excel Add-in, ensuring users are granted appropriate access without over-provisioning.

OPTION 1: The Excel Template Name

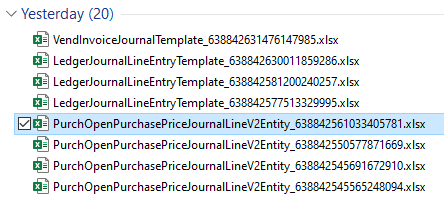
Most of the time, the downloaded Excel template's file name includes the entity name.


OPTION 2: The Excel Template Designer

In D365FO, navigate to Procurement and sourcing >> Prices and discounts >> Trade agreement journals.

Select a journal with Relation: Price (purch.) and click lines.

Click Open in Microsoft Office and choose the relevant data entity.


System downloads the excel template.

Open the downloaded template and click design in the Excel Add-in.


Click + Add table or + Add fields.


Select data entity source field will reveal the actual source data entity.


This field shows you the exact data entity name, not the excel data entity name.


This helps identify the standard entity used in the integration, which can then be translated to the Excel entity name. Once you know the data entity name, apply the following pattern:

[Module prefix] + [Entity name] + "Entity"

Module prefix: e.g., Invent, Purch, Sales, Ledger

Entity name: As retrieved from the template

Example: 

If the source entity is OpenPurchasePriceJournalLineV2 then

the Excel entity would be PurchOpenPurchasePriceJournalLineV2Entity as shown below


Special Case: Multiple Entities in One Template

In some cases, the Excel template contains multiple excel data entities. You may need to do some investigation to identify the name of the secondary entity—for example, in general ledger journal lines.

Navigate to General ledger >> Journal entries >> General journals.

Click Open in Microsoft Office and choose the relevant data entity.


System downloads the excel template.

Open the downloaded template and click design in the Excel Add-in.


Note that you are seeing two data entities, unlike the usual view. So both entities should be accessible by the same security role.

⚠️ Note: Another way to identify the presence of multiple data entities is by checking the downloaded Excel file name. If it ends with "Template," it indicates that multiple entities are included.

Click + Add table or + Add fields.


Select data entity source field will reveal the actual source data entity.


This field shows you the exact data entity name, not the excel data entity name.


Now you can apply the below formula and identify exact required excel data entity name for your security configuration.

[Module prefix] + [Entity name] + "Entity" = LedgerLedgerJournalLineEntity (No need to use 'Ledger' two times)

If you grant access to excel data entity LedgerJournalLineEntity, user can use export to excel add-in feature.


MOST COMMON EXCEL ADD-IN DATA ENTITIES

Here are the most frequently used Excel data entities, especially in journal-heavy environments:

  • General Ledger (GL) Journal Lines: Requires access to both header and line entities
  • Inventory Counting Journal Lines: Only one entity is required
  • Trade Agreement Journal Lines: Different entities may be activated depending on the price type
  • Vendor Invoice Journal Lines: Requires access to both header and line entities

CONCLUSION

Identifying the correct Excel Add-in data entity name is essential when configuring security roles in D365FO. Without it, even experienced users might be blocked from using the Excel integration features they rely on for daily operations. Use the methods outlined above—especially downloading templates and checking the entity structure—to accurately assign permissions. As always, keep in mind that Excel Add-in entities are security-aware, so careful role configuration ensures both usability and compliance with least privilege principles.

Wednesday, January 8, 2025

Vendor Reconciliation in Dynamics 365 Finance and Operations


RECONCILIATIONS IN DYNAMICS 365 FINANCE AND OPERATIONS

Reconciliation is essential to ensure the financial impact of transactions is accurate. This article provides a detailed overview of the different types of reconciliations available in Dynamics 365 Finance and Operations.

Let's get started.

CONTENT

Introduction
Reconciliation types
Demo - vendor reconciliation
Conclusion

INTRODUCTION

In Dynamics 365 Finance and Operations, reconciliations help verify that transactions are recorded correctly across the General Ledger (GL), subledgers, and external systems, such as bank statements. By ensuring consistency and alignment, reconciliation plays a key role in financial reporting, compliance, and operational efficiency. This article explores the various reconciliation types available in D365FO, providing insights into their purpose, processes, and practical applications.

RECONCILIATION TYPES

INTERNAL RECON

Internal recon: Ensures ERP's consistency and validates subledger and ledger consistency. These are D365 Finance reports.

  • Vendor to ledger recon
  • Customer to ledger recon
  • Bank to ledger recon
  • Potential conflicts - inventory and general ledger

The main objective is to ensure that no ledger accounts used in posting profiles are directly impacted by journal entries. In other words, there should be no discrepancies between the subledger and the general ledger. If differences arise, it indicates that General Journal entries were posted to main accounts linked to subledgers. To mitigate this issue, an ITAC control can be implemented by enabling the "Do not allow manual entry" field in the Chart of Accounts.

General ledger >> Chart of accounts >> Accounts >> Main accounts


EXTERNAL RECON

External recon: Ensures ERP and external system's consistency and assist reconciliation of ERP and external parties.

  • Vendor recon: This recon is between you and your vendors to make sure that outstanding balance in the system is correct.
  • Customer recon: Similarly, this recon is between you and your customers/clients to make sure that outstanding balance in the system is correct.
  • Bank recon: This recon is between you and your bank to make sure that bank balance in the system is correct.

RECON METHODS

Recon methods: You can use different approaches to ease your reconciliation process.

  • Manual reconciliation: Requires manually pulling data from D365FO and processing it on Excel. This approach requires deep understanding of which reports and transactions to analyze. This approach is tie consuming and open to human error.
  • Automation within D365: This approach contains built-in reports and inquiries. It's a quick and easy method to identify mismatches between GL and subledgers. This approach reduces manual effort.
  • Autonomous via Agent: A new capability that automates the comparison of financial transactions. D365FO identifies differences and highlights mismatches for review.

TOOLS

Selecting the right tools for reconciliation is essential, as different tools offer distinct capabilities to support accuracy, completeness, and efficiency. If standard D365 Finance reports confirm no discrepancies between the ledger and subledger, no further action may be required. However, if additional investigation is needed to validate report completeness and accuracy, supplementary tools can enhance the reconciliation process.

  • D365 Finance Reports: Provides built-in validation for ledger and subledger consistency.
  • Excel: Allows for custom analysis and detailed reconciliation outside the system.
  • Excel + Autonomous Agents: Enhances reconciliation efficiency by automating data extraction and comparison.
Organizations should evaluate the most appropriate tools on their reconciliation complexity, reporting needs, and available automation capabilities.

Let's deep delve into vendor reconciliation.

DEMO - VENDOR RECONCILIATION

This section focuses on vendor reconciliation within Dynamics 365 Finance and Operations (D365FO).

The objective is to verify whether vendor transactions align with ledger transactions and identify any manual journal interventions that may have affected vendor transactions.

The reconciliation logic ensures that vendor transactions and ledger transactions remain consistent.

Step 1: Retrieve Vendor Transactions

Let's take a look at the vendor transactions first.

Navigate to Accounts payable >> Inquiries and reports >> Vendor transactions report


Apply the required filters, including a specific date range.

Run the report and review the output.


Report output as shown below. The next step is to convert this output to a workable format for further calculations.

Export the report to Excel for further analysis.


Analyzing Vendor Transactions

Open the exported excel file.

Scroll to the bottom of the report to locate the total debit and credit amounts for all vendors within the selected date range.


Calculate the total vendor balance.


For this example, the total vendor balance is $85,670.78.

Let's take a look at the ledger transactions now.

Step 2: Retrieve Ledger Transactions

Navigate to General ledger >> Inquiries and reports >> Voucher transactions


On next page, apply the required filters, including the relevant/targeted ledger accounts to be included in the report.

How to Identify the Relevant Ledger Accounts? 

The accounts to be included are all ledger accounts used in the Vendor posting profiles. These accounts determine how vendor transactions are posted to the general ledger.


Run the report and review the output. Report is as shown below. Export the report to Excel for further analysis.


Analyzing Ledger Transactions

Open the exported Excel file.

Summarize the Amount column to calculate the total ledger balance.


For this example, the total ledger balance is $85,670.78.

Step 3: Validate the Reconciliation

Since the total vendor balance ($85,670.78) matches the total ledger transactions balance ($85,670.78) for the selected date range, the reconciliation is successful. This confirms that vendor transactions are accurately reflected in the ledger without any discrepancies caused by manual interventions.

Simplified Reconciliation: Vendor to Ledger Reconciliation Report

Is there a more efficient way to perform vendor reconciliation without manually comparing reports? Yes!

D365FO provides a built-in report that directly compares vendor balances against ledger balances, eliminating the need for manual calculations.

Generating the Vendor to Ledger Reconciliation Report: Navigate to Accounts payable >> Periodic tasks >> Vendor to ledger reconciliation report.


Apply the required filters, including a specific date range.

Run the report and review the output.


The report provides a direct comparison of total vendor balances and corresponding ledger balances

In this example, the total vendor balance matches the total ledger balance at $85,670.78, confirming that there are no discrepancies. Since the balances align, this verifies that vendor transactions are accurately recorded in the ledger and no manual journal interventions have caused inconsistencies.  This method provides a faster and more efficient way to verify vendor reconciliation without manually exporting and analyzing multiple reports.


CONCLUSION

Effective reconciliation is essential for maintaining financial accuracy and ensuring compliance in Dynamics 365 Finance and Operations. This article demonstrated the vendor reconciliation process, emphasizing both manual and automated approaches. While traditional reconciliation methods require exporting and validating reports, D365FO’s built-in Vendor to Ledger Reconciliation Report streamlines the process, providing a direct comparison of vendor and ledger balances.

Understanding Telemetry Pricing for Dynamics 365 Finance & Operations (D365FO)

UNDERSTANDING TELEMETRY PRICING FOR DYNAMICS 365 FINANCE AND OPERATIONS (D365FO) CONTENT Introduction D365FO Telemetry Capabilities Key Pric...