Showing posts with label Business Documents. Show all posts

Friday, June 7, 2024

Configurable Business Documents in Dynamics 365 Finance and Operations - PART 5 - Business documents security


CONFIGURABLE BUSINESS DOCUMENTS IN DYNAMICS 365 FINANCE AND OPERATIONS - PART 5 - BUSINESS DOCUMENTS SECURITY

This article series explains and demonstrates the use of configurable business documents in real-life scenarios. The purpose is to provide a unique implementation resource. The entire series will be in five parts as follows: 

PART 5: Business documents security

Let's get started with PART 5 which is the last part of this series.

CONTENT

Introduction
Activating Business Document security permissions 
Configuring Business Document security permissions
Summary

Introduction

Managing access to Configurable Business Document (CBD) templates within the Business Document Management workspace is crucial for maintaining organized and secure operations across various business domains (functional areas). By default, all users with access to this workspace can view all available ER solution templates. However, configuring access permissions allows administrators to control which users can edit specific templates, ensuring that only authorized personnel have the appropriate access based on their roles. This article outlines the step-by-step process for setting up these access permissions, enabling businesses to tailor template access according to functional areas and user roles, thereby enhancing document management efficiency and security.

Activating Business Document security permissions

If business document access permissions are not activated, every user with access to the Business Document Management workspace will see all of the ER document templates. To activate these permissions, follow these steps:

Go to Organization administration >> Electronic reporting >> Business document management >> Manage access permissions to edit templates.


Note that system notifies you that security is not in place yet.
Click on the access permissions settings. (1)
Activate the security. (2)

In this case, Business document management workspace (below) will show only


those templates that reside in ER format configurations and that are marked by a Business document type tag as below.


Configuring Business Document security permissions

The document list in the Business document management workspace can be restricted by configuring access permissions. This is crucial when various templates are used to create business documents across different domains (functional areas), and you need to grant specific users access to edit different templates within the Business Document Management workspace.

Access permissions for Business Document Management can be configured in the Access Permissions Configurator. Only one of the following users have access to this page:
  • Users assigned to System administrator role
  • Users assigned to any role that has duty Configure permissions to access Business document templates for editing (AOT name ERBDTemplatesSecurity)
Now, we know who can set up security configuration changes (any role with "Configure permissions to access Business document templates for editing" duty).

Let's talk about who can edit the business documents. 

When security is not active, every user assigned to any security role that is configured to perform the Manage Business document templates (AOT name ERBDManageTemplates) duty is able to open the Business document management workspace and can edit any template that is available. 

Let's assign Manage Business document templates duty to Accounts receivable clerk and see what is available to the role.


Note: In our case, there are only 2 documents that we have created in the previous articles in total in the Business document management workspace as below.
Please note that Accounts receivable clerk can see all available business documents because security is not active.


That's not what we want. What we want is to allow the Accounts receivable clerk to see only their related process documents.

Follow the procedure below to configure specific access to Business Documents for all legal entities:

Let's activate the security by going to Configurator of access permissions page.
Click on Organization administration >> Electronic invoicing >> Business document management >> Manage access permissions to edit templates.
Click on Access permissions settings.

Activate the parameter.
Click on OK.
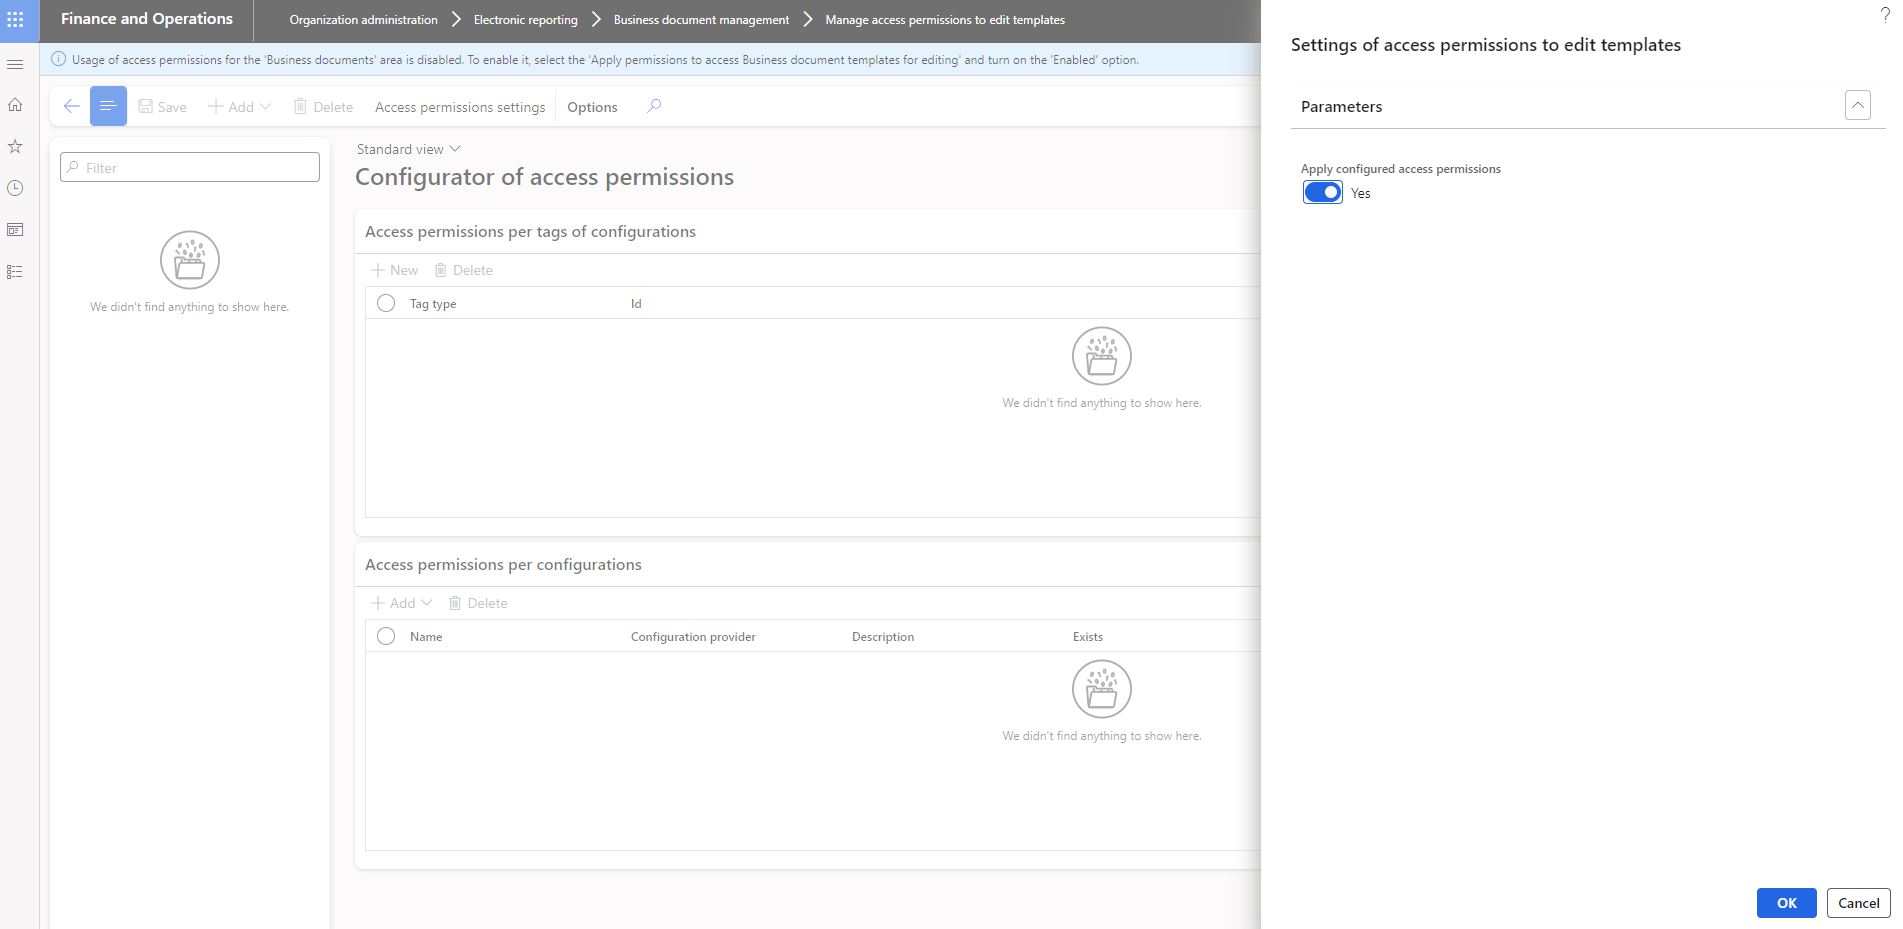


What we want is to provide users access to only their respective business areas. The next step is for this purpose, to configure specific access permissions.

Click on +Add.
Select the role Accounts receivable clerk.
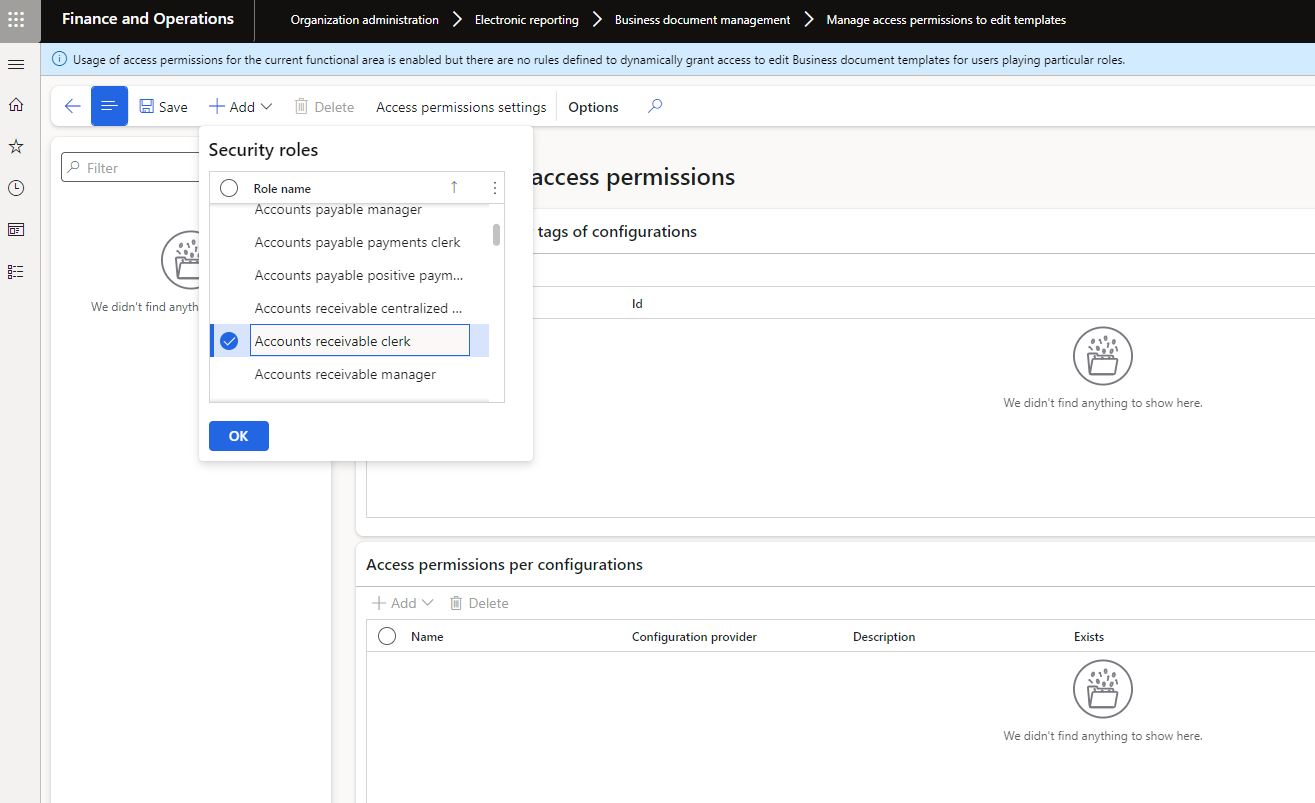
Create new line on the Access permissions per tags of configurations.
Select tag type Functional area.
Select Id Invoicing.

Create new line on the Access permissions per configurations.
Select related report configuration. We are selecting Free text invoice (Excel) Your company since we want Accounts receivable clerk to see only invoice, not packing slip.

All required configurations have been completed. Let's take a second look at the business document management workspace with Accounts receivable clerk role. There should be only free text invoice design there.

Please note that the Accounts Receivable Clerk can now only see the free text invoice design, as expected.

In summary, different combinations of the security settings result in the following:

In conclusion, this series on Configurable Business Documents in Dynamics 365 Finance and Operations has provided a comprehensive guide to setting up and securing business documents. By following the steps outlined across these five parts, organizations can effectively manage document configurations, make format changes, add new fields, and control access based on user roles and business areas. Implementing these security measures ensures that only authorized personnel can view and edit specific templates. 

This final part on Business Document Security completes the series, equipping you with the knowledge to fully leverage configurable business documents in your Dynamics 365 Finance and Operations environments.

Wednesday, May 8, 2024

Configurable Business Documents in Dynamics 365 Finance and Operations - PART 4 - Adding a new field


CONFIGURABLE BUSINESS DOCUMENTS IN DYNAMICS 365 FINANCE AND OPERATIONS - PART 4 - ADDING A NEW FIELD

This article series explains and demonstrates configurable business document use in real life scenarios. The purpose is to provide a unique implementation resource. Whole series will be in 5 parts as follows: 

PART 4: Adding a new field

Let's get started with PART 4.

CONTENT

INTRODUCTION

SCENARIO 1: FREE TEXT INVOICE CHANGES
Download the format template
Make the template changes
Upload the updated template back
Test the solution

SCENARIO 2: VENDOR CHECK CHANGES
Deriving a new document
Download the format template
Make the template changes
Upload the updated template back
Configure print destination
Assign the new check format to bank
Test the solution
Activate the format

Introduction

In this part of the series, we will focus on making data and format changes to Microsoft's out-of-box free text invoice and vendor checks that are Configurable Business Documents (CBD).

This article covers two scenarios:
  • Scenario 1: Modifying the design of a free text invoice by generating a new design based on a previous custom design and implementing changes.
  • Scenario 2: Modifying the design of a vendor check by generating a new design based on Microsoft's default design and implementing changes.
 
Scenario 1: Free text invoice changes

Let's continue from where we left off in PART 3 of this article series and proceed with further design changes to the Free Text Invoice.

The existing design for the free text invoice is as follows:


There are 2 options:
  • Scenario 1 Option 1: Making a change to the existing format.
  • Scenario 1 Option 2: Deriving a new format an making a change to the new format.
Let's continue with the Scenario 1 Option 1.

Download the format template: Go to the format/design.


Click on the attachment.


Click on Open.

System automatically downloads the template in use.

Make the template changes: Let's make some changes.


First, let's add a new line.


Second, let's change the color of selected lines. We will also add our new label "Customer reference".


Third, we should add a name range.


As of now, we are done with all excel template changes. 

Save the template.

Upload the updated template back: Go back to designer page and import the updated template in the system.


Select the file.


You will see the new field on the format designer as shown below.

Switch to mapping tab on the right pane and find the source field of the data model.


Click on Bind.


This is a simple binding. But formulas can be used and transformations can be done if needed in your scenario.

Click on Save and go back to the previous page.


Change document's last status from Draft to Completed.


As of the moment, new document version's preview can be seen in Business document management workspace.

Test the solution: Let's test it.
A free text invoice's Customer reference field is populated.


New added field appears as desired. Note that same field exist in the standard template as well.

Mission completed.

Scenario 2: Vendor check changes

Deriving a new document: In this scenario, we will derive a new format from the Microsoft template and add a new field to it.

Go to Configurations page for this.

Organization administration >> Electronic reporting >> Configurations
Select the source configuration from the left panel.
Click on +Create configuration and select Derive from. Enter the format name and click on Create configuration.
Click on designer after creation the format.
Download the format template: Go to View action pane and select attachments.
You can preview  the file here.
Click 'Open' to download the format file.
Save the file.
Open the file.

Make the template changes: This is where we do the changes.


  • Merge the cells if necessary. (1)
  • Right click and select "Define name". (2)
The plan is to add a new field = Bank account name to the vendor check template.
  • Name the field: BankName. (3)


Note that field name becomes BankName (4)
Upload the updated template back: Go to designer >> Import >> Update from Excel as shown below.
This is the most complicated step.

The purpose is to match created excel field to a data model field. The challenge is to find the correct field in the data model. 
  • Note that new created field appears after the upload. (1)
  • Find the correct source data field in the data model. (2)
  • Bind the excel field and system field. (3)
Note that template field is now matched to data model's field. (4)
Configure print destination: There is one last setting that manages produced report format.
Go to Organization administration >> Electronic reporting >> Electronic reporting destination
Create header and line accordingly.
  • Select the document name that will be used. (1)
  • Create a line and do the required settings. (2)
The last step is to tell bank account to use the new Business Document format.

Assign the new check format to bank: Go to Cash and bank management >> Bank accounts >> Bank accounts
Select the bank account that will have the new check format and go to Set up action pane >> Check button.


Note that there is an exceptional situation for checks:
Configurable business document format setup is done on the bank check layout.
Electronic reporting format setup is done on the method of payment.
Select the new format. 
Don't forget to enter number of slip lines. 

It's time to test the solution.

Test the solution: Go to Cash and bank management >> Inquiries and reports >> Checks.
Select the check and click on Print check copy.
Note that issuing bank account name now appears on the report as "Operating account  - USD" for this example.
 
New design
Old design
Note that the only difference between the new design and the old design is Bank name that we added.

Note: Depending on company policy, reprinting may not be allowed for your project. Ensure that the below parameter is active if the 'Print Check Copy' button is greyed out, as long as this doesn't violate company policy.

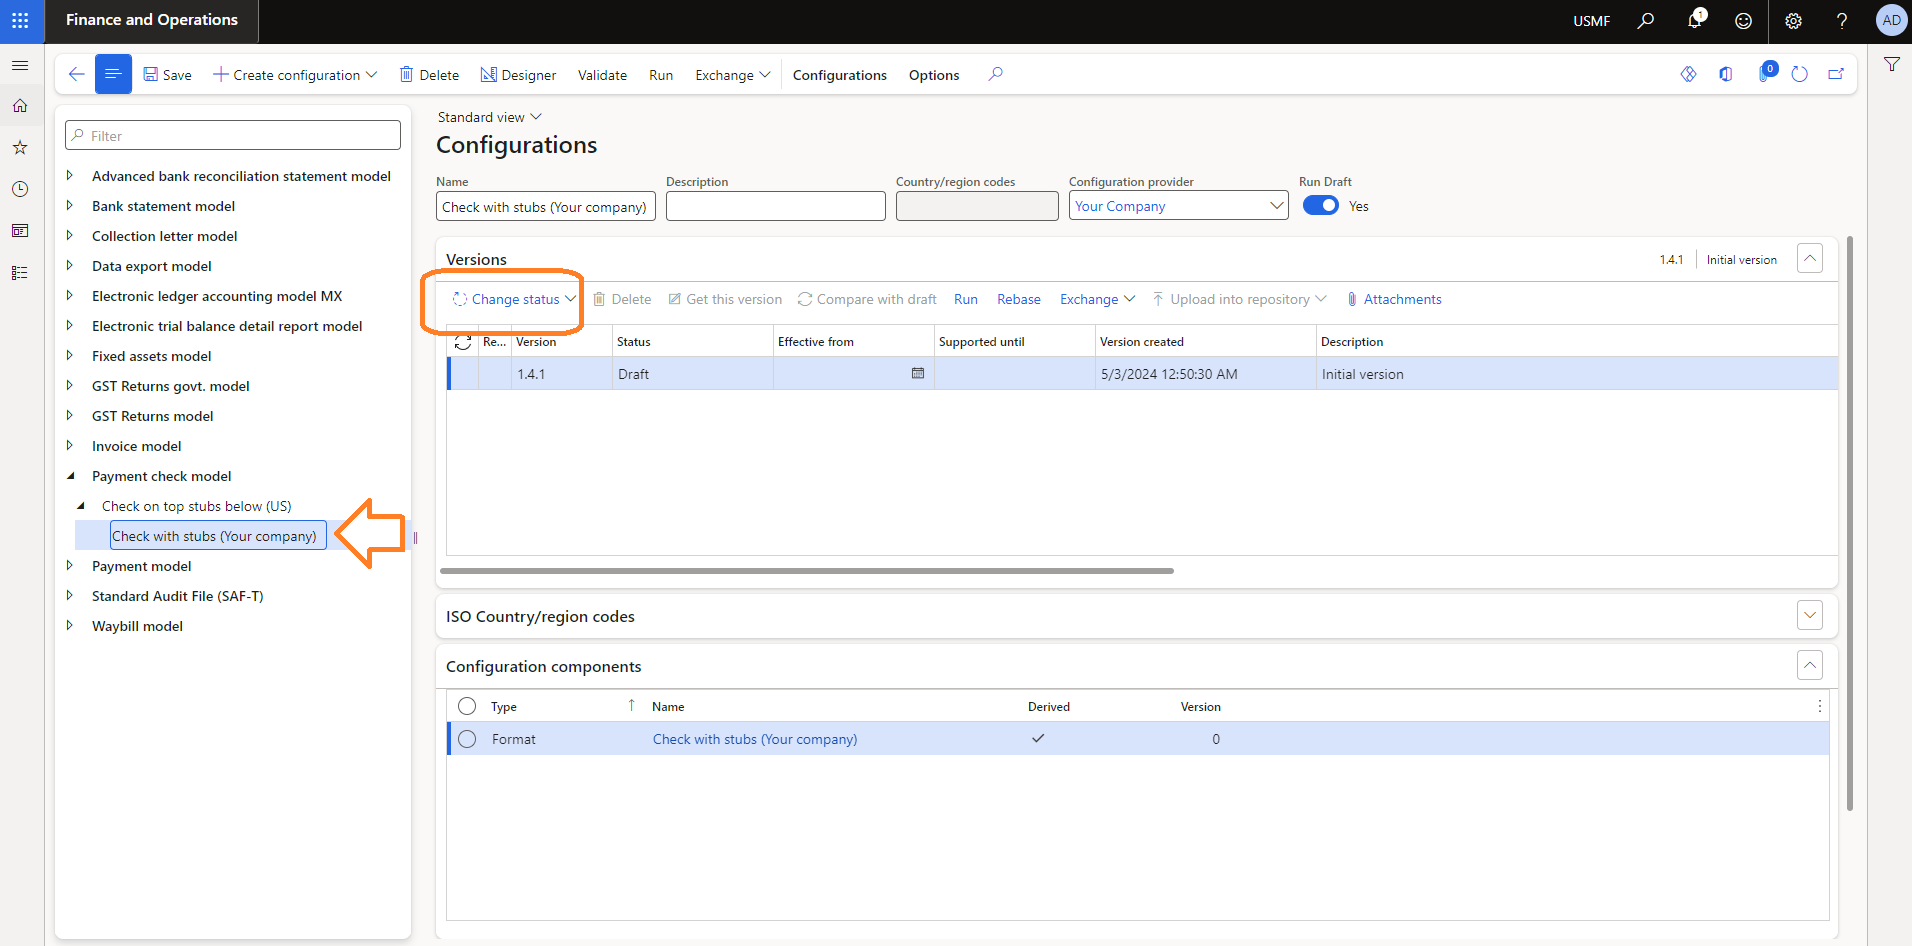
Activate the format: Since the new format works as expected, we can now switch it from Draft to Completed.

Go to Organization administration >> Electronic reporting >> Configurations
Change the status to completed.
Note that status becomes Completed and system automatically generates a new draft version of the format for future changes.
In summary, PART 4 of this series guides users through the process of adding new fields to existing document formats in Dynamics 365 Finance and Operations. With practical steps for modifying templates and mapping data fields, users can effectively implement changes to documents like the Free Text Invoice and Vendor Checks. By ensuring adherence to company policies and thorough testing, users can seamlessly transition their formats from Draft to Completed status, optimizing their business operations. 

Stay tuned for the upcoming final part of this article series, which will explore the crucial aspect of security in configurable business documents.

Understanding Telemetry Pricing for Dynamics 365 Finance & Operations (D365FO)

UNDERSTANDING TELEMETRY PRICING FOR DYNAMICS 365 FINANCE AND OPERATIONS (D365FO) CONTENT Introduction D365FO Telemetry Capabilities Key Pric...