Wednesday, May 15, 2024

Dynamics 365 Finance and Operations Business Events


DYNAMICS 365 FINANCE AND OPERATIONS BUSINESS EVENTS

CONTENT

Introduction
Business event types
Business event catalog
Power automate endpoints
Summary

INTRODUCTION

In Dynamics 365 Finance and Operations, a business event represents a significant action or change in the system that can be captured and sent to external systems or processes. Business events help facilitate integration by allowing external systems to be notified of specific occurrences in real time. For example, an event might be triggered when a customer invoice is posted, a purchase order is confirmed, or a workflow status is updated.

Business events are beneficial for automating workflows, integrating with external applications, or triggering notifications and actions in other systems. Key points include:

  • Event Types: Events are predefined for standard actions, like changes in status for sales orders, purchase orders, or journal postings. Custom events can also be created.
  • Event Handling: Business events can be managed and routed through different platforms, such as Microsoft Power Automate, Microsoft Azure Event Grid, or custom event handlers.
  • Real-Time Data: Since business events are raised as soon as a transaction occurs, they enable real-time data sharing and action across systems without the need for frequent data polling.
  • Scenarios: Business events could trigger automated notifications, initiate follow-up workflows, or start external processes, such as sending alerts to a supplier when a purchase order is confirmed.

By using business events, organizations can improve operational efficiency and streamline processes that rely on external integrations with Dynamics 365 Finance and Operations.

Business events must not be considered a mechanism for exporting data. By definition, business events are supposed to be lightweight and nimble. They aren't intended to carry large payloads to fulfill data export scenarios.

BUSINESS EVENT TYPES

Business events can be categorized based on 3 main trigger types:

  • Application business events: Business events can be triggered based on a completed business activity like below
    •  Vendor invoice matched: This event is triggered when invoice matching validation is completed for a vendor invoice as part of the Procure to pay process.
    • Vendor invoice posted: This event business event is triggered when a user posts a vendor invoice as part of the Procure to Pay process.
    • Purchase order confirmed: This event is triggered when a purchase order is confirmed.
    • Free text invoice posted: This event is triggered when a user posts a free text invoice as part of the Quote to Cash process.
  • Workflow business events: Workflow business events are generated at various points in the processing of a workflow.
  • Alerts as business events: User-configured alerts can serve as business events, offering two main types: change-based alerts and due date alerts. These alerts can be set to issue a business event, providing notifications or triggers for external systems or applications. This setup enables both sophisticated user notifications and cross-system business process integration. To configure an alert as a business event, select Send externally as Yes in the "Create alert rule" dialog. To ensure alerts function as intended, the batch processes for change-based or due date alerts must be enabled for batch processing. Additionally, the business event must be active for either alert type to send notifications externally.

BUSINESS EVENT CATALOG

The business events catalog can be accessed from System administration > Set up > Business events. The business event catalog lists the business events that are available in your system.


A business event’s category reflects its source. Events originating from the workflow system are categorized under "Workflow," while those from other modules use the respective module name as their category. The business event catalog is built during database synchronization at the time of deployment. Therefore, users should see the complete list of business events in the catalog. However, if an explicit update of the catalog is required, you can select Manage > Rebuild business events catalog.

The business event catalog provides a description for each event, helping you understand its role and context within the business process. It also displays the list of data fields that will be included in the event.

In scenarios where external integration systems require the schema of the payload for a business event during development, you can select Download schema to download the JavaScript Object Notation (JSON) schema.

In summary, the business event catalog helps identify the business events that are required for an implementation. It also helps identify the schema for each business event.

The next step is to create and manage Endpoints.

POWER AUTOMATE ENDPOINTS (BUSINESS EVENT ENDPOINTS)

Endpoints let you manage the destinations that business events are sent to.


A finance and operations app doesn't provision the endpoints. The endpoints must be created separately and provided to the app. The app then sends events to the endpoints that are provided. Customers might incur additional costs if they use these endpoints in their Azure subscription.


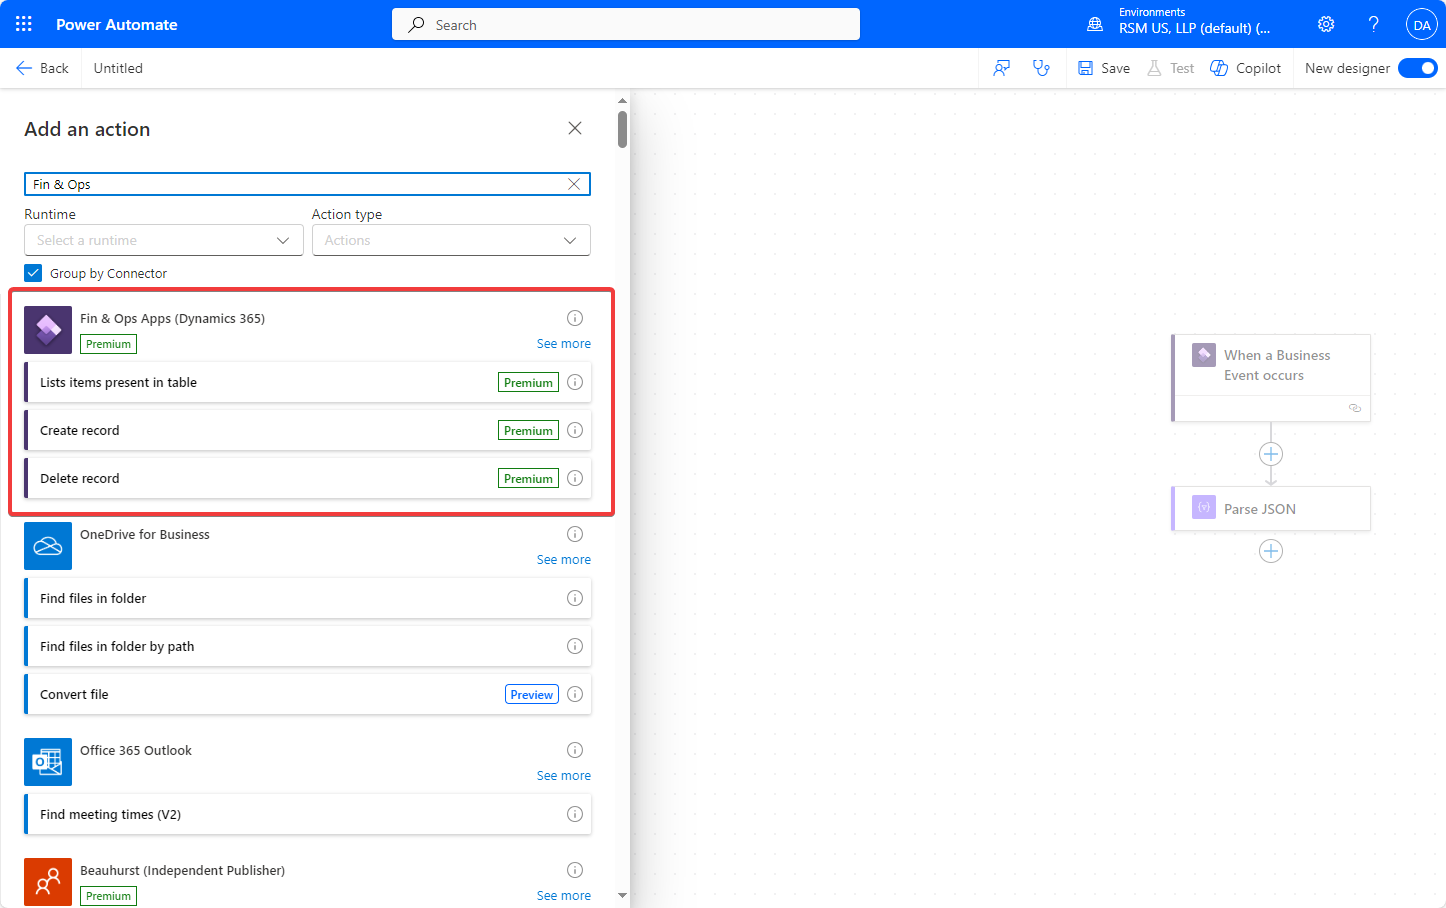
The Microsoft Power Automate endpoint type isn't made available for setup directly in finance and operations apps. This endpoint type is used for subscriptions that are created and sent directly from a flow in Power Automate. The endpoint is created on the Endpoints tab of the Business events page in finance and operations apps when you subscribe to a finance and operations apps business event or data event in Power Automate.


SUMMARY

There are three types of business events: Application, workflow and alert business events. 

The Microsoft Power Automate endpoint type isn't made available for setup directly in finance and operations apps. This endpoint type is used for subscriptions that are created and sent directly from a flow in Power Automate.

Business event catalog is the starting point of the configuration. You go to make Power automate  page after downloading the business event schema from the business event catalog. Created endpoint will be automatically seen in the finance and operations apps.

Wednesday, May 8, 2024

Configurable Business Documents in Dynamics 365 Finance and Operations - PART 4 - Adding a new field


CONFIGURABLE BUSINESS DOCUMENTS IN DYNAMICS 365 FINANCE AND OPERATIONS - PART 4 - ADDING A NEW FIELD

This article series explains and demonstrates configurable business document use in real life scenarios. The purpose is to provide a unique implementation resource. Whole series will be in 5 parts as follows: 

PART 4: Adding a new field

Let's get started with PART 4.

CONTENT

INTRODUCTION

SCENARIO 1: FREE TEXT INVOICE CHANGES
Download the format template
Make the template changes
Upload the updated template back
Test the solution

SCENARIO 2: VENDOR CHECK CHANGES
Deriving a new document
Download the format template
Make the template changes
Upload the updated template back
Configure print destination
Assign the new check format to bank
Test the solution
Activate the format

Introduction

In this part of the series, we will focus on making data and format changes to Microsoft's out-of-box free text invoice and vendor checks that are Configurable Business Documents (CBD).

This article covers two scenarios:
  • Scenario 1: Modifying the design of a free text invoice by generating a new design based on a previous custom design and implementing changes.
  • Scenario 2: Modifying the design of a vendor check by generating a new design based on Microsoft's default design and implementing changes.
 
Scenario 1: Free text invoice changes

Let's continue from where we left off in PART 3 of this article series and proceed with further design changes to the Free Text Invoice.

The existing design for the free text invoice is as follows:


There are 2 options:
  • Scenario 1 Option 1: Making a change to the existing format.
  • Scenario 1 Option 2: Deriving a new format an making a change to the new format.
Let's continue with the Scenario 1 Option 1.

Download the format template: Go to the format/design.


Click on the attachment.


Click on Open.

System automatically downloads the template in use.

Make the template changes: Let's make some changes.


First, let's add a new line.


Second, let's change the color of selected lines. We will also add our new label "Customer reference".


Third, we should add a name range.


As of now, we are done with all excel template changes. 

Save the template.

Upload the updated template back: Go back to designer page and import the updated template in the system.


Select the file.


You will see the new field on the format designer as shown below.

Switch to mapping tab on the right pane and find the source field of the data model.


Click on Bind.


This is a simple binding. But formulas can be used and transformations can be done if needed in your scenario.

Click on Save and go back to the previous page.


Change document's last status from Draft to Completed.


As of the moment, new document version's preview can be seen in Business document management workspace.

Test the solution: Let's test it.
A free text invoice's Customer reference field is populated.


New added field appears as desired. Note that same field exist in the standard template as well.

Mission completed.

Scenario 2: Vendor check changes

Deriving a new document: In this scenario, we will derive a new format from the Microsoft template and add a new field to it.

Go to Configurations page for this.

Organization administration >> Electronic reporting >> Configurations
Select the source configuration from the left panel.
Click on +Create configuration and select Derive from. Enter the format name and click on Create configuration.
Click on designer after creation the format.
Download the format template: Go to View action pane and select attachments.
You can preview  the file here.
Click 'Open' to download the format file.
Save the file.
Open the file.

Make the template changes: This is where we do the changes.


  • Merge the cells if necessary. (1)
  • Right click and select "Define name". (2)
The plan is to add a new field = Bank account name to the vendor check template.
  • Name the field: BankName. (3)


Note that field name becomes BankName (4)
Upload the updated template back: Go to designer >> Import >> Update from Excel as shown below.
This is the most complicated step.

The purpose is to match created excel field to a data model field. The challenge is to find the correct field in the data model. 
  • Note that new created field appears after the upload. (1)
  • Find the correct source data field in the data model. (2)
  • Bind the excel field and system field. (3)
Note that template field is now matched to data model's field. (4)
Configure print destination: There is one last setting that manages produced report format.
Go to Organization administration >> Electronic reporting >> Electronic reporting destination
Create header and line accordingly.
  • Select the document name that will be used. (1)
  • Create a line and do the required settings. (2)
The last step is to tell bank account to use the new Business Document format.

Assign the new check format to bank: Go to Cash and bank management >> Bank accounts >> Bank accounts
Select the bank account that will have the new check format and go to Set up action pane >> Check button.


Note that there is an exceptional situation for checks:
Configurable business document format setup is done on the bank check layout.
Electronic reporting format setup is done on the method of payment.
Select the new format. 
Don't forget to enter number of slip lines. 

It's time to test the solution.

Test the solution: Go to Cash and bank management >> Inquiries and reports >> Checks.
Select the check and click on Print check copy.
Note that issuing bank account name now appears on the report as "Operating account  - USD" for this example.
 
New design
Old design
Note that the only difference between the new design and the old design is Bank name that we added.

Note: Depending on company policy, reprinting may not be allowed for your project. Ensure that the below parameter is active if the 'Print Check Copy' button is greyed out, as long as this doesn't violate company policy.

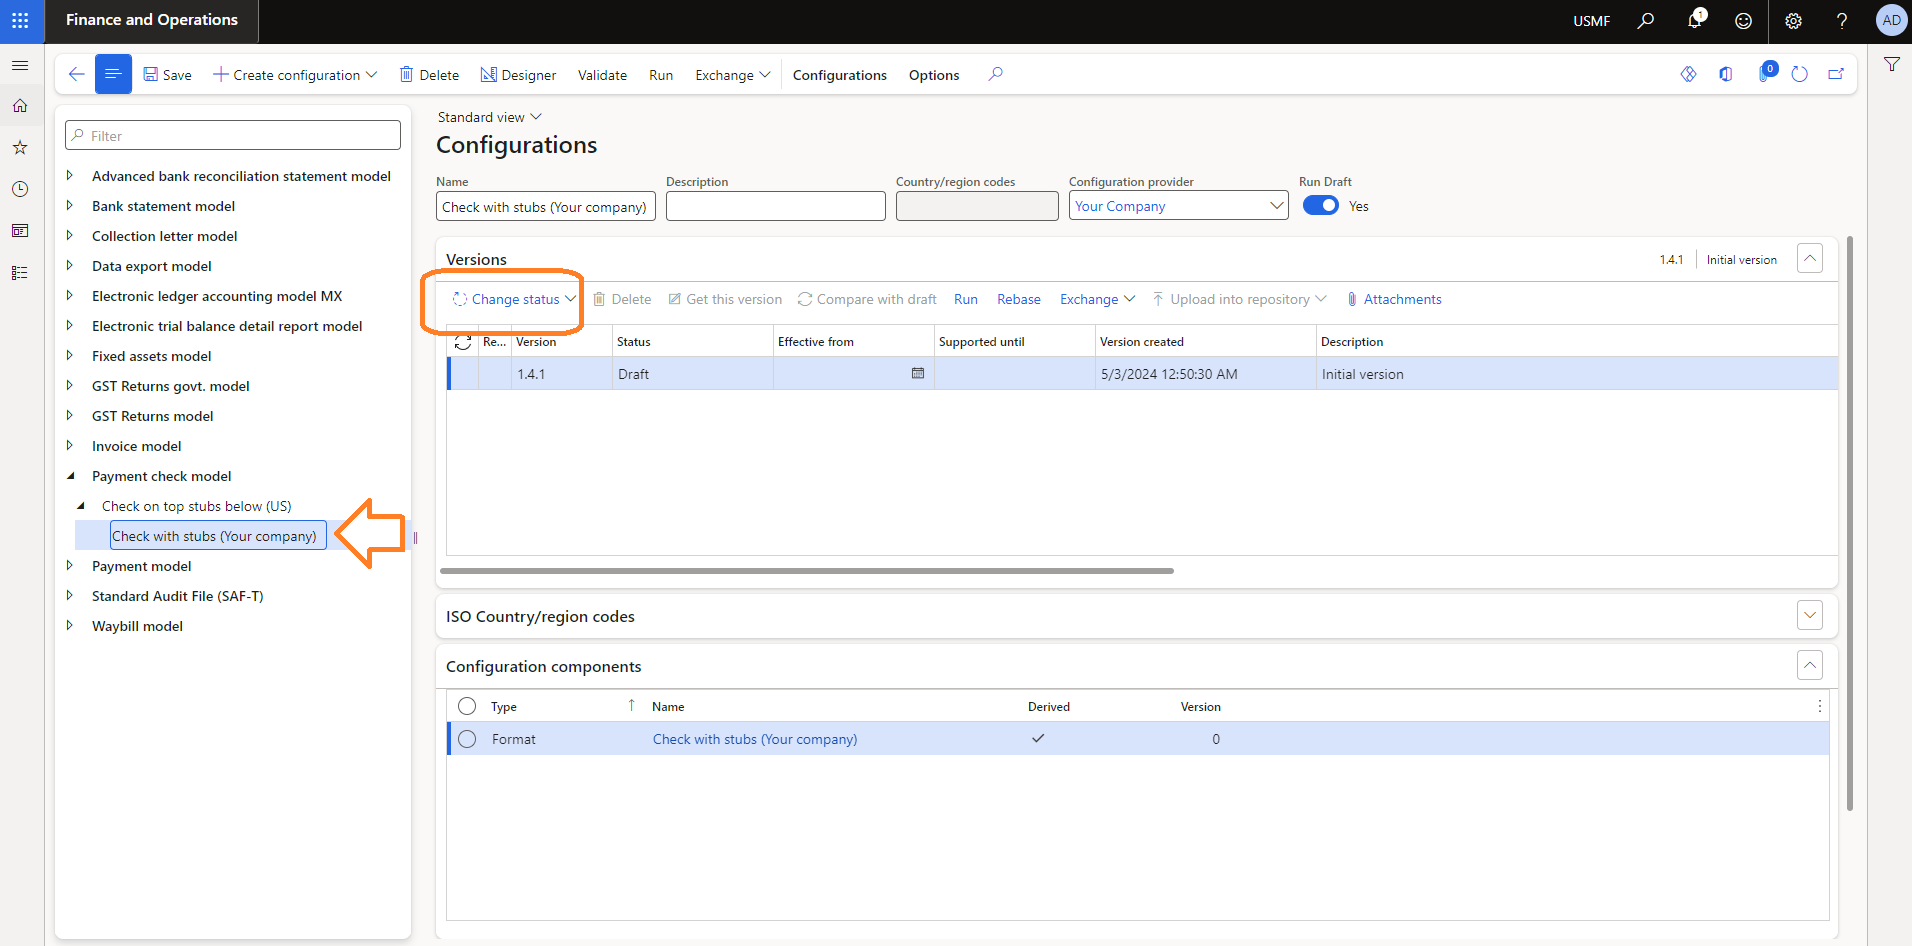
Activate the format: Since the new format works as expected, we can now switch it from Draft to Completed.

Go to Organization administration >> Electronic reporting >> Configurations
Change the status to completed.
Note that status becomes Completed and system automatically generates a new draft version of the format for future changes.
In summary, PART 4 of this series guides users through the process of adding new fields to existing document formats in Dynamics 365 Finance and Operations. With practical steps for modifying templates and mapping data fields, users can effectively implement changes to documents like the Free Text Invoice and Vendor Checks. By ensuring adherence to company policies and thorough testing, users can seamlessly transition their formats from Draft to Completed status, optimizing their business operations. 

Stay tuned for the upcoming final part of this article series, which will explore the crucial aspect of security in configurable business documents.

Understanding Telemetry Pricing for Dynamics 365 Finance & Operations (D365FO)

UNDERSTANDING TELEMETRY PRICING FOR DYNAMICS 365 FINANCE AND OPERATIONS (D365FO) CONTENT Introduction D365FO Telemetry Capabilities Key Pric...