
EXCEL (ADD-IN) DATA ENTITY IDENTIFICATION FOR SECURITY PURPOSES IN DYNAMICS 365 FINANCE AND OPERATIONS (D365FO)
CONTENT Introduction Understanding the Two Types of Data Entities Why You Need Excel Entity Names in Security Roles How to Identify the Correct Excel Data Entity Name Most Common Excel Add-in Data Entities Conclusion |
INTRODUCTION
In Dynamics 365 Finance and Operations (D365FO), Excel Add-in integrations are frequently used by business users to update journal data efficiently. However, granting access to Excel-based data entities requires precise identification of entity names, because they are different than data management entities. This article explains the distinction between standard data entities and Excel Add-in (Office integration) data entities, and provides a structured approach for identifying the correct entity names needed when configuring security roles.
UNDERSTANDING THE TWO TYPES OF DATA ENTITIES
There are two primary types of data entities in D365FO. Although they both enable access to system data, they are used in different contexts and have distinct characteristics:
1. Data Entity (Used in Data Management Projects)
- Purpose: Primarily used for data import/export, data migration, system integrations, and data projects in the Data Management Workspace.
- Accessed via: Data Management Framework (DMF) or Integration APIs.
- Characteristics:
- Supports staging tables and data validation.
- Can handle large volumes of data.
- Often includes all required fields for complete record creation.
- Suitable for IT and system administrators.
2. Excel Data Entity (Used in Excel Add-in)
- Purpose: Designed for end users (e.g., accountants, planners) to update or manage transactional data directly in Excel, like journal lines, forecast lines, budget register entries, etc.
- Accessed via: “Open in Excel” button on D365FO forms or from Excel using the Excel Add-in.
- Characteristics:
- Easy-to-use interface with filtering and lookup capabilities.
- Often shows only a subset of fields relevant to day-to-day operations.
- Real-time read/write interaction with D365FO.
- Security-aware (only shows what the user has permission to access).
⚠️ Note: Not every data entity is exposed for Excel; only entities designed for Office integration are surfaced in Excel Add-ins. That’s why they have different names.
Example for Comparison: The data entity used in Data Management is not the same as the one used for the journal line Excel Add-in. Confusing these can result in incomplete security configurations.
Functional Name: Purchase trade agreement journal lines
- Data entity name: Open purchase price journal lines V2
- Excel data entity name: PurchOpenPurchasePriceJournalLineV2Entity


WHY YOU NEED EXCEL ENTITY NAMES IN SECURITY ROLES
When assigning permissions, especially for users expected to use Excel integrations, identifying the correct Excel data entity name is critical. Without it, users may have access to the journal forms but will not see the "Open in Excel" button.
Common use cases that require Excel Add-in access:
- General Ledger (GL) Journal Lines
- Inventory Counting Journal Lines
- Trade Agreement Journal Lines
- Vendor Invoice Journal Lines
This method is widely used to update journal lines in bulk. However, if the security role doesn’t include the specific Excel entity, the integration features will be hidden or restricted.
HOW TO IDENTIFY THE CORRECT EXCEL DATA ENTITY NAME
In D365FO, identifying the correct Excel Add-in data entity is necessary when configuring security roles, especially if users rely on the “Open in Excel” feature. The entity name used for the Excel integration is not always obvious, and often differs from the one used in Data Management. This section outlines practical steps for identifying the exact data entity tied to the Excel Add-in, ensuring users are granted appropriate access without over-provisioning.
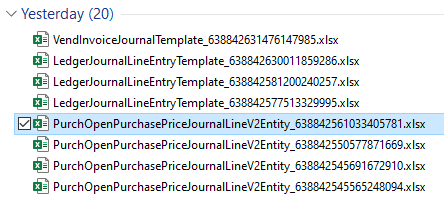
OPTION 1: The Excel Template Name
Most of the time, the downloaded Excel template's file name includes the entity name.
OPTION 2: The Excel Template Designer
In D365FO, navigate to Procurement and sourcing >> Prices and discounts >> Trade agreement journals.
Select a journal with Relation: Price (purch.) and click lines.
Click Open in Microsoft Office and choose the relevant data entity.

System downloads the excel template.
Open the downloaded template and click design in the Excel Add-in.

Click + Add table or + Add fields.

Select data entity source field will reveal the actual source data entity.

This field shows you the exact data entity name, not the excel data entity name.

This helps identify the standard entity used in the integration, which can then be translated to the Excel entity name. Once you know the data entity name, apply the following pattern:
[Module prefix] + [Entity name] + "Entity"
Module prefix: e.g., Invent, Purch, Sales, Ledger
Entity name: As retrieved from the template
Example:
If the source entity is OpenPurchasePriceJournalLineV2 then
the Excel entity would be PurchOpenPurchasePriceJournalLineV2Entity as shown below

Special Case: Multiple Entities in One Template
In some cases, the Excel template contains multiple excel data entities. You may need to do some investigation to identify the name of the secondary entity—for example, in general ledger journal lines.
Navigate to General ledger >> Journal entries >> General journals.
Click Open in Microsoft Office and choose the relevant data entity.

System downloads the excel template.
Open the downloaded template and click design in the Excel Add-in.

Note that you are seeing two data entities, unlike the usual view. So both entities should be accessible by the same security role.
⚠️ Note: Another way to identify the presence of multiple data entities is by checking the downloaded Excel file name. If it ends with "Template," it indicates that multiple entities are included.
Click + Add table or + Add fields.

Select data entity source field will reveal the actual source data entity.

This field shows you the exact data entity name, not the excel data entity name.

Now you can apply the below formula and identify exact required excel data entity name for your security configuration.
[Module prefix] + [Entity name] + "Entity" = LedgerLedgerJournalLineEntity (No need to use 'Ledger' two times)
If you grant access to excel data entity LedgerJournalLineEntity, user can use export to excel add-in feature.

MOST COMMON EXCEL ADD-IN DATA ENTITIES
Here are the most frequently used Excel data entities, especially in journal-heavy environments:
- General Ledger (GL) Journal Lines: Requires access to both header and line entities
- Inventory Counting Journal Lines: Only one entity is required
- Trade Agreement Journal Lines: Different entities may be activated depending on the price type
- Vendor Invoice Journal Lines: Requires access to both header and line entities
CONCLUSION
Identifying the correct Excel Add-in data entity name is essential when configuring security roles in D365FO. Without it, even experienced users might be blocked from using the Excel integration features they rely on for daily operations. Use the methods outlined above—especially downloading templates and checking the entity structure—to accurately assign permissions. As always, keep in mind that Excel Add-in entities are security-aware, so careful role configuration ensures both usability and compliance with least privilege principles.


