Showing posts with label Automation. Show all posts

Sunday, March 16, 2025

Understanding Azure App Registration and Client Secrets in Real-Life Scenarios


UNDERSTANDING AZURE APP REGISTRATION AND CLIENT SECRETS IN REAL-LIFE SCENARIOS

CONTENT

Introduction
What is Azure App Registration?
Understanding Client Secrets
Real Business Scenario
Best Practices for App Registration and Client Secrets
Conclusion

INTRODUCTION

Modern businesses rely on cloud-based applications like Dynamics 365, Power Apps, and various third-party services. To ensure seamless integration, secure authentication, and automated data access, organizations need a structured approach. Azure App Registration, a component of Microsoft Entra ID (formerly Azure Active Directory), plays a crucial role in enabling applications to authenticate securely without manual user intervention.

This article provides a practical understanding of Azure App Registration and Client Secrets, explaining their significance, implementation, and real-world applications. You will learn:

  • Why Azure App Registration is a must for modern business apps
  • How Client Secrets facilitate secure authentication
  • A real-life example demonstrating automation using there technologies
  • Best practices to enhance security and operational efficiency

Let's get started.

WHAT IS AZURE APP REGISTRATION?

Azure App Registration provides a secure method for applications to authenticate and interact with Microsoft services such as Dynamics 365, Microsoft 365, and Azure resources. By registering an application in Microsoft Entra ID, you establish its identity and enable secure API access:
  • Client ID: A unique identifier for the registered application, like a driver’s license number.
  • Client Secret: A confidential key used for authentication (similar to a password for the application).
  • Tenant ID: A unique identifier that associates the application with an organization’s Microsoft Entra ID directory.
Why Does Your Business Need It?
Businesses rely on secure, automated data exchange between applications to reduce manual work and improve efficiency. Without a structured authentication method, organizations often resort to insecure or inefficient workarounds, such as shared passwords or manual exports.

Azure App Registration ensures:
  • Automated Access – Business applications can retrieve and update data without user intervention.
  • Stronger Security – Eliminates the risks of storing user credentials in applications.
  • Seamless Integration – Power Apps, Power BI, and third-party tools can connect securely to Microsoft services.
  • Regulatory Compliance – Ensures controlled access to sensitive data, supporting SOX and GDPR requirements.
By implementing Azure App Registration, businesses can streamline operations while maintaining security and compliance.

UNDERSTANDING CLIENT SECRETS

A Client Secret is a confidential key used by an application to authenticate itself when requesting access to Microsoft services. Unlike a user's password, a Client Secret is used for application-only authentication, meaning the app, not a person, is granted access to resources.

How Authentication Works with Client Secrets?
When an application wants to connect to a Microsoft service (such as Dynamics 365 or Microsoft Graph API), it follows these steps:

1. The application sends a request to the Microsoft Entra ID token endpoint, including:
  • Client ID (to identify the app)
  • Client Secret (to prove its identity)
  • Tenant ID (to specify the organization’s Azure directory)
  • Scope (defining the level of access requested)
2. Microsoft Entra ID verifies the credentials and, if valid, issues an OAuth 2.0 access token.
3. The application uses this token to securely interact with Microsoft services (e.g., retrieving user-role data from D365FO).
4. The access token expires after a set period, requiring the app to request a new token using the same process.

Security Considerations
  • Do not store Client Secrets in source code or environment variables.
  • Use Azure Key Vault to store and manage Client Secrets securely.
  • Implement token expiration policies and regularly rotate secrets.
  • Consider Managed Identities as a more secure alternative for Azure-hosted applications, eliminating the need for Client Secrets altogether.

REAL BUSINESS SCENARIO

Let’s dive into a scenario of how companies use Azure App Registration and Client Secrets to tackle real-world problems.


Scenario: Automating D365FO User Access Reviews

Problem Statement: A financial services company using Dynamics 365 Finance & Operations (D365FO) needs to conduct periodic user access reviews for SOX compliance. The challenges include:
  • User-role assignments must be reviewed periodically, but manually exporting the data is time-consuming.
  • IT cannot grant auditors direct access to sensitive security data.
  • Managers require an intuitive way to review and approve access assignments without using complex processes/reports.
Solution: Automating Access Reviews with Power Platform
  • By leveraging Azure App Registration, Power Automate, and Power BI, the company automates user access reviews as follows.
  • The company needs an automated process to extract user-role assignments, store them in Power Apps for review, and visualize them in Power BI for compliance reporting.
This solution automatically extracts user-role assignments from D365FO, stores them in Dataverse (Power Apps Table), and provides a Power BI dashboard for monitoring. 

Main solution steps are as follows:
  • Register an App in Azure AD for Secure Access
  • Extract User-Role Assignments from D365FO
  • Store and Process Data in Power Apps
  • Generate Power BI Dashboards for Compliance Teams
Step 1: Register an App in Azure AD for Secure Access

To access D365FO data via APIs, we need to register an application in Azure AD.

1. Go to Azure AD:
  • Click + Add > App registration.

2. Register the App:
  • Name: D365FO User Access Review App
  • Supported account types: Choose Single Tenant (if internal) or Multi-Tenant (if external users need access). The purpose of this selection is to let a internal or a third party application to communicate.  Select Single Tenant for internal use.
  • Redirect URI (optional): Leave this field blank, as it is not required for this scenario. It is only needed in user login scenarios where a Power App relies on a human user signing in with their own Microsoft credentials (e.g., their D365FO or Microsoft 365 login) to access data. In contrast, this setup involves the app running independently with its own credentials (Client ID and Secret). Technically, such user-based authentication falls under a “delegated permissions” scenario, where the app acts on behalf of the user by using their identity to authenticate.
  • Click Register.

3. Grant API Permissions for D365 Finance and Operations Access:
  • Go to API Permissions > + Add a permission
  • Select Dynamics ERP.
  • Choose permission type:
    • Application Permissions: Use this if your Power App runs without a user logging in (e.g., a Power Automate flow pulling data automatically). This is “app-only” access, using the Client ID and Secret. This fits best in our scenario.
    • Delegated Permissions: Use this if a user signs into the Power App and it pulls data on their behalf (e.g., they click a button to refresh the list). This uses the user’s login.
  • Go to API Permissions > + Add a permission
  • Select the permission level.
  • Click Add permissions.
  • Grant admin consent: Azure AD requires an admin to approve these permissions before they’re active. This ensures only authorized apps get access to D365FO. 
    • If you are admin, click Grant admin consent for <your tenant>.
4. Generate Authentication Credentials
  • Go to Certificates & secrets > Client secrets.
  • Click + New client secret.
  • Set an expiration date.
  • Click Add.
  • Copy the Secret Value. It won't be visible later.
5. Store the Credentials Securely
  • Save Client ID, Tenant ID, and Client Secret in a secure location (Azure Key Vault recommended).
Step 2: Extract User-Role Assignments from D365FO

Once the Azure AD app is registered, you can extract security role assignments from D365FO using data entities.

1. Identify the Data Entity:
  • Use System administration >> Data management workspace in D365FO.
  • Locate the entity "Security user role association"(SecurityUserRoleAssociations).
2. Export data manually for testing.
3. Automate data extraction
  • Use the OAuth 2.0 token obtained from Microsoft Entra ID.
  • Call the OData API endpoint to fetch security role data.
Automate data extraction with OData API: Power Apps (or any external service) needs to use OAuth 2.0 authentication to securely access the SecurityUserRoleAssociations data entity in D365 Finance & Operations (D365FO).
  • You must construct an OAuth 2.0 access token using your Client ID, Client Secret, and Tenant ID before making API calls to D365FO.
  • Extract data in JSON or CSV format for further processing.
4. Schedule Automated Extraction
  • Schedule periodic data extraction using Power Automate or Azure Logic Apps.
Step 3: Store and Process Data in Power Apps

1. Use Dataverse to store extracted data securely.
2. Create a Power App that allows compliance teams to:
  • Review user-role assignments (by sending D365FO security data to Power Apps) in an interactive interface.
  • Approve or reject access changes based on predefined policies.
3. Automate Review Notifications: Use Power Automate to trigger notifications to compliance teams:
  • Send alerts when new roles are assigned.
  • Flag high-risk role assignments for immediate review.
  • Generate audit logs for tracking access reviews.
Step 4: Generate Power BI Dashboards for Compliance Teams

1. Connect Power BI to Dataverse to visualize access review data dynamically.
2. Create Key Reports displaying:
  • Users with excessive roles.
  • Pending access approvals by managers.
  • Trends in security role assignments over time.
3. Enable Automated Report Generation
  • Set up scheduled reports for audit teams.
  • Generate compliance reports with key risk indicators.

BEST PRACTICES FOR APP REGISTRATION AND CLIENT SECRETS

1. Use Azure Key Vault to store Client Secrets securely.
2. Enable Role-Based Access Control (RBAC) to restrict secret access.
3. Implement token expiration policies and rotate Client Secrets periodically.
4. Prefer Managed Identities for Azure-hosted applications to avoid using Client Secrets.
5. Use Conditional Access Policies to limit app access based on security conditions.

CONCLUSION

Azure App Registration and Client Secrets play a vital role in enabling secure, automated application authentication in Microsoft environments. By understanding how to configure them properly and following best practices, businesses can streamline operations, enhance security, and ensure compliance.

Through real-world scenarios like automating D365FO user access reviews, organizations can see the tangible benefits of leveraging these technologies efficiently. With proper implementation and security controls, Azure App Registration provides a robust solution for modern enterprise applications.

Saturday, November 9, 2024

Configuring Dynamics 365 Finance and Operations Business Events


CONFIGURING DYNAMICS 365 FINANCE AND OPERATIONS BUSINESS EVENTS

CONTENT

Introduction
Business event catalog (D365FO)
Endpoint types
End-to-end automation solution (Power Automate)
Conclusion

INTRODUCTION

In the first article of this series, we explored the fundamentals of business events in Dynamics 365 Finance and Operations (D365FO), including event types, the business event catalog, and how to leverage Power Automate endpoints. Now, we will dive deeper into a practical scenario where we configure a business event using the Finance and Operations connector in Power Automate to automate workflows.

This article will guide you through creating a new flow in Power Automate, subscribing to a business event via the D365FO connector, and setting up an automated email notification. By harnessing the power of business events and the FinOps connector, you can streamline communication and automate notifications for key business processes, eliminating manual follow-ups and enhancing operational efficiency.

We will cover:

  • How to create a new flow in Power Automate
  • How to subscribe to a business event via the FinOps connector
  • How to set up an automated email trigger when a business event is raised

Let’s get started on configuring business events to automate actions and bring real-time notifications into your business processes.

BUSINESS EVENT CATALOG

This is a catalog that contains important business activities like new vendor application request approval, purchase requisition status change, vendor invoice posting, vendor payment posting, etc. 

Complete catalog content can be seen under System administration >> Setup >> Business events >> Business events catalog.

This page shows the list of actions that can be subject to external system notifications.


Posted/approved document triggers a business event that notifies external system(s).


One of the fundamental components of business events in Dynamics 365 Finance and Operations (D365FO) is the endpoint. An endpoint serves as a connection point that enables D365FO to interact with external systems, services, or applications when a business event is triggered. It represents the external destination or communication channel where event data is sent.

ENDPOINT TYPES

Endpoints define the target location for event notifications, facilitating integration and automated responses in connected systems. Setting up endpoints is a crucial first step in the configuration process.

System administration >> Setup >> Business events >> Business events catalog

Switch to endpoints tab, click on +New


When you add a new endpoint in Dynamics 365 Finance and Operations (D365FO), it is automatically synchronized with Dataverse. Additionally, endpoints can be created directly in Dataverse using the ServiceEndpoint table. If the service endpoint is set up through a subscription to a D365FO event, it will be available in D365FO and can be accessed from the Endpoints tab on the Business Events page. This synchronization process supports the following endpoint types:

  • Azure Service Bus Queue
  • Azure Service Bus Topic
  • Azure Event Grid
  • Azure Event Hub

Power Automate Endpoints: The Microsoft Power Automate endpoint type isn't made available for setup directly in finance and operations apps. This endpoint type is used for subscriptions that are created and sent directly from a flow in Power Automate.

The endpoint is created on the Endpoints tab of the Business events page in finance and operations apps when you subscribe to a finance and operations apps business event or data event in Power Automate.

In this article, we’ll set up a Power Automate endpoint.

Dataverse Endpoints: The Dataverse endpoint type also isn't available for manual setup in finance and operations apps. The endpoint is created when a plug-in or an SDK step is registered on a finance and operations apps business event or data event in Dataverse. When the step is registered, it becomes visible as an endpoint in the list on the Endpoints tab of the Business events page in finance and operations apps.

END-TO-END AUTOMATION SOLUTION

Scenario: An email is automatically sent when a purchase order is confirmed.

Solution components

  • Business event selection: In our example, we will use purchase order confirmation.
  • Business event schema: In Dynamics 365 Finance and Operations (D365FO), a business event schema is a structured data model that defines the format and content of a business event message.
  • Power automation platform: We will use a power automation endpoint in this scenario.
  • OData Query Language: The development language used for querying data in this context is OData (Open Data Protocol), specifically using OData Query Language. OData Query Language is used to filter and manipulate data from REST APIs, especially in services like Dynamics 365 Finance and Operations and Microsoft Dataverse. In Power Automate and D365FO integration scenarios, the queries often adhere to the OData v4 standard, which is widely used for accessing and interacting with data in RESTful APIs.

Configuration

We will start with downloading business event schema in D365FO.

Go to System administration >> Setup >> Business events >> Business events catalog

Find the purchase order confirmation event and download the schema.


Downloaded file looks like below.


I asked ChatGPT to format it nicely for your information.


Next step is power platform configurations.

Go to make.powerautomate.com

Click on +Create then 'Automated cloud flow'.


Enter a flow name and select the trigger.

Flow name: POconfirmation_BusinessEventDemo

Trigger: Fin & Ops Apps (Dynamics 365)


Click on Create.

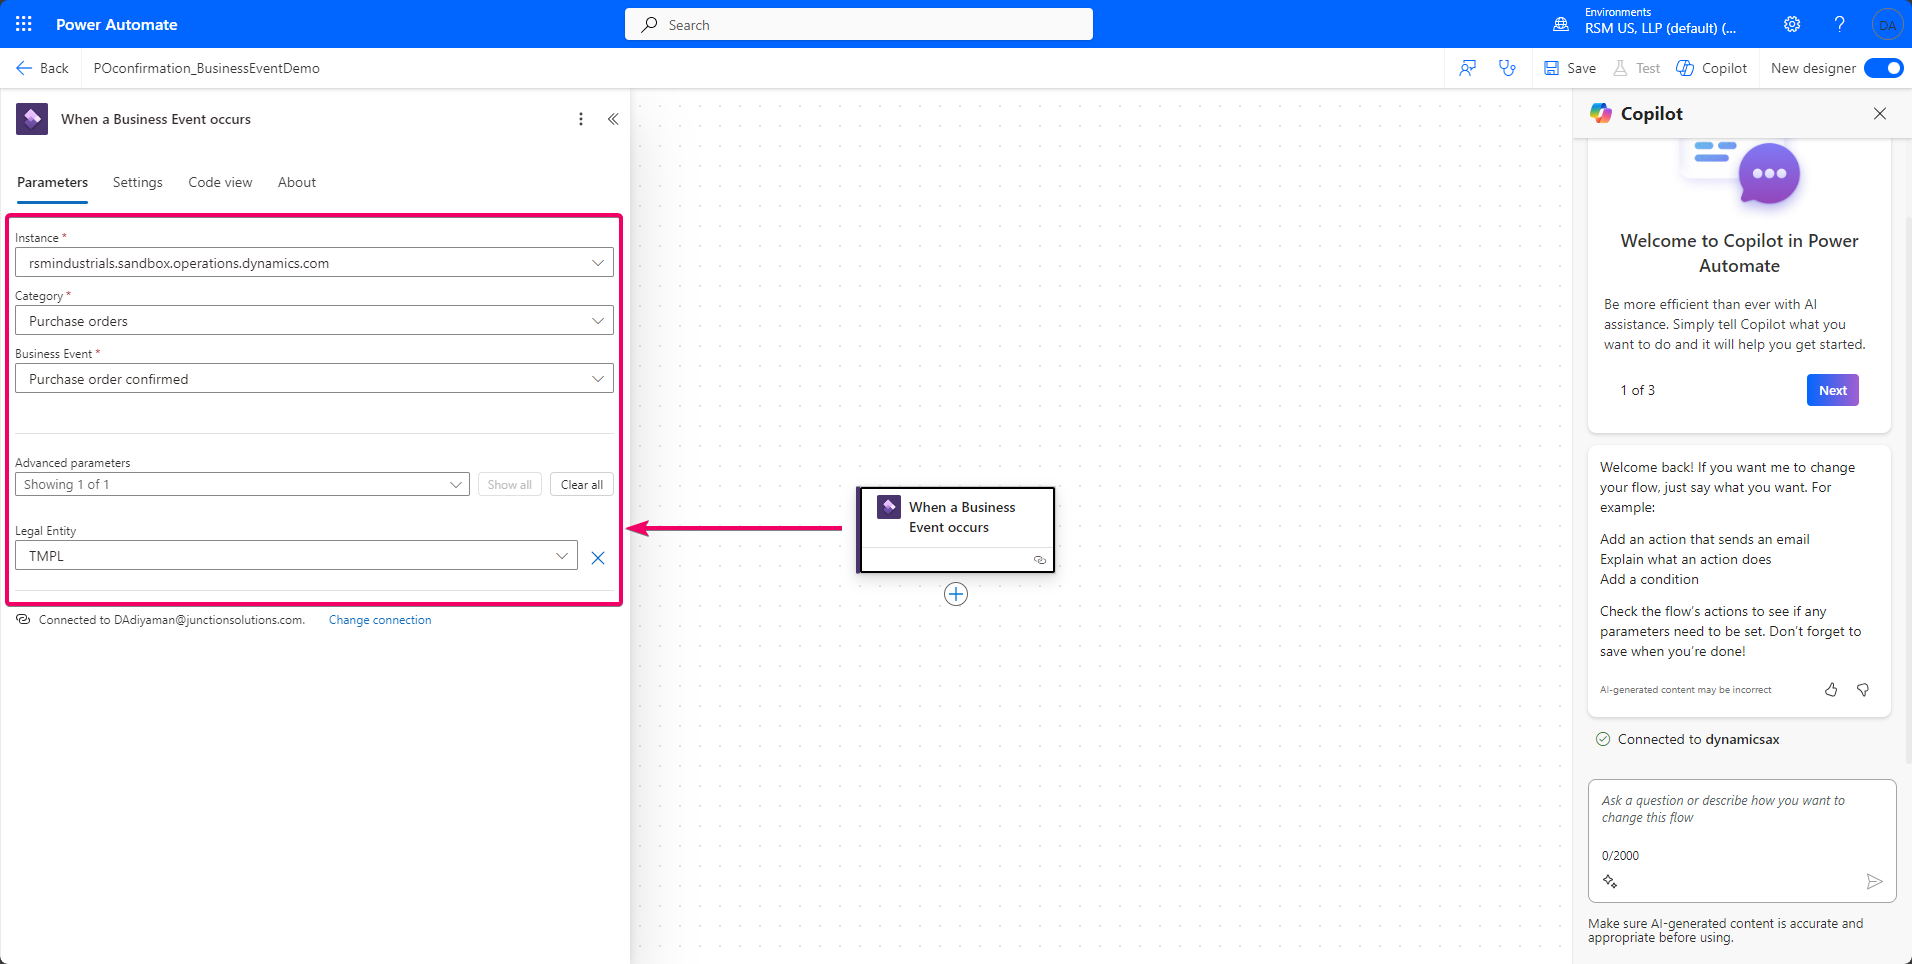
Now, system automatically adds business event element.

Select your D365FO environment.

Select category of the business event. You can see that it should be 'Purchase orders' according to business event catalog.

Select the business event. We are selecting 'Purchase order confirmed' here.

Select legal entity.


OK, we are done with this business event element.

Click on + to add a new flow action. 

Find Parse JSON and add it to the flow.


Configure the Parse action.

Click on Content's lightning icon.


then select Body.


Click on schema generation from the sample payload.


Paste business event schema into the screen.


Click on Done. Note that Power Platform automatically creates the schema on the left side of the screen.


This step captures Dynamics 365 Finance and Operations' response and translates it to a readable message in Power Platform.

Next step is about finding the vendor that comes from the message. We will use data entities for that purpose.

Click on + to add a new flow action.


Search for 'Fin & Ops Apps (Dynamics 365) ' and select 'Lists items present in table' for data entities.


Fill in the required fields.


Select the connected D365FO environment.

Select 'Vendors' entity.

Add a filter and use the below query.


As result, this action item should look like below.


Next step is about sending purchase order as email. We will use 'Send email' operation for that purpose.

Click on + to add a new flow action.


Let's do the configuration of email action.


The flow is ready to be tested.


Demo

Let's confirm a purchase order in the company where we indicated in the automation.

Confirming purchase order: Navigate to the purchase order and proceed to confirm it, which will trigger the automation process.


Reviewing Power Automate Flow: Open the Power Automate interface to observe the flow in action. Here, we can view historical runs and monitor the progress of the current execution.


Once the flow is completed, the status will update to 'Succeeded', confirming a successful run. 

Receiving email: As configured, the system sends an automated email upon completion of the purchase order confirmation. The email serves as a notification to the stakeholders.

Reading email: Open the received email to verify its contents. The details should reflect the expected purchase order information, indicating that the automation is working correctly.


CONCLUSION

In summary, this configuration demonstrates how to effectively leverage Dynamics 365 Finance and Operations business events in conjunction with Power Automate to automate standard processes. By integrating these tools, you can enhance the responsiveness of business workflows, reduce manual interventions, and ensure timely notifications for critical actions, such as purchase order confirmations. This solution illustrates a practical approach to optimizing operational processes using existing platform capabilities.

Understanding Telemetry Pricing for Dynamics 365 Finance & Operations (D365FO)

UNDERSTANDING TELEMETRY PRICING FOR DYNAMICS 365 FINANCE AND OPERATIONS (D365FO) CONTENT Introduction D365FO Telemetry Capabilities Key Pric...