Thursday, October 31, 2024

Dynamics 365 Finance and Operations and Power Apps Integration via Fin & Ops Apps (Dynamics 365) connector


DYNAMICS 365 FINANCE AND OPERATIONS AND POWER APPS INTEGRATION VIA FIN & OPS APPS (DYNAMICS 365) CONNECTOR

CONTENT

Introduction
Connectors
Connections
Fin & Ops Apps (Dynamics 365) connector
Conclusion

INTRODUCTION

Microsoft's large ecosystem of software as a service (SaaS) connectors enables you to connect apps, data, and devices in the cloud. Examples of popular connectors include Salesforce, Office 365, Twitter (X), Dropbox, Google services, and more. Connectors allow the underlying service to talk to Microsoft Power Automate, Microsoft Power Apps, and Azure Logic Apps.

CONNECTORS

There are two types of connectors:

  • Prebuilt: Predefined connectors that can be used without you making modifications. They address automating commonly used business process scenarios.
  • Custom: Function-based connectors that you build to support your tailored scenarios.

Connectors are available for use in multiple products.

Power Automate

  • Power Automate allows you to build workflows and automate processes across your apps and services. You can streamline notifications, sync data between systems, automate approval, and more.

Power Apps

  • Power Apps enables you to build cloud connected and cross platform business apps using clicks and minimal code. You can create rich user experiences across the web, phones, and tablets. You can assemble forms, add business logic, and take advantage of device capabilities with full creative freedom.

Logic Apps

  • Logic Apps is the workflow engine for Power Automate. It enables pro-developers to visually create or programmatically configure workflows in Azure. A connector in Logic Apps enables users to automate EAI, Business to business (B2B), and Business to consumer (B2C) scenarios while reaping the benefits of source control, testing, support, and operations.

There are hundreds of Power Apps connectors available. This article's focus is Fin & Ops Apps (Dynamics 365) connector and Power Apps.

CONNECTIONS

In Power Apps, a connection is a link between your Power App and a data source or service, allowing the app to interact with external data or functionalities. Connections are made through connectors, which are pre-built interfaces that Power Apps provides to connect with a wide range of data sources like Microsoft 365, SQL Server, SharePoint, Dynamics 365, and third-party services like Salesforce or Google services.

Each connection carries specific credentials and permissions that define how the app can interact with the connected service. For instance, if you create a connection to SharePoint, that connection uses your SharePoint account to access and manipulate data according to your account's permissions.

Here's a quick breakdown:

  • Connectors are predefined ways to connect to external data sources (e.g., SharePoint connector, SQL connector).
  • Connections are the instances of these connectors with specific configurations and credentials (e.g., your account login to access a particular SharePoint site).

In summary, a connection enables your app to perform actions like reading, writing, or updating data within the service or data source it connects to, according to the permissions granted. 

FIN & OPS APPS (DYNAMICS 365) CONNECTOR

Fin & Ops Apps (Dynamics 365) connector 

  • provides access to data entities,
  • is not shareable connection. If the power app is shared with another user, another user will be prompted to create new connection explicitly.
  • is a Premium connector for Power Automate and Power Apps or an Enterprise connector for Azure Logic Apps.
A premium connector for Power Apps is a connector that requires additional licensing and offers advanced capabilities:
  • Benefits: Premium connectors allow users to access more services and applications, which can lead to greater integration between systems and more complex workflow automation.
  • Licensing: Premium connectors require additional licensing for both the app and its users. For example, if an automated flow uses a premium connector, only the flow owner needs a Premium license. However, if an instant flow uses a premium connector, every user who runs the flow needs a Power Automate Premium license.
Fin & Ops Apps (Dynamics 365) connector 
is eligible for all regions and includes parameters for creating connections for different actions.  These actions can be Create, Delete, Execute, Get a record, Get list of entities, Lists items present in table and Update a record.
  • Create record: Create a new record in an entity.
  • Delete record: Deletes a single record in an entity.
  • Execute action: Execute action.
  • Get a record: Retrieves a single record.
  • Get list of entities: Retrieves a list of entities.
  • Lists items present in table: Lists items present in table.
  • Update a record: Updates a single record in an entity. 


These parameters that is for Get action are as below:

  • Instance: App's connected Dynamics 365 for Fin & Ops instance.
  • Entity name: App's entities.
  • Object: App's objects to be retrieved.

CONCLUSION

Fin & Ops Apps (Dynamics 365) connector for Power Apps is a powerful tool that enhances the integration between Dynamics 365 Finance and Operations and custom applications. By using this connector, organizations can efficiently access and interact with Finance and Operations data, empowering users to create, update, and retrieve records directly within Power Apps. This integration allows businesses to extend Dynamics 365 capabilities, automate routine tasks, and develop custom applications tailored to specific needs—all while keeping data synchronized and workflows seamless. Leveraging the Fin & Ops connector in Power Apps enables a more agile and connected approach to managing business processes across the organization.

Wednesday, October 23, 2024

Recurring Contract Billing in Dynamics 365 Finance


RECURRING CONTRACT BILLING IN DYNAMICS 365 FINANCE

CONTENT

Introduction
Subscription billing
Recurring contract billing
Invoicing
Conclusion

INTRODUCTION

Revenue recognition plays a vital role in SOX (Sarbanes-Oxley Act) compliance because it ensures that a company’s financial statements accurately represent its financial health and performance. SOX was enacted to protect investors from corporate fraud by enforcing stringent financial reporting requirements. One of the critical areas that companies must manage correctly under SOX is how they recognize revenue—the process of determining when and how much income should be recorded in their accounts.

If a company inaccurately reports revenue, it can create a misleading picture of its profitability and financial stability. This could result in stakeholders, such as investors, regulators, and auditors, making decisions based on incorrect information. Proper revenue recognition ensures that financial statements reflect the true timing and amount of revenue generated from business activities, providing a transparent view of a company’s financial performance. This transparency is essential for maintaining trust in the financial markets and meeting the requirements set by SOX for public companies.

SUBSCRIPTION BILLING

Subscription billing enables organizations to manage subscription revenue opportunities and recurring billing through billing schedules. Complex pricing and billing models and revenue allocation are easily managed, and are billed and recognized at the line level. Multi-element revenue allocation enables allocation of revenue to comply with International Accounting Standards (International Financial Reporting Standard 15 [IFRS 15]) and Generally Accepted Accounting Principles (US GAAP) standards (Accounting Standards Codification Topic 606 [ASC 606]).

The solution has three modules that can be used independently. Alternatively, all three modules can be used together.

  • Recurring contract billing – This module enables recurring billing and price management to provide control over pricing and billing parameters, contract renewal, and consolidated invoicing. This is what we will be focusing on in this article.
  • Revenue and expense deferrals – This module eliminates manual processes and dependency on external systems by managing revenue and enabling real-time insight into monthly recurring revenue.
  • Multiple element revenue allocation – This module helps with revenue compliance by handling pricing and revenue allocation across multiple items.

Subscription billing is enabled through Feature management. However, it can't be used with the Revenue recognition feature. You must disable that feature before you enable subscription billing.

Disable Revenue recognition - Enable Subscription Billing

To use the subscription billing functionality, you'll need to ensure that the Revenue recognition feature is disabled. You won't be able to enable subscription billing if revenue recognition is enabled.

To enable subscription billing, follow these steps:

1 - In Dynamics 365 Finance, go to the Feature management workspace.

2 - In the Feature management workspace, select the All tab to display all features that exist.

3 - In the search field, enter Revenue recognition.

4 - Select the Revenue recognition feature and then select Disable in the right pane. It's already disabled in my environment.

5 - In the filter, enter Subscription billing, and select Module as the filter. It's already enabled in my environment.

6 - Enable Subscription billing and at least one of the following: Recurring contract billing, Revenue and expense deferrals, or Multiple element revenue allocation. Each feature is a separate application. To enable Billing schedules with projects, Recurring contract billing must also be enabled. They are already enabled in my environment.

RECURRING CONTRACT BILLING

With recurring contract billing in Microsoft Dynamics 365 Finance, you can have more control of billing parameters at the line-item level. You can use this feature to set up automated contracts, which will supply you with recurring revenue reports. As a result, you’ll be able to forecast more accurately. The flexible pricing models of this feature will be beneficial when you’re invoicing customers. Additionally, if the customer has multiple billing schedules, you can use recurring contract billing to consolidate their invoices. Because organizations use several methods to invoice customers, this feature offers support to your specific business process.

Billing Schedule Group

Finance gives you the opportunity to separate recurring contract billing into groups, which automatically applies the default values of the group. This feature helps make the process of setting up a new billing schedule easier, and you can adjust default values if desired.

Let's create a billing schedule group.

Go to Subscription billing >> Recurring contract billing >> Setup >> Billing schedule group.

The Pricing method field has four different default pricing methods for you to choose from to run your items on the Billing schedule.

  • Standard - Calculate the unit price that is based on the total quantity that you enter.
  • Flat - Flat price.
  • Tier - Calculate the unit price by using your fixed quantity at your different pricing brackets.
  • Flat Tier - Calculate the unit price by using your fixed quantity and extended price amounts for your different pricing brackets.

The Item type field has four different default types of items for you to choose from for your Billing group.

  • Standard - Quantity statistic.
  • Usage - Value for metered or consumption-type items.
  • Milestone - Value for Milestone billing functionality. Make sure that you select the Milestone template as well in the Milestone template field if you want to use this type of item.

Billing Schedule

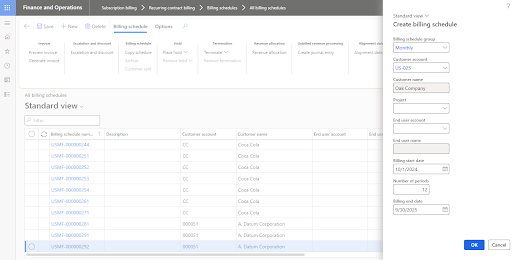
A billing schedule is a feature that enables the implementation of recurring billing on a set schedule. For instance, you might need to configure a monthly recurring bill where a customer is billed every two weeks over a six-month period.

Go to Subscription billing >> Recurring contract billing >> Billing schedules >> All billing schedules

Click on +New

Select customer account, billing schedule, billing start date, number of periods. Note that billing end date is populated automatically by the system. Select OK.


Don't forget to enter a description.

Go to lines and create a new line.


Above line indicates that a $10.99 will be invoiced monthly from 10/1/24 to 9/30/25. Item ID 75 will be used for the invoicing.

You can continue adding line as needed.

INVOICING

There are 2 ways of invoicing.

Go to Subscription billing >> Recurring contract billing >> Billing schedules >> All billing schedules


Invoice Simulation

Follow the below steps to simulate invoices

Go to Subscription billing >> Recurring contract billing >> Billing schedules >> All billing schedules

Find the billing schedule that you want to work on.

On the Billing Schedule action Pane, select Invoice > Preview invoice.

Select the end date (as of date) of the billing period and click on Next.


System will show you the invoices that will be created as of the given date.

Click on Generate button in order to generate invoice preview if the results are as expected.

Invoice Generation

Follow the below steps to generate invoices

Go to Subscription billing >> Recurring contract billing >> Billing schedules >> All billing schedules

Find the billing schedule that you want to work on.

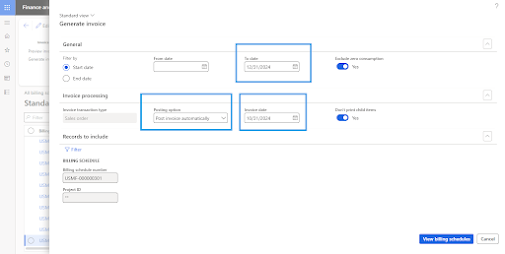
On the Billing Schedule action Pane, select Invoice > Generate invoice


Enter the dates accordingly. 


Review the generated results.


Click on Generate all if the results are as expected.


Note that system generates an order with multiple lines.


Created sales order is in Invoiced status as below.


System generates 1 invoice for the all selected periods.


Invoice details can be seen in the invoice journal.


CONCLUSION
In conclusion, recurring contract billing in Dynamics 365 Finance streamlines the management of subscription revenue, offering flexible pricing models, automated billing schedules, and consolidated invoicing. By leveraging this feature, organizations can achieve more accurate revenue forecasting and ensure compliance with financial reporting standards such as IFRS 15 and ASC 606. The ability to automate billing processes and manage recurring contracts helps businesses maintain consistent cash flow and reduce manual tasks, ultimately supporting greater financial transparency and efficiency.

Sunday, October 6, 2024

Segregating Responsibilities in Vendor Invoice Processing


SEGREGATING RESPONSIBILITIES IN VENDOR INVOICE PROCESSING

CONTENT

Introduction
SOD business process flow in Vendor Invoice Processing
Prerequisites for Implementing SOD in Vendor Invoice Processing
Scenario 1: Processing a service invoice
Scenario 2: Processing an inventory invoice
Conclusion

Introduction

Segregation of Duties (SOD) is a foundational principle in internal control that ensures critical tasks within business processes are divided among multiple individuals. This division of responsibilities helps prevent fraud, errors, and conflicts of interest by reducing the likelihood of any one person being in control of all parts of a transaction. It is particularly relevant for financial operations, where sensitive transactions such as vendor invoice processing must be handled with care to maintain compliance with regulations such as SOX (Sarbanes-Oxley Act) and safeguard the organization from financial mismanagement.

Microsoft Dynamics 365 Finance (D365 Finance) integrates SOD principles throughout its workflows, ensuring that organizations can enforce these controls systematically. Vendor invoice registration and processing, in particular, benefit from D365 Finance’s robust SOD capabilities, allowing businesses to create clear separation between invoice registration, matching, and final posting activities.

Before going into the technical details of vendor invoice processing in D365 Finance, it is essential to understand why SOD is critical for businesses. By enforcing SOD:

  • Risk of Fraud is Minimized: When key duties like approval, execution, and verification are split across multiple individuals, it becomes much harder for anyone to manipulate the system without detection.
  • Error Detection is Enhanced: SOD reduces the likelihood of undetected mistakes, as different eyes are involved in various steps of the process, providing opportunities for checks and balances.
  • Compliance Requirements are Met: Regulatory frameworks such as SOX mandate SOD as part of their requirements for financial reporting integrity, and failure to implement these can result in penalties or reputational damage.

In vendor invoice processing, SOD plays a key role by ensuring that the registration, approval, and posting of invoices are handled by separate personnel, or at least separate workflow processes, reducing the chance of unauthorized or erroneous payments.

SOD business process flow in Vendor Invoice Processing

Microsoft designed Dynamics 365 Finance screens and workflows with built-in SOD principles to streamline the segregation of duties in processes like vendor invoice registration and approval. Let's explore how this process works within D365 Finance, focusing on the distinct stages of Registering, Matching, and Posting.

1. Registering the Vendor Invoice

The purpose of the invoice registration stage is to capture the invoice details without fully committing them to the financial ledgers. This temporary registration helps organizations maintain an organized workflow where invoices are captured as they arrive but are not yet officially posted. The SOD principle here is that the person responsible for registering the invoice does not have the ability to approve or post it.

In Dynamics 365 Finance, you can either register invoices manually or through automation. The manual registration process involves creating a journal entry, inputting minimal details such as the invoice number, vendor, and total amount.

This flexibility allows businesses to set up Power Automate integrations or other data entities to streamline the registration process. The key benefit of automation here is that it reduces manual data entry, allowing invoices to flow seamlessly into the system while still maintaining SOD principles.

At this stage, there is no need to match the invoice to a purchase order (PO), allowing for a quick and efficient way to capture the total invoice amount without being bogged down by details.

2. Matching the Invoice to Purchase Orders

Matching invoices to purchase orders is crucial for verifying that the goods have indeed been ordered and received. This step not only ensures the accuracy of the invoice but also reinforces SOD principles by requiring different individuals or workflows to handle the verification of the goods or services received.

During the matching phase, the system cross-references the invoice with the relevant purchase order and/or product receipts. In D365 Finance, the system can automatically match these documents, reducing the chance for manual errors. If a discrepancy is detected, it needs to be resolved before proceeding to final posting.

3. Posting the Invoice

Once the invoice has been registered and matched, it moves to the final stage of posting, where it becomes a permanent record in the financial system. Posting invoices involves applying the correct expense accounts and ensuring all relevant checks have been completed. The segregation here ensures that the person posting the invoice is not the same individual who registered or matched it.

In Dynamics 365 Finance, the invoice approval screen facilitates the final posting. The system brings all the required account information automatically, and the user responsible for posting merely needs to review and approve the details.

Prerequisites for Implementing SOD in Vendor Invoice Processing

Before implementing the segregation of duties (SOD) principles in vendor invoice processing within Dynamics 365 Finance, there are a few key configurations that must be set up to ensure a smooth workflow. Below are the essential prerequisites:

  • Invoice Register Journal Type Creation: This journal type is necessary for the temporary registration of invoices. It allows the system to capture the invoice details without immediately posting them. Follow these steps to create it: Navigate to General ledger > Journal setup > Journal names. Create and configure the journal for invoice registration.


  • Invoice Approval Journal Type Creation: The invoice approval journal type enables the retrieval and final posting of previously registered invoices. This setup is critical for separating the registration from the approval and posting processes: Go to General ledger > Journal setup > Journal names. Create the appropriate journal for invoice approval.


  • Vendor Posting Profile Setup: Vendor posting profiles dictate how the system posts transactions to general ledger accounts. For the invoice registration process, you need to configure a temporary vendor account and offset account: Navigate to Accounts payable > Setup > Vendor posting profile. Set the Arrival account to a temporary vendor account and the Offset account to a temporary offset account.

Let’s consider a typical situation where three different individuals are responsible for the stages of processing a vendor invoice. 

Emma is responsible for registering the invoice.

John handles matching the invoice with the Purchase Order (PO) and Product Receipt.

Sophia is responsible for the final posting of the invoice in the financial system.

SCENARIO 1: Processing a service invoice

Invoice Registration by Emma: Emma works in the accounts payable department, and her role is to register invoices as they arrive. Today, she receives an invoice from a vendor for a batch of products ordered by the company. Emma’s responsibility is to input the invoice details into the system without finalizing the transaction.

In Dynamics 365 Finance, Emma follows these steps:

Go to Accounts payable >> Invoices >> Invoice register

Click on +New and select a (invoice registration) journal name


Create a journal line.
Emma enters the vendor account, invoice number, date, and total amount of the invoice. At this point, she does not match it with any purchase order.

Once the details are entered, she posts the invoice as temporarily registered in the system.

Posted journal voucher is as below

A voucher is created, and the system logs the invoice in a way that allows it to be reviewed and processed later. This voucher’s account setup is done in the vendor posting profile as explained in the prerequisites section.

Emma’s role is now complete. Her responsibilities ensure that invoices are captured in the system quickly but without granting her the ability to finalize or post them.

Invoice Posting by Sophia: Finally, Sophia, who works in the finance department, is responsible for approving and posting the invoice after all checks have been completed. Sophia’s task is to review the details entered by Emma before completing the posting process.

In Dynamics 365 Finance, Sophia performs the following:

Go to Accounts payable >> Invoices >> Invoice approval

Click on +New and select a (invoice approval) journal name


Empty screen comes up, click on Find vouchers to find temporal posted invoices.


Find the invoice by clicking on Find vouchers.


Select the invoice and click on Select button and then OK button.


Once the relevant invoice is found, she reviews the accounts and details automatically populated by the system. She enters the appropriate expense account to which the invoice will be posted.


Click on Post.


Posted voucher is as below:


SCENARIO 2: Processing an inventory invoice

This scenario is different from the previous one. In addition to the steps in the first scenario, this process includes matching the purchase order (PO) and product receipt before posting the invoice.

Invoice Registration by Emma: Emma works in the accounts payable department, and her role is to register invoices as they arrive. Today, she receives an invoice from a vendor for a batch of products ordered by the company. Emma’s responsibility is to input the invoice details into the system without finalizing the transaction.

In Dynamics 365 Finance, Emma follows these steps:

Go to Accounts payable >> Invoices >> Invoice register

Click on +New and select a (invoice registration) journal name.

Create a journal line, enter the vendor account, invoice number, invoice date and invoice amount.


Click on post.


Posted journal voucher is as below.

So far, invoice has been temporarily registered and there is no purchase order relation.

This voucher’s account setup is done in the vendor posting profile as explained in the prerequisites section.

Invoice Matching by John: Next, John, who works in the procurement department, is responsible for ensuring that the invoice details match the relevant purchase orders and product receipts. In this case, the invoice pertains to an order that was placed last month, and the products have already been delivered.

John performs the following actions:

He navigates to Accounts payable > Invoices > Invoice pool, where the temporarily registered invoices are listed.

Click on Purchase order and select the PO number.

John selects the corresponding invoice and then clicks on Find purchase orders to locate the purchase order associated with the invoice.


System creates a pending invoice on the invoice pool screen. Click on Match product receipts.


Match the product receipt by clicking on Match product receipts.


Perform invoice matching by clicking on Update match status.


John's role ensures that the goods or services invoiced are properly matched against what was ordered and received, adding a crucial layer of verification in the process. He does not, however, have the authority to post the invoice.

Invoice Posting by Sophia: Finally, Sophia, who works in the finance department, is responsible for approving and posting the invoice after all checks have been completed. Sophia’s task is to review the details entered by Emma and the matching done by John before completing the posting process.

In Dynamics 365 Finance, Sophia performs the following:

Go to Accounts payable >> Invoices >> Invoice approval

Click on +New and select a (invoice approval) journal name.


Empty screen comes up.

Sophia clicks on Find vouchers to locate the invoices that have been matched but are pending approval and posting.


Select the invoice and click on Select button and then OK button.


System automatically brings all accounts to be used for the posting. Enter the expense account here.


Go to pending vendor invoices.

Accounts payable >> Invoices >> Pending vendor invoices.


Find the invoice and click on Post.


Posted voucher is as below.

Conclusion
This clear segregation of duties ensures that no one individual has control over the entire vendor invoice process. By splitting the process into distinct responsibilities—registration, matching, and posting—the organization minimizes the risk of fraud or error. Each person involved has a specific role and responsibility, contributing to the integrity of the financial data and reducing the likelihood of internal control failures.

Security Role Assignments in Dynamics 365 Finance and Operations

SECURITY ROLE ASSIGNMENTS IN DYNAMICS 365 FINANCE AND OPERATIONS This article provides detailed information about the user security role ass...