Friday, August 9, 2024

Unannounced Sales Returns in Dynamics 365 Finance and Operations


UNANNOUNCED SALES RETURNS

CONTENT

Introduction
Return details
Receive unannounced returned item by the return details
Mixed license plate receiving
Blind returns
Receive unannounced returned item by blind return 
Mixed license plate receiving 
Required configurations
Blind return demo

Introduction

In Microsoft Dynamics 365 Supply Chain Management, the sales return process typically begins with the creation of a Return Material Authorization (RMA) order. The RMA order is crucial for managing returns, particularly when the reason for the return is unclear or not immediately disclosed. It serves as the central document guiding the subsequent steps in the return process, including warehouse arrival and receiving procedures.

However, there are instances where customers may return products without prior notice or an associated order. In such cases, the standard RMA process is bypassed, requiring special handling to manage these unplanned or unannounced returns.

This article will walk you through configuring Supply Chain Management to handle unannounced returns and the procedures for receiving these returns in the warehouse

For example, if a customer arrives at the bay door wanting to return an item without having a return material authorization (RMA), it’s considered an unannounced sales return.

This can be handled in 2 ways.

  • Return details
  • Blind returns


RETURN DETAILS

In this scenario, the customer doesn’t need to contact the seller; simply bringing the RETURN LABEL or providing the RETURN DETAIL ID created at the time of order shipment is sufficient. The RETURN LABEL or RETURN DETAIL ID contains the necessary return details (return ID, original order ID, shipment ID, order lines, return until dates) required to process the return.

A return detail record can be created in two ways:

  • Order creation > Order shipment > Packing > Return label creation via the small parcel shipment process
  • Order creation > Order shipment > Shipment confirmation > Return details creation

In summary, each shipment process can create either a return label (if containerization is used) or a return details ID with an expiration date (if the expiration date is set up).

Receiving Unannounced Returned Items by Return Details

Assumption: The customer already has the return details.

1. Open the Warehouse Management mobile app.
2. Select Return Details Receiving (You'll need to create menu/menu item first).
3. Scan the Return ID.
4. Scan the Item ID.
5. System generates a License Plate (LP).
6. Enter the Quantity.
7. Select the Disposition Code.

Please note that a "Work Completed" message will appear.

Important: Do not forget to click CANCEL to release the flow and complete the process.

All unannounced returns will go to the Mixed License Plate Receiving screen.

Mixed License Plate Receiving

1. Go to Warehouse Management > Inquiries and Reports > Mixed License Plate Receiving.
2. Note that the received license plate appears on the list page.
3. Select the license plate and click the Complete License Plate button in the License Plate Action pane.

  • An arrival journal is automatically posted.
  • A "Return Orders" work order is automatically created to move the item from the default receiving location to the destination location, based on the location directives setup.
  • A new RMA is created with a line item that has a "Registered" status.

The next steps are to post the packing slip and invoice. This is not in this article's scope.

BLIND RETURNS

In this scenario, the selling company doesn’t maintain return details, which means the customer doesn’t have any reference information like a return label, return details ID, original sales order, shipment ID, RMA, etc. This is considered a complete blind return. In other words, the customer doesn’t need to contact the seller before the actual return.

Receiving Unannounced Returned Items by Blind Return

Assumption: The customer doesn’t have any reference data (e.g., no return label, no order number).

1. Open the Warehouse Management mobile app.
2. Select Blind Return.
3. Scan the Customer ID.
4. Scan the Item ID.
5. The system generates a License Plate (LP).
6. Enter the Quantity.
7. Select the Disposition Code.

Please note that a "Work Completed" message will appear.

Important: Do not forget to click CANCEL to release the flow and complete the process.

All unannounced returns will go to the Mixed License Plate Receiving screen.

Mixed License Plate Receiving

1. Go to Warehouse Management > Inquiries and Reports > Mixed License Plate Receiving.
2. Note that the received license plate appears on the list page.
3. Select the license plate and click the Complete License Plate button in the License Plate Action pane.

  • An arrival journal is automatically posted.
  • A Return Order's work order is automatically created to move the item from the default receiving location to the destination location based on the location directives setup.
  • A new RMA is created with a line item that has a "Registered" status.

The next steps are to post the packing slip and invoice.

REQUIRED CONFIGURATIONS

Warehouse Parameters: Go to Warehouse Management > Setup > Warehouse Management Parameters > Returns fast tab.

  • Default Return Order Journal: Select a journal name.
  • Enable Return Details Creation: Set to Yes (Enable this process if it’s used). If this parameter is set to Yes, then activate the Enable Sales Load Line Picking Route parameter on the Loads fast tab. This links sales line inventory transactions and load lines.
  • Enable Return Order Creation from Mobile Device: Set to Yes (Always enable this. This is for both "return details" and "blind return").

Number Sequence Configurations:

  • Load Line Inventory Pick: This number is used on the load line’s "Load Line Inventory Pick" tab.
  • Return ID: Configure the sequence for the Return ID.

Return Item Policies: Go to Warehouse Management > Setup > Return Items > Return Item Policies.

  • Determine which items can be returned.
  • Set a maximum number of days allowed for returning the selected items, if applicable.

Return Item Receiving Policies: Go to Warehouse Management > Setup > Mobile Device > Return Item Receiving Policies.

  • Define what functionality is in use. Options include: Return Details, Blind Returns.

Mobile Device Menu Items: Go to Warehouse Management > Setup > Mobile Device > Mobile Device Menu Items.

  • Create a Blind Return menu item to receive return items.
    • Mode: Work.
    • Work Creation Process: Return Item Receiving.
    • Generate License Plate: Yes (since the returned item is placed in the receiving location).
    • Display Disposition Code: Yes (select one of the created policies, select Blind here).

Mobile Device Menu: Go to Warehouse Management > Setup > Mobile Device > Mobile Device Menu.

  • Create a menu that contains the Blind Return menu item.

Mobile Device Disposition Code: Go to Warehouse Management > Setup > Mobile Device > Disposition Codes.

  • Create a new disposition code for mobile device returns.
    • Disposition Code: Return Credit
    • Inventory Status: Available
    • Work Template: Returns (select a return work template).
    • Return Disposition Code: Credit (select a disposition code).

BLIND RETURN DEMO

A blind return occurs when a return is made without an existing RMA order or any pre-recorded return details, and there is no need to reference the original sales order or shipment during the receiving process. During the return item receiving process, workers must use the mobile app.

Go to main mobile device menu, select Return > Blind return


All you know about this return is Customer account. Enter or scan the customer account. Hit OK.


Enter the item id.

Scan the license plate if there is any, otherwise, leave it empty.

Enter the return quantity.

Select the disposition code.

Hit OK.

Note that system generates license plate if you leave it empty.


Hit OK.


Note that work is now completed.

DO NOT forget to hit CANCEL to complete the flow. If you don't, generated license plate cannot be processed.

System will take you to previous menu when you hit Cancel.

We already know that "All unannounced returns will go to the Mixed License Plate Receiving screen". Let's review the license plate that we just received. 

Go to Warehouse management >> Inquiries and reports >> Mixed license plate receiving.

Note that the received license plate appears on the list page. Select the license plate and click the Complete License Plate button in the License Plate Action pane.


When the completion ends, LP disappears from this screen.

When "Show completed license plate" is checked, you can now see that RMA number and Work creation numbers are now populated.


Completing License Plate results with below activities:

  • An arrival journal is automatically posted.
  • A Return Order's work order is automatically created to move the item from the default receiving location to the destination location based on the location directives setup.
  • A new RMA is created with a line item that has a "Registered" status.

Posted arrival journal is as below:


Created return order's work order is as below:


Created RMA is as below:


In conclusion, the ability to seamlessly receive unannounced sales returns in Microsoft Dynamics 365 Supply Chain Management showcases the system's flexibility and efficiency, allowing businesses to effortlessly handle unexpected situations while maintaining operational fluidity and enhancing customer satisfaction. This capability underscores the beauty of a well-configured system that adapts to real-world challenges with ease.

Friday, August 2, 2024

Vendor Prepayments in Dynamics 365 Finance & Operations


VENDOR PREPAYMENTS IN DYNAMICS 365 FINANCE AND OPERATIONS

CONTENT

Introduction
Vendor prepayment reasons
Vendor prepayment types in D365FO
Setup requirements for vendor prepayments
Demo
Conclusion

INTRODUCTION

A vendor prepayment is an advance payment made to a supplier before goods or services are received. In Dynamics 365 Finance & Operations (D365FO), vendor prepayment functionality enables businesses to streamline payment processes, mitigate financial risks, and maintain healthy relationships with suppliers.

In this article, we will explore the importance of vendor prepayments, review the necessary configurations within D365FO, and walk through a demonstration of how to process vendor prepayments. Finally, we will wrap up with some key takeaways and best practices.

Vendor Prepayments Reasons

There are several reasons why organizations utilize vendor prepayments:

  • Supplier Relationship Management: Making a prepayment can build trust with suppliers and improve relationships, especially with new vendors or during periods of high demand when suppliers may require upfront payments.
  • Risk Mitigation: Prepayments help mitigate financial risks, particularly when dealing with overseas suppliers or when a vendor has specific prepayment terms outlined in the contract.
  • Cash Flow Management: Some businesses opt for prepayments as a way to manage cash flow effectively, locking in pricing and securing essential goods or services before price changes or supply shortages occur.
  • Compliance and Contractual Requirements: Prepayments may be necessary to comply with certain contractual obligations or to meet industry-specific regulations.

By leveraging the prepayment functionality in D365FO, organizations can ensure smooth payment processing and maintain accurate financial records throughout the procurement cycle.

Vendor Prepayment Types in D365FO

Organizations can use advance payments (prepayments) in 2 different ways. 

  • Prepayment invoicing: This method creates a prepayment invoice that's associated with a purchase order. This method is easier for tracking prepayment sources/reasons. Prepayment invoices are frequently used in business transactions, where a vendor requests an advance deposit before fulfilling a purchase order. This is often the case for custom goods or services that require upfront payments. With the prepayment invoicing feature, you can specify a prepayment amount on the purchase order, record and process the prepayment invoice, and then apply this prepayment against the final invoice once it is issued.
  • Prepayments: This method creates prepayment journal vouchers by creating journal entries and marking them as prepayment journal vouchers. For this method, you can't track which prepayments to a vendor are made against which purchase orders. However, you can mark a posted prepayment for settlement against a purchase order. In several countries and regions, accounting standards require that prepayments made to vendors or received from customers are recorded in dedicated ledger accounts rather than the general customer or vendor accounts. These prepayments are initially posted to specific prepayment accounts. Once a sales order or purchase order is processed, and the invoice is issued, the payment is applied, reversing the prepayment entries. The invoice amounts are then automatically transferred to the standard customer or vendor summary accounts. 

Microsoft has has a detailed chart that compares these 2 methods:


This article focuses on prepayments process that is done from journal entries since it's more flexible.

Setup Requirements for Vendor Prepayments

A new prepayment posting profile: Since prepayment is a liability that needs to be tracked, it deserves having a separate account. The only way of reflecting this approach in D365FO is to create another posting profile for vendor prepayments.

Accounts payable >> Setup >> Accounts payable parameters

Go to Ledger and sales tax tab and select the prepayment posting profile in the 'Posting profile for payment journal with prepayment' field.


New Prepayment Journal Name: As a best practice, each type of transaction should have its own distinct journal name.

General ledger >> Journal setup >> Journal names

Everything is ready, let's make a prepayment now.

DEMO

Accounts payable >> Payments >> Vendor payment journal

Create a new header and select prepayment journal.


Go to the lines.

Select vendor, and populate the prepayment amount in the debit field.


Switch to payment tab.

Toggle the 'Prepayment journal voucher' parameter on. Note that the system automatically updates the 'Posting profile'.


When the journal is posted, generated voucher is as below.


Let's take a look at the vendor balance.
Accounts payable >> Vendors >> All vendors
Find the vendor and click on Balance button as shown below.


Please note that the vendor balance is currently positive due to the recorded prepayment. This reflects the advance payment made to the vendor before the receipt of goods or services.


Let's assume that we got the invoice that is $10K from the vendor. It's now time to register vendor's real invoice.
Go to Accounts payable >> Invoices >> Invoice journal
Enter the header information and click on the lines.


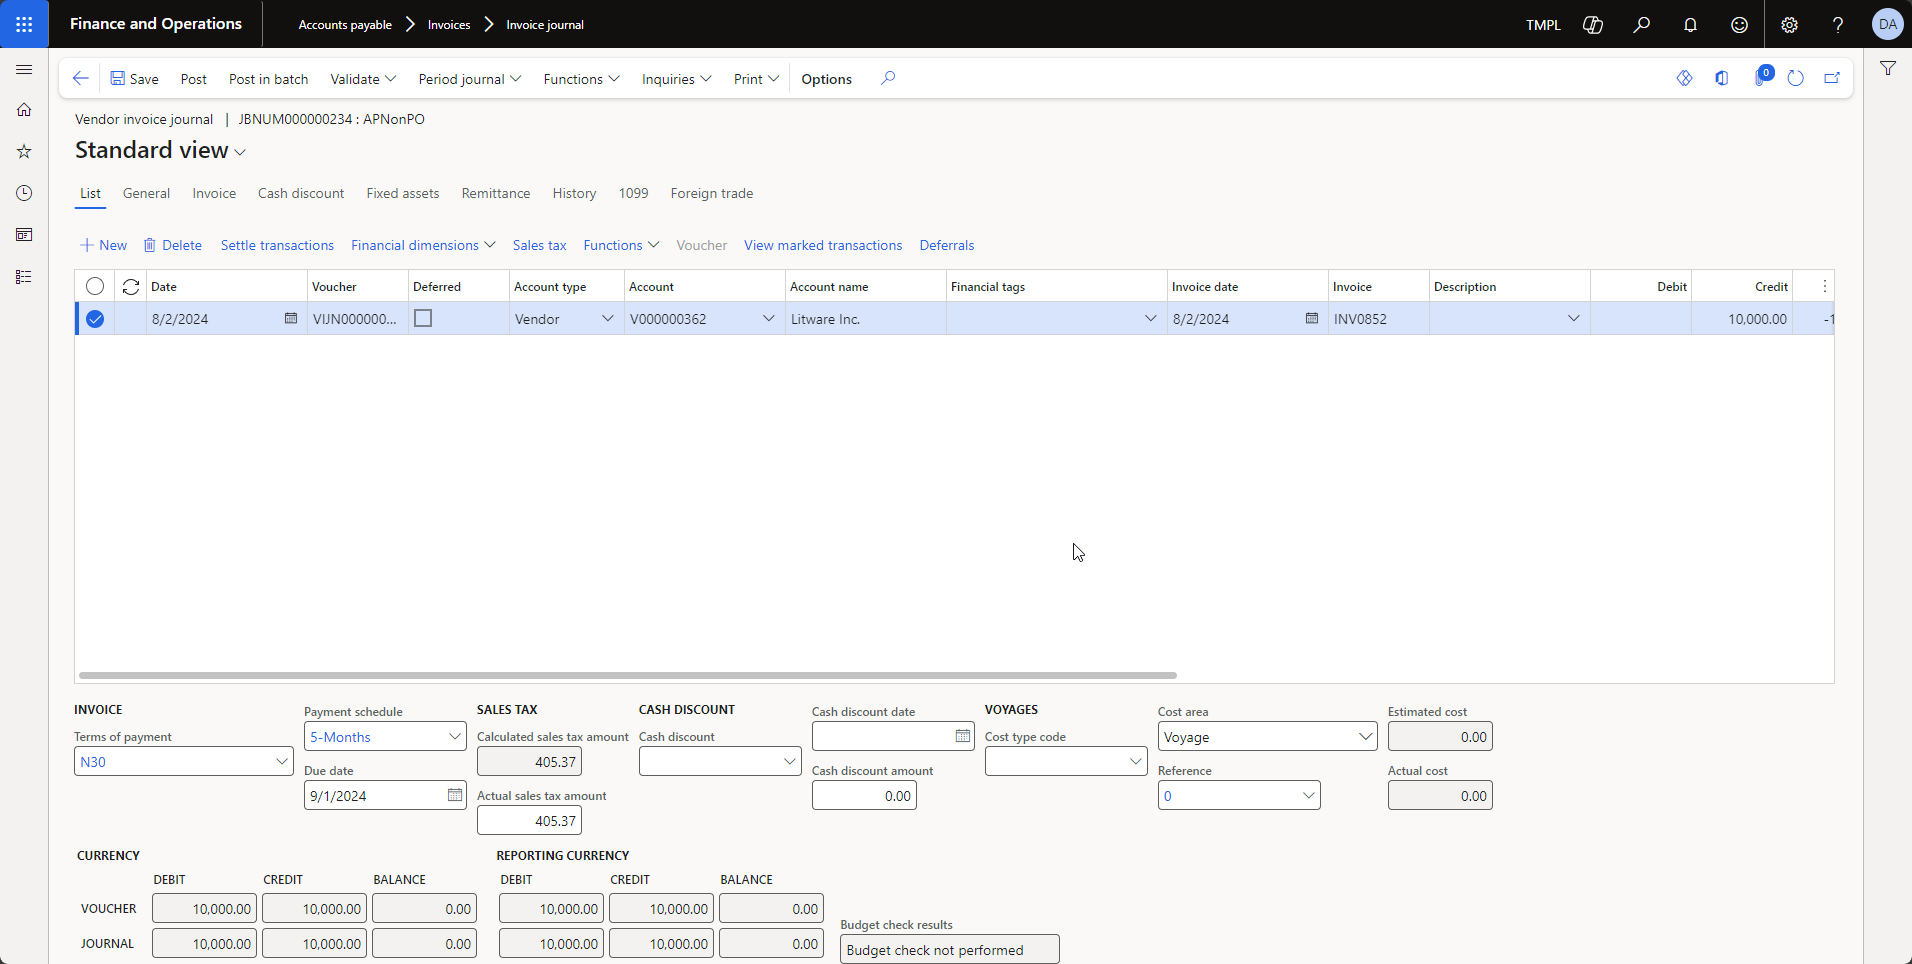
Enter the line information such as vendor account, invoice date, invoice number and invoice amount.


Click on 'Settle transactions' as shown below.


Select the prepayment voucher.

Click OK.


Note that the system notifies you since the selected voucher is a prepayment.

Click on Yes.


On the journal line, the system notifies you that the selected voucher amount intended for settlement differs from the amount entered on the journal line. The system then prompts you to confirm whether you want to adjust the invoice amount.


Post the invoice journal now.


Click on the Voucher button.

Note that the amount is $10,000 as expected.


Let's take a quick look at the vendor's new balance.


Note that vendor's new balance is now $8,000 as expected.

Finally let's take a look at the vendor's transactions.


CONCLUSION

Vendor prepayments in D365FO offer an efficient way to manage advance payments and meet specific procurement needs. This article demonstrated how to configure the necessary setup for prepayments and provided a walkthrough of processing prepayments via journal entries. The system’s prepayment functionality ensures accurate accounting by tracking these payments separately and automating the settlement process against vendor invoices. By following these steps, users can maintain clear financial records, reduce reconciliation efforts, and handle prepayments in compliance with local accounting standards.

Tuesday, July 23, 2024

Automating Vendor Invoice Posting with Workflow Approval in D365 Finance


AUTOMATING VENDOR INVOICE POSTING WITH WORKFLOW APPROVAL IN D365 FINANCE

CONTENT

Introduction
Configuration
End-to-End demo
Conclusion

INTRODUCTION

Managing vendor invoices efficiently is a crucial aspect of the Procure-to-Pay process in Dynamics 365 Finance and Operations (D365FO). Manual posting of vendor invoices after approval can often lead to delays, increased workload, and potential errors. However, with the Automatic Posting Upon Approval feature in D365FO's workflow setup, you can streamline this process, reducing manual intervention and speeding up the overall cycle time.

In this article, we will explore workflow automation capabilities in D365FO and focus on automating vendor invoice posting once the invoice is approved. This feature not only enhances efficiency but also ensures consistency and compliance, as the entire process is executed seamlessly within the system. 

CONFIGURATION

In this article, we will explore two optional workflow configurations designed to enhance your invoice registration process.

First, automated invoice posting. This setup allows you to configure the workflow to automatically post invoices once they are approved, eliminating the need for manual posting. The key benefits of this approach include faster processing times, reduced manual effort, and minimized risk of errors, ultimately contributing to a more streamlined Procure-to-Pay process.

Second, placeholders. Placeholders carry field values on D365FO approval screens or in emails. By using placeholders, you can provide better insights to the approver, helping them understand why the item is awaiting approval. Placeholders are temporary objects or items used to represent specific data or actions in a workflow configuration, ensuring that workflow actions or notifications include specific references to the item being processed.

Let's delve into the workflow configuration details. This article demonstrates above workflow configurations on vendor invoices based on purchase orders.

First, let's create a workflow for vendor invoices.

Accounts payable >> Setup >> Accounts payable workflows. 

There is no Vendor invoice workflow configured in my system.

Click on +New and select Vendor invoice workflow.


Workflow configurator pops-up. Configured workflow is as below.


This workflow starts with a conditional decision. This step allows you to define conditions based on the document that is subject to workflow. In our case, if the invoice total amount is equal or greater than 1000, it goes to an approval process (left side). If the invoice total amount is less than 1000, it goes to final step (right side) and invoice is posted automatically.

Workflow continues with approval steps. Approval steps may contain single or multiple approvers. In our case, there is just one approver and there is only one approval step. Inside of main approval branch is as below.

Finally, we have Automated posting. This is last workflow step that posts approved purchase order invoices automatically. Note: This is not a batch job, this is part of the workflow approval process.


Let's configure placeholders now as well.

First, setting up a message with placeholder for submission instructions. Select the main workflow frame and click on Basic settings.


Click on Insert placeholders under Submission instructions section.

Type your message by including placeholders.

Below example uses invoice number as a placeholder: 

"Invoice %Vendor invoices.Num% is ready for submission."


Next, setting up a message with placeholder for approval instructions. Double click on the approval steps to get into actual approval steps. 

Select the individual approval step and click on Basic settings.


Below screen pops-up.


Click on Insert placeholders under Work item subject section.

Type your message by including placeholders.

Below example uses invoice number as a placeholder: 

"Invoice number %Vendor invoices.Num% is waiting for your approval."

Additionally,

Click on Insert placeholders under Work item instructions section.

Type your message by including placeholders.

Below example uses invoice number as a placeholder: 

Please review and approve vendor invoice %Vendor invoices.Num%."


Save and close the workflow configuration, don't forget to activate the workflow. Active and ready invoice workflow approval should be looking like below.


Let's do the end-to-end demo in order to demonstrate the function of Placeholders and Automated invoice posting.

END-TO-END DEMO

Create a PO, receive it and get ready for invoice registration.

Find your purchase order on the purchase orders list page under

Accounts payable >> Purchase orders >> All purchase orders

or

Procurement and sourcing >> Purchase orders >> All purchase orders

Click on Invoice button.


Enter the invoice information and click on Workflow at the top. 

Note that now system shows you the submission instruction that includes the placeholder(s).


Submit the workflow.

(The expectation is to see similar placeholder usage for approval instructions at the moment of approval.)

Go to Work items assigned to me on the D365FO's dashboard page. Click on the item that is pending. System should take you to pending invoice screen.

Click on Workflow at the top.

Note that now system shows you the approval instruction that includes the placeholder(s).

Click on Approve.

Wait for the completion of workflow approval process. You can see that from the workflow history on the pending invoice.


Let's now go to workflow history details.

Organization administration >> Workflow >> Workflow history

Find the related workflow and click on the instance id.


Automated workflow posting step now can be seen as shown below.

The voucher of this transaction is as below.

CONCLUSION

In conclusion, automating vendor invoice posting through workflow approval in Dynamics 365 Finance significantly streamlines the Procure-to-Pay process. By implementing the automatic posting feature, you can reduce manual intervention, increase processing speed, and minimize errors. Additionally, the use of placeholders enhances the user experience by providing clear and relevant information during the approval process. Overall, these configurations offer a more efficient and consistent approach to managing vendor invoices, ensuring compliance and improving operational efficiency.

Understanding Telemetry Pricing for Dynamics 365 Finance & Operations (D365FO)

UNDERSTANDING TELEMETRY PRICING FOR DYNAMICS 365 FINANCE AND OPERATIONS (D365FO) CONTENT Introduction D365FO Telemetry Capabilities Key Pric...